Selecting a panel template
The panel topology is defined using the configuration panel
"PT_main.pnl" in the directory
<wincc_oa_path>/panels/para/PanelTopology. To open the configuration panel click
on the"Panel topology" button in the"Settings" tab of the System
Management panel:
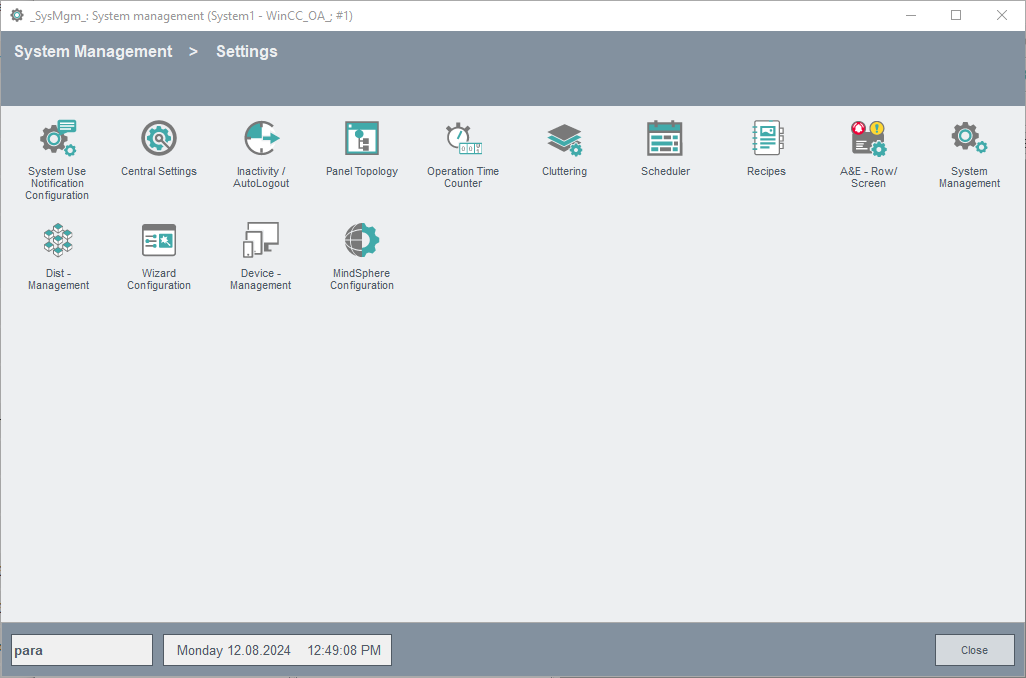
Open the topology configuration panel (see also Configuration panel for the Panel topology/Group alert facility). The panel template defines the appearance and size of the base panel that is opened after logging into WinCC OA. The process displays of the panel topology are subsequently displayed in this panel. A selection of predefined templates are offered by default (see below for description), although you can also create your own customized template. The panel template can be changed whenever you want by clicking on the "Template" button in the lower right corner of the Topology Configuration panel.
If you subsequently need to change the panel template or screen resolution, you should also adjust the panels in the topology to suit the new panel size if it has changed. So always define the template first!
The size of the selected template is applied automatically after the start. Per default it has a resolution of 1250 x 770 pixel, because during the configuration of the panel topology it is not yet defined, which resolution is used on the clients. This does not apply to child panels or to root panels in another module, which can take any size. The base panel (= template with its modules, or customized panel) is opened after logging into WinCC OA, and displays the configured Start Panel (see also Panel topology/Group alert example).
When updating an older project (older than version 3.8) and the "old" templates have been used/changed, then the changes template modules have to be copied to the new created directory /panels/para/PanelTopology/templates/<templateName>/ with the following names:
Base panel: basePanel_<x-resolution>_<y-resolution>_<templateName>.pnl
Alert bar panel: infoPanel_<x-resolution>_<y-resolution>_<templateName>.pnl
Navigation panel: naviPanel_<x-resolution>_<y-resolution>_<templateName>.pnl
The screen configuration provides the specification of the default configuration of any number of screens for selective users. Here, the logged-in user, who has the permission to do so, can define the configuration for other users or user groups. For further information on screen configuration and configuration see chapter Multi Screen Configuration.
Templates
This section describes the predefined templates which are provided by WinCC OA for selection and how to create an individual template.
Note that when opening the panel topology through GEDI, the Default configuration (template) will always be shown (check box "Use as default configuration"). If you set a user-specific template and open the panel topology again through GEDI, the default configuration will be shown and not the set user-specific configuration.
Predefined templates
Each template consists of up to three modules which are placed in the root panel depending on the selected template. The template parts are stored in the WinCC OA installation directory under <wincc_oa_path>/panels/para/PanelTopology/template/<templateName>.
The following table described the predefined templates with the position information of the modules and available sizes.
| Template | Module | Sizes |
| ETMMENU |
Base panel - centered Alert bar with system information - bottom |
1920 x 1200 1680 x 1050 1600 x 1200 1400 x 1050 1280 x 1024 1024 x 768 |
| ETMTREE |
Base panel - centered Alert bar with system information - bottom Navigation bar with tree view - left |
|
| TEMPLATE1 |
Base panel - centered Alert bar with system information - bottom Navigation bar - top |
|
| TEMPLATE2 |
Base panel - centered Alert bar with system information - top Navigation bar - bottom |
|
| TEMPLATE3 |
Base panel - centered Alert bar with system information - bottom Navigation bar - left |
|
| USERDEFINED | New user defined template |
ETMMENU
ETMTREE
TEMPLATE1
TEMPLATE2
TEMPLATE3
 Creating a template
An individual template that has been created in WinCC OA can be integrated into the screen configuration. To do so, the following steps have to be performed:
-
Create a WinCC OA panel from e.g. the already available template modules (see below). Place them anywhere in root panel.
-
Create a new folder in the project directory WinCC OA panels/para/PanelTopology/templates/. The folder name must match the template name and may only contain uppercase letters!
-
Save the template modules of the panels created in the desired size in the new folder:
-
basePanel_<x-resolution>_<y-resolution>_<templateName>.pnl
-
infoPanel_<x-resolution>_<y-resolution>_<templateName>.pnl
-
naviPanel_<x-resolution>_<y-resolution>_<templateName>.pnl
-
Create a new folder in the project directory under pictures/para/PanelTopology/templates/. The folder name must match the template name and may only contain uppercase letters!
-
Save a Screenshot (*.png) of the created template in the new folder, so that a preview of the template in the screen configuration is available.
Example
It is assumed that a template already exists and a screenshot (MYTEMPLATE.png) is available. The following additional steps have to be performed:
-
Create a new folder with the name "MYTEMPLATE" in the WinCC OA project directory panels/para/PanelTopology/templates/.
-
Save the template parts in the new folder:
Base panel:
/MYTEMPLATE/basePanel_1280_1024_MYTEMPLATE.pnl
Alert bar with system information: /MYTEMPLATE/infoPanel_1280_1024_MYTEMPLATE.pnl
Navigation bar: /MYTEMPLATE/naviPanel_1280_1024_MYTEMPLATE.pnl
-
Create a new folder with the name "MYTEMPLATE" in the WinCC OA project directory images/para/PanelTopology/templates/.
-
Save the screenshot MYTEMPLATE.png in the new folder.
Base panel layout
The base panel, which is opened after logging into WinCC OA, might look like the example below (depending on the template type selected) once the panel topology has been configured:
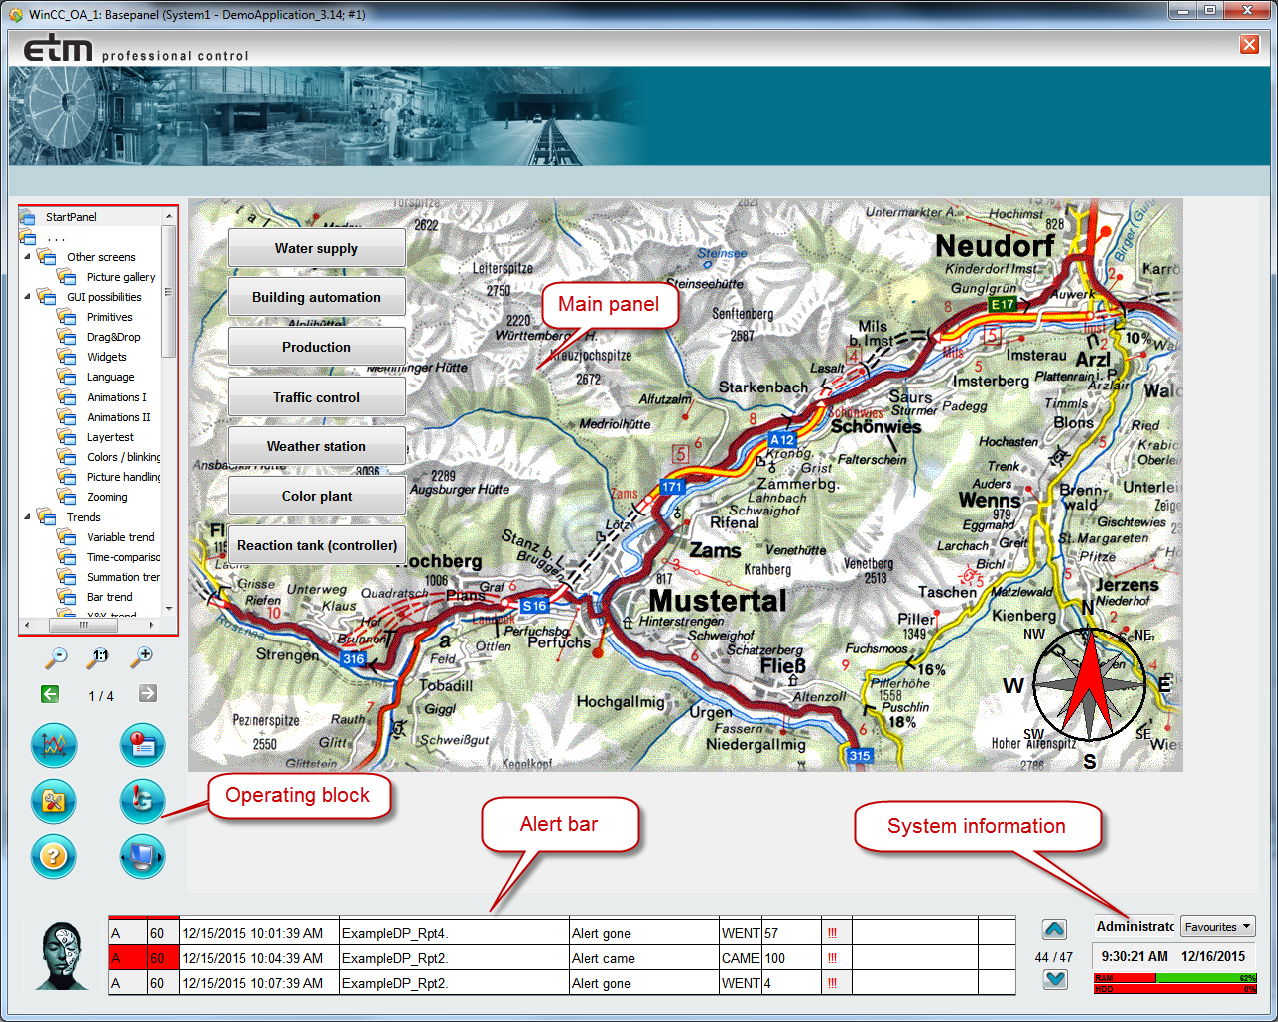
Operating block (navigation bar)
As in the WinCC OA DemoApplication, the navigation bar contains a number of options for navigating through the topology of a project. This module has the name "naviModule" in the templates (exclusive ETMMENU).
On the left are the "Start" button (with a dynamically generated cascade) and the direct-selection buttons (see also Configuration of the direct-selection feature). A navigation button appears in the center and provides another means of navigating around the panel hierarchy. Its icon is a house surrounded by four arrows pointing in all four directions. On the right of the bar are the buttons for opening some of the predefined independent process displays (Variable Trend, Alert panel - is opened as rootpanel in a new module, System management panel - is opened as childpanel in the "mainModule", link to the Online Help) together with frequently-used function buttons (Acknowledge all and Acknowledge horn). The operating actions available in the navigation bar depend on the user that is logged in (e.g. the user "guest" can only open the Online Help from the independent process displays - all the other buttons are disabled and shown in gray). Please refer to the Online Help for the WinCC OA DemoApplication for a more detailed description of the navigation bar WinCC OA DemoApplication - Navigation facilities.
Main panel
The root panels defined in the panel topology are displayed here. When the base panel is first opened after logging in, this panel displays the first panel configured in the topology or user screen configuration (the start panel). This module has the name "mainModule" in all three templates.
Alert bar with system information
This module contains a three-line alert panel (see also Alert Panel) with scroll bar (name of the module in all three templates is "infoModule"). System information is displayed alongside, for instance details of the logged-in user, system time and date, hard-disk capacity and RAM utilization. If you right-click on the line displaying the current user a context menu opens containing various options (e.g. login, login as ..., User Administration). The size of the alert bar is adjusted automatically according to the resolution. Once again please refer to the WinCC OA DemoApplication Online Help for more details - WinCC OA DemoApplication - Alert handling, WinCC OA DemoApplication - User interface.
If you want to display your logo beside the alert bar in the base panel, save it in the directory <proj_path>/pictures with the file name "firmLogo.gif" (80x80 pixels)! Your company logo can be saved in the format "bmp" or "gif" ("gif" has the advantage of transparency).


