Setting the node parameters
The StartPanel is the topmost element in the tree view (the node name cannot be changed
or deleted), and is the first panel to be opened in the selected module. At
configuration a panel with the name "main.pnl" is saved
automatically for the StartPanel in the directory <proj_path>/panels (or a
sub-directory of this directory). Of course an existing panel can be configured for the
StartPanel. As many panels and intermediate nodes as you want can be added below this
element.
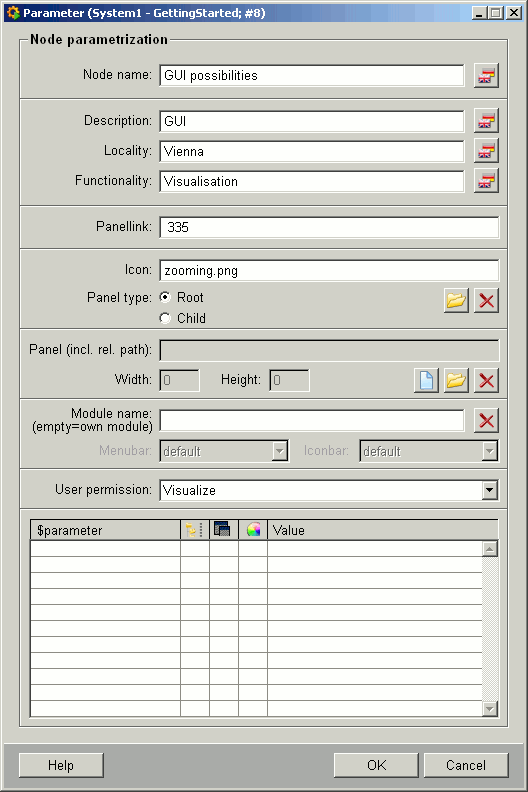
As soon as you create a node, a panel opens for entering the panel parameters that can be linked to this node. You can also open this panel by clicking on the "Settings ..." button (see also Configuration panel for the Panel topology/Group alert facility - Node).

-
You must specify a node name right at the top. The name you specify is used in the tree structure of the topology, so for clarity in large process installations you should choose a "suitable" name, not just any arbitrary name.
All node names in the topology must be unique, otherwise when navigating the first node is taken, which corresponds to the indicated name!
-
Optionally you can specify the description, locality, functionality for the node.
-
In "Panellink" you can specify the teletext number of the panel (the teletext functionality is not available yet!)
-
Selecting an icon from the directory <proj_path>/pictures or
<wincc_oa_path>/picturesis optional (the icon is used when this panel is configured to a direct-selection button, see Configuration of the direct-selection feature). The relative path of the icon is displayed in this field. A tooltip text is generated automatically and gets the name of the node. -
You can also set the panel type to be a root panel (displayed in the module provided for it according to the selected template) or a child panel (opened from a root panel or via the direct-selection buttons).
-
The crucial parameters are those that define a panel for the node. The following buttons are used to set these parameters:
![]() New - Creates a new panel. (see Creating a new
panel)
New - Creates a new panel. (see Creating a new
panel)
![]() Open file - Lets you select an existing panel.
Open file - Lets you select an existing panel.
![]() Delete - Deletes the defined entry.
Delete - Deletes the defined entry.
-
You can define the name of the module in which a defined root panel is to be displayed. Once you have defined the name of a module in this field, you can also configure the menu bar and toolbar display (both combo boxes are enabled by moving the focus out of the "Module name" field, for instance by pressing the "TAB" Key or clicking on another field). If a child panel is selected then this section and its settings change --> two check boxes with the properties "Modal" (i.e. only actions can be executed in the child panel) and "Centered" (i.e. child panel is displayed precisely in the center of the root panel) can be enabled and thus assigned to the child panel.
-
You can assign a user permission to open a panel. When a panel is configured to a direct-selection button, the permissions of the user trying to open this panel are checked before opening it (see also authorization levels). Default authorization levels are assigned to the independent panels in the project (SysMgm: para, Alert & Event panel, Trend: operator, Online Help: guest). For example the user "operator" can open all independent panels in the project except for the System Management panel (this button is also disabled in the navigation bar).
-
$parameters for the configured panel are displayed right at the bottom of the panel, where they can be edited. In case of distributed systems you can also configure data points from other systems.
-
It is also possible to execute a script Evalscript functionName() in the $parameter field of the parameter panel. EVALSCRIPT functionName() evaluates a dollar parameter before the panel is opened. Furthermore, it is possible to execute a function instead of opening a panel. EXECSCRIPT functionName() is added to the Panel(inc.rel.path) field. The script can, however, only be added if the node is added to the "..." branch of the main panel (of the panel topology).


Creating a new panel

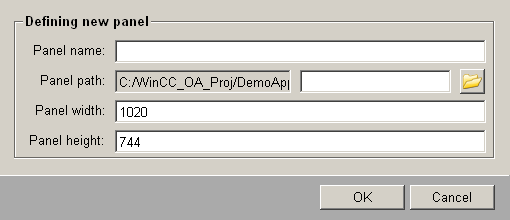
You must first specify a panel name when defining a new panel. The panel is saved in
the folder <proj_path>/panels(or in a sub-directory of this
directory) with the name"panelname".pnl. The panel width and
height are dependent on the selected template type (see Selecting a panel template and cannot be changed --> exception: you
can define the panel width and height when you create a new child panel).
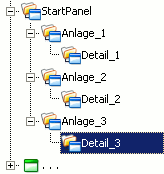
You might create a panel topology that looked something like the following example:

The icons in front of the node names indicate whether the node is a root panel or a child panel. Child panels have been linked to the nodes "Detail_1" to "Detail_3".


