Configuration panel for the Panel topology/Group alert facility
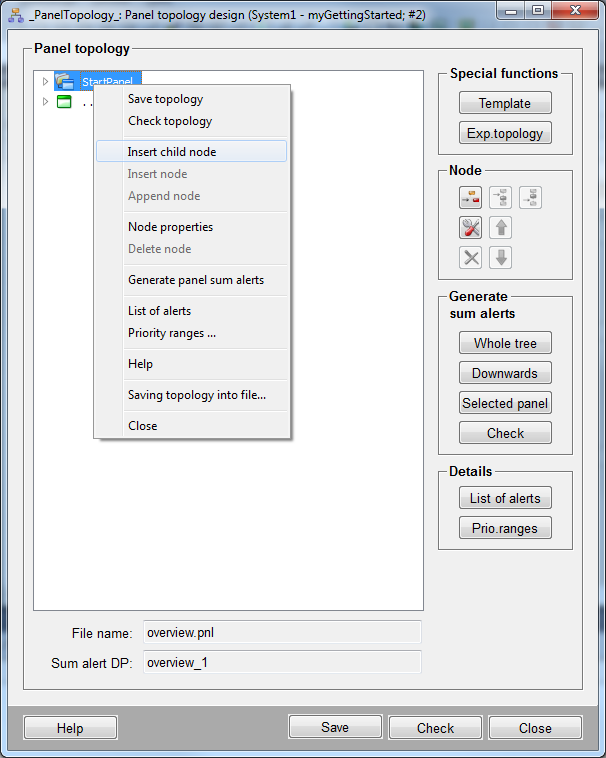
After selecting a panel template you then need to define the actual panel topology in the
PT_main.pnlconfiguration panel provided for the
purpose:

This panel can be divided into three parts:
-
A tree object is embedded on the left-hand side. This object is a tree view (same format as used in Explorer) and shows all the panels with intermediate nodes that are contained in the topology.
-
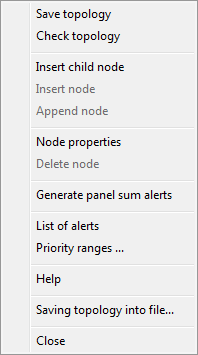
On the right-hand side are buttons for entering additional parameters or for creating the tree view structure and linking the relevant panels to the nodes. This panel also contains buttons for generating group alerts. (The most important functions provided by these buttons can also be performed directly from a context menu - see Context menu for the tree view).
-
The lower section of the panel contains details about the objects (panels) selected in the tree view: file name and name of the group-alert data point.
The node named "..." already displayed below the StartPanel in the tree view is the predefined structure of the independent process displays mentioned in the Basic Information page. The complete system management section and its panels are reproduced in this hierarchy. You can edit this structure or add elements to it.
The default languages for the panel topology are German and English. If other languages are used then the node names of the independent panels must be specified manually.
This panel contains the following buttons and functions:
Topology
-
Save - Checks the panel topology and saves the settings in the internal DP. Before saving you are asked whether you want to generate group alerts. Since generating group alerts can be a lengthy process, it is sensible to leave this task until you have finished editing or creating the panel topology.
-
Check - Checks that all the settings have been configured correctly (e.g. panel exists, panel cross-references)
To execute another function instead of the check of the panel topology, HOOK functions can be implemented. For further information see Implementing panel topology HOOK functions.
Node
-
 Adds a
child node.
 -
 Inserts a node of the same hierarchical level above.
 -
 Inserts a node of the same hierarchical level below.
 -
Properties ... - Opens a panel for configuring the panel linked to this node. (see also Setting the node parameters)
-
Delete - Removes from the tree view a selected node/child node together with the set parameters (the panel itself still exists in the project).
-
The arrow buttons can be used to move a node up or down. The node that should be moved may, however, not contain any sub nodes.
Generate sum alerts - see also Generating group alerts
-
Whole tree - For generating the group alerts for all panels in the topology.
-
Downwards - For generating the group alerts for all panels below the specified node in the hierarchy.
-
Selected panel - For generating the group alerts for a specific panel.
-
Check- For checking the group alerts (checking that the group-alert data points exist in each of the panels). See also Checking group alerts.
Note that the group alerts can only be generated of acknowledgeable (alerts with an acknowledge script) elements.
Details
-
List of alerts - Displays in a child panel all (group) alerts from all panels (see also List of alerts).
-
Prio.ranges ...- Opens the configuration panel for the priority ranges (see also Configuring priority ranges). Here you can define the alert ranges for the alert priorities. The alert ranges define how the symbols are used in the graphical reporting of the group alerts (if only two alert ranges are defined then just the first two symbols are used for the graphical reporting display - you can find out more about the objects supplied for graphical reporting of group alerts in the STD_PANELS chapter).
Configuration panel buttons
-
Close - Closes the Topology configuration panel. Before it closes, you are notified of any unsaved changes which you can accept with the "Yes" button or reject with the "No" button.
-
Template - For selecting a panel template for displaying the panel topology (see also Selecting a panel template).
-
Export topology - Saves the Panel topology in an ASCII File. The file selector opens for saving the file with any name. The text file contains the structure of the topology.
-
Help - Link to the Online Help.
Drag & drop and multi-selection in the configuration panel of the panel topology
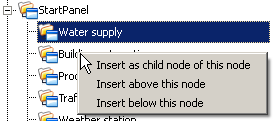
Drag & drop of nodes is now supported by the configuration panel of the panel topology. Dropping a node to another node opens a context menu with three possible options:
Insert as child node of this node
Inserts the dropped node as child node of the selected node.
Insert above this node
Inserts the dropped node above the selected node on the same level.
Insert below this node
Inserts the dropped node below the selected node on the same level.

Drag & drop is not supported for the "..." node.
Multi-selection
Multi-selection of nodes to delete them or to move them using drag & drop is supported by the configuration panel of the panel topology.
Implementing panel topology HOOK functions
There are two HOOK functions available which allow executing another function instead of the panel topology check when saving ("Save" button) or checking ("Check" button) the topology.
-
HOOK_TopologySaveButton() - with a click on the "Save" button the function HOOK_TopologySaveButton() is called, if available. Therefore the check of the panel topology (pt_checkTopologie()) is skipped. Afterwards the saving process is executed as usual.
-
HOOK_TopologyCheckButton() - with a click on the "Check" button the function HOOK_TopologyCheckButton is called, if available. Therefore the check of the panel topology (pt_checkTopologie()) is skipped.
Implement one or both HOOK functions for example in a new CTRL library. Load the CTRL library using the LoadCtrlLibs config entry in the config file of the project, e.g.:
[ctrl]
LoadCtrlLibs = "myLibrary.ctl"
Now if the "Save" or the "Check" button is clicked in the panel topology panel, the code from the HOOK_TopologySaveButton() or HOOK_TopologyCheckButton() function will be executed instead of the check of the panel topology.


