Dialogs for Graphic Object - Input Dialog
The next step is to create an input dialog. You could also create a direct input using buttons and input dialogs in the process image. Since two-stage handling is mostly required due to safety reasons, this example shows the more complex case.
 EXAMPLE
-
Create a new panel and save it under
/panels/objects_parts/GS_PUMP_dialog.pnlin the project directory. Before that, create also the sub directory/objects_parts/. -
Select the panel size, approximately 132 x 232 pixels.
-
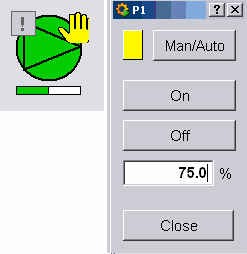
Add all graphic elements as shown in the following figure. You can modify the standard settings if necessary (text inputs for buttons, fonts, border style, etc.). You do not have to apply the size settings accurately - only the rough structure is important!
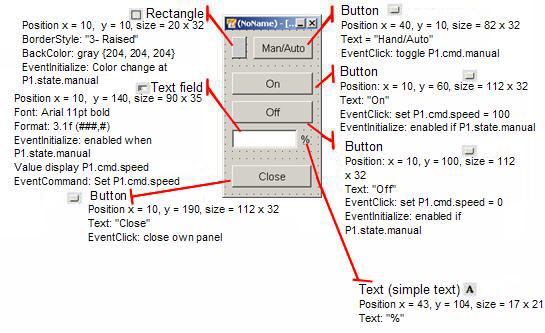
The next step is to define the dynamic properties for the input dialog. Proceed as described in the following. The both buttons On and Off as well as the input field for the actual value of the rotation speed, should only be enabled when the pump is running in manual mode, meaning, P1.state.manual equals TRUE.
-
Select the rectangle top left and configure a color change for the background color (Initialize) using the wizards. When P1.state.manual equals TRUE/1, the rectangle should be yellow. Otherwise it should be gray. How to proceed was already shown in the figure in the chapter Dynamization of Graphic Elements.
-
Select the button "Man/Auto"and open the wizards for the simple configuration of the "Clicked" event in the property sheet.
-
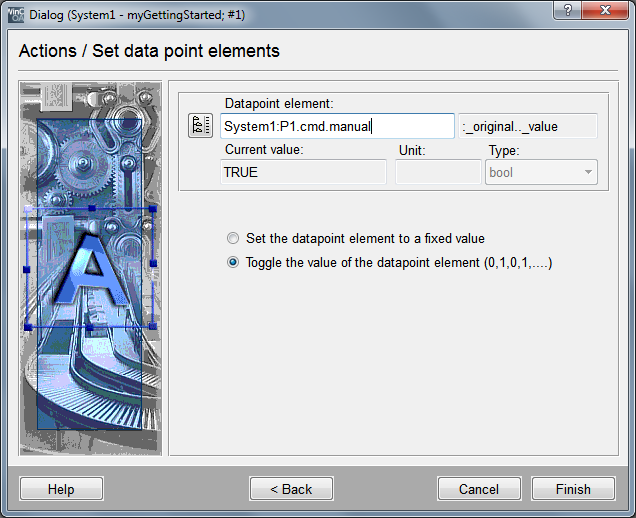
Select the option "Set/Read data point elements" and click on Next.
-
Enter P1.cmd.manual for the data point and select the option "Toggle the value of the data point element".
-
Complete this step with Finish.
If you test the input dialog directly via the Quicktest panel in the preview of the graphic editor, the click on the button "Man/Auto" has no direct, visible effect. This is because of the fact that the rectangle visualizes the state of P1.state.manual (also the state confirmation) and the button affects P1.cmd.manual (the command). Therefore, you can check it via the data point monitor or PARA. Later you will add a simulation script that generates these state confirmations artificial for the devices.
Since the inputs should only be possible in manual mode, the next step is to activate and deactivate all elements depending on P1.state.manual.
-
Select the single buttons On, Off and the field for the input of the rotation speed.
-
Open the wizard for simple configuration of the "initialize" event and select the option "Activate object" and proceed with Next>.
-
Enter P1.state.manual for the data point and select the value TRUE, "Enable object".
Disabled graphic elements are shown greyed out. If a graphic element with image (e.g. rectangle) is deactivated, also the image will be grayed out. Disabled graphic elements can neither be used (click, double click, right click with the mouse), nor can the text fields be used for input. You cannot use hotkeys either.
-
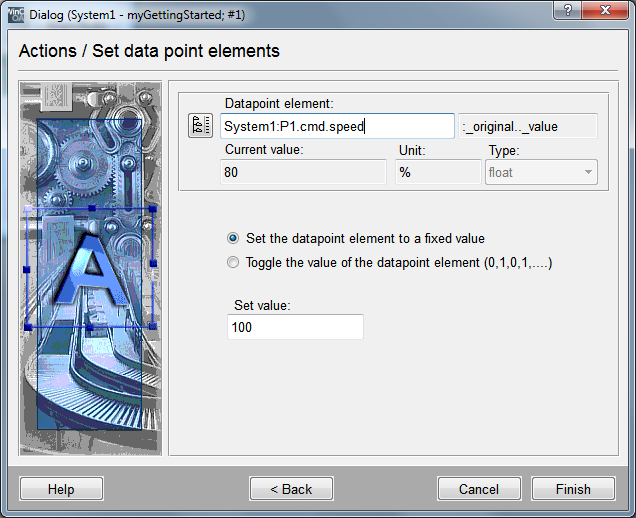
Select the On button and open the wizard for clicked in the property sheet. Proceed as shown in the previous figure and select the option "Set the data point element to a fixed value". As the target for the value change, enter the data point element P1.cmd.speed. The set value at mouse click should be 100.
-
Proceed in the same way for the button Off. The set value must be 0.
-
Select the input field and select"Set/Read data point elements" for the "command" event. Enter P1.cmd.speed as target again. However, you do not have to enter a value this time. When pressing Enter after the input of the desired rotation speed, this value will be applied to the data point.
-
Additionally, it's possible to display the particular current set value of the rotation speed in the text field. Therefore the user will already know the current setting when opening the dialog: select the "Display value" option for the "initialize" event and enter P1.cmd.speed as source data point,
Finally you have to configure the closing of the dialog panel with a [mouse click] on the close button. Use the wizards for clicked and select the option "Close panel" from the Panel functions - it's always the own panel (leave the fields empty) that will be closed if no panel and module name are indicated.
The input dialog for the pump P1 is ready to be tested in the preview window now. The graphic of P1 has to be configured in a way that theinput dialog is opened by a [leftMouseClick]. This sequence corresponds to the approach integration of test panels "Data point monitor" (see also Figure. 8.17 and Figure. 8.18).
-
Select the circle element of the pump P1 in the panel process.pnl.
-
Open the wizard for simple configuration in the property sheet of clicked.
-
Select the option "Panel functions" and confirm with Next.
-
Select the action "Open panel (if necessary in a new module)" and confirm with Next.
-
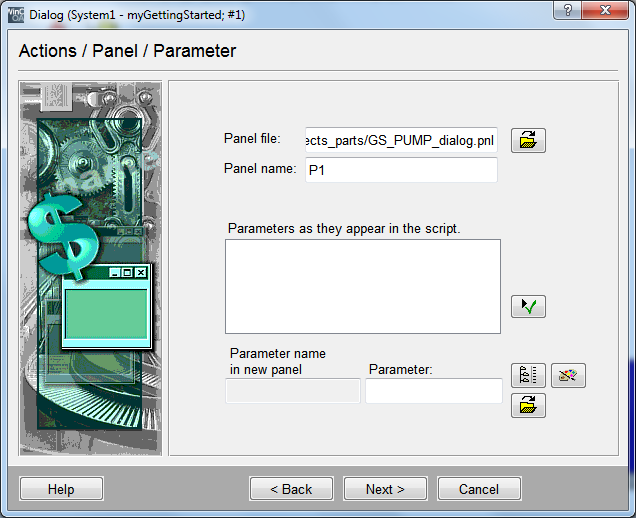
Select the before created input dialog using the panel selection dialog - the input dialog was saved in
<proj_path>\panels\objects_parts\GS_PUMP_dialog.pnl. -
Enter "P1" in the panel name field. The dialog has no $ parameters that should be passed so that you can proceed with Next.
-
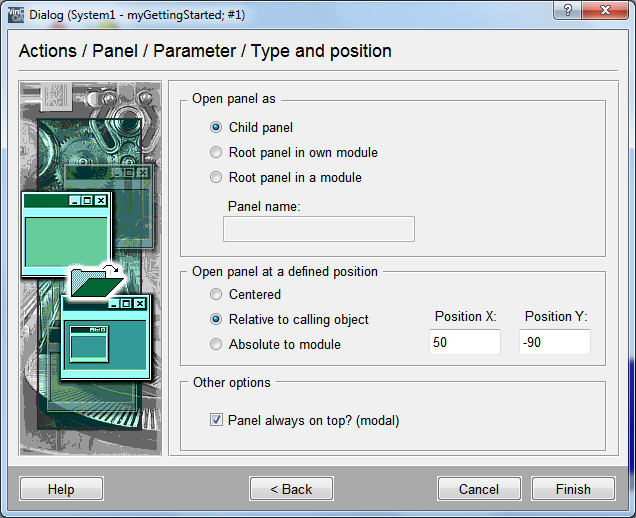
Select "Child panel in parent panel " f or the type of call and " relative to calling object " for the call position with an offset of approximately x = 50, y = -90.
-
Complete the configuration with Finish.
The functionality of the pump display for P1 and the associated input dialog can only be checked in the preview. The data point monitor that will be opened with a [rightMouseClick] on the pump symbol, allows the monitoring and targeted change of values.


