Clock
A clock can be used to show the system time in a panel.
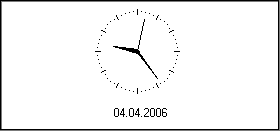
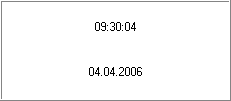
Clocks can be shown with a digital or analog display and with a date line below the time display or not. Dates can also be displayed without the time information. Analog clocks have a clock face divided into hours and hour, minute and second hands if the display accuracy equals one second. Analog clocks with an accuracy of less than one second do not have a second hand. Digital time displays and date information can be presented in a wide range of formats. Program actions cannot be initiated from clocks, these are solely a means of displaying the current system time and date. Status indicators can be confirmed, however, by clicking on clocks.
The WinCC OA system time may not be adjusted back.
![]() To create a clock
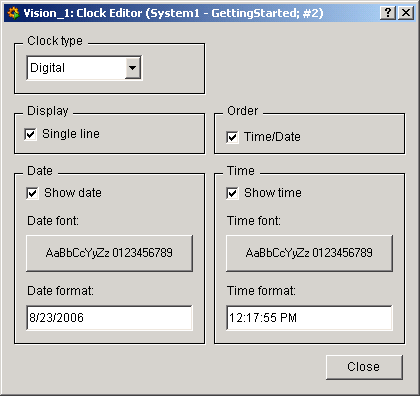
To create a clock
-
Click on the clock icon
 .
. -
Click in your panel.
-
The Clock Editor opens.
-
Select a clock type (analog or digital).
-
If you want to display the time and date on a single line, select the check box Single line. If the time should be displayed before the date, select the check box Time/Date. If both the date and time should be displayed activate the check boxes Show Date and Show Time.
-
Click on the Date and Timefont buttons to select the font.
-
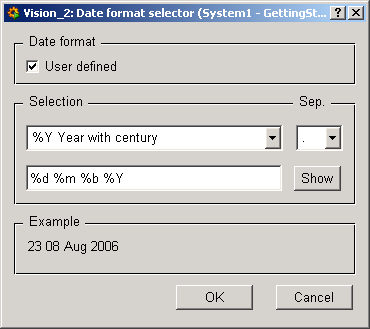
Click in the Date and Time format input fields to configure user-defined formats.
-
Select the format. The format (selection) will be displayed in the frame below. Enter the separator required in the Sep. input field and select another format.
-
The format (all selections) is shown in the input field.
-
Click on OK to confirm the selection.
A double-click on the clock in the panel during engineering opens the Clock Editor.
For clock functions, see Control graphics/ Clock functions.


