Creating a new PowerConfig for a DPE
Clicking on the Create new PowerConfig button opens the panel below for entering the PowerConfig parameters:
Screenshot: Panel for defining a new DPE PowerConfig
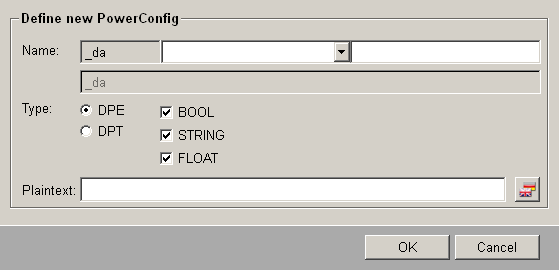
From the combo box (next to the text field displaying "_da" with the gray background) select a Config that you want to use for creating a PowerConfig (when copying an existing PowerConfig, this combo box also has a gray background and displays the Config for the source PowerConfig). You can then add a personal choice of characters in the next text field along. The name of the PowerConfig is displayed in the grayed-out text field underneath.
When entering your personal choice of characters for the PowerConfig name, make sure you do not use any spaces or special characters (for example, *?.;).
The PowerConfig name is composed from the following wording: _da + name of the Config (for example, _pv_range for the WinCC OA value range Config - you can find more information on the Configs available in WinCC OA under Configs (configuring data points)) + _ + personal choice of characters. For example: _da_pv_range_test for a periphery address PowerConfig.
By specifying the _pv_range Config for the name of the new PowerConfig, after creating the PowerConfig, WinCC OA value range can be selected from the combo box when configuring at a data point (more details on the page Inserting a DPE PowerConfig).
The data type (BOOL, STRING or FLOAT) must also be selected for a PowerConfig that is inserted at a data point element (DPE). A PowerConfig having the FLOAT data type can, for instance, be inserted at data point elements having the FLOAT, INT or UNSIGNED type. Selecting all the check boxes (BOOL, STRING and FLOAT) covers all the data types in WinCC OA.
When configuring the plain text, you can assign an alternative name to the PowerConfig that is displayed for selection in the Configuration combo box of the PowerConfig Editor. Clicking on OK confirms the entries you have made and closes the panel; Cancel closes the panel without adopting any of the settings.
Example
Create a PowerConfig for Periphery address (OPC input) that can only be used for elements of bool data type. When this PowerConfig is inserted, no further sub-PowerConfigs are to be created at the data point element. Server, Group, Item and Address-activation are the attributes that can be changed for this peripheral address.
- Click on the Create new PowerConfig button in the PowerConfig Editor.
- Enter the following parameters in the panel for defining a new PowerConfig:
Figure 1. Screenshot: Defining a new PowerConfig 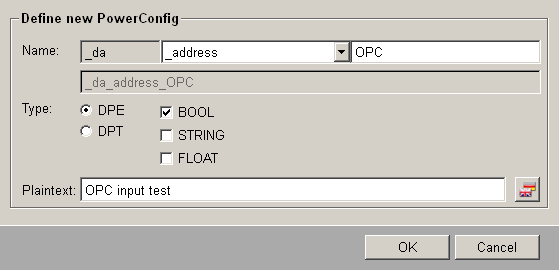
- Select the PowerConfig just created "B - Test OPC Input" from the combo box containing the defined configurations, in order to set the variables and scripts on the tabs in the following steps.
- The DriverIDs tab is not needed because a PowerConfig for a specific driver
type is created in this example. On the Variables tab, declare all the
variables that are required in the following scripts for setting/reading the
attributes of the PowerConfig (further information on the Variables tab page). You need to define the
following variables for this example:
Name Type Default value Description Server string Part of the peripherals address Group string Part of the peripherals address Item string Part of the peripherals address _reference string "$$_mp_"+dpTypeName($DPE)+"_OPCITEM" Reference string (defines the address) _active bool Address activation _direction int Specifies the direction (input or output). _drv_ident string "OPCCLIENT" Driver type - In this step you enter in the Input tab a script that reads the current values of
the attributes and writes them to defined variables (for example, when opening the
PowerConfig configuration panel from the data point). Enter the following script in
this tab:
dpGet($DPE+":_address.._reference",_reference, $DPE+":_address.._active",_active, $DPE+":_address.._drv_ident",_drv_ident, $DPE+":_address.._direction",_direction); - Enter in the Input calculation tab a script that splits up the reference
string and writes the values to the variables Server, Group and Item (
no "real" WinCC OA attributes are used for Server, Group and Item
for an OPC peripherals address). These variables are intended to be used as dynamic
attributes, which can be changed at each data point. Define the following script,
which splits up the string:
Server = substr(_reference, 0, strpos(_reference, "$")); _reference = substr(_reference, strpos(_reference, "$")+1, strlen(_reference)); Group = substr(_reference, 0, strpos(_reference, "$")); Item = substr(_reference, strpos(_reference, "$")+1, strlen(_reference)); - On the Manual input tab, select the variables (dynamic attributes) whose
parameters can be set at each data point (more information on this tab is given on
the Manual input tab page). For this example
the variables Server, Group, Item und _active have been
used. Since the variable names are already used in other PowerConfig scripts, the
plain text name of the dynamic attributes from the
da.catcatalog file is also used. - Once the reference string has been split up, so that the individual parameters can
be set for each DP using PowerConfig configuration (click on OK in the
configuration panel), the address (reference string) must be re-assembled on the
Output calculation tab. This ensures that the attribute
_address.._reference is set correctly for the OPC peripherals address.
The following script re-assembles the string:
_reference = Server+"$"+Group+"$"+Item; - The script defined on the Output tab is used to set the values given to the
variables to the specific attributes of the Config. For this example, write the
following script in this tab:
dpSetWait($DPE+":_address.._drv_ident",_drv_ident, $DPE+":_address.._reference",_reference, $DPE+":_address.._direction",_direction, $DPE+":_address.._active",_active); err = getLastError(); if (dynlen(err) > 0) { throwError(err); } - The last step in creating the new PowerConfig involves using a script in the
Default tab to set values to attributes that will appear in the
Configuration screen when the PowerConfig is inserted at the master data point for
the first time. In this example the following attributes are given values:
dpSet($DPE+":_address.._reference",_reference, $DPE+":_address.._active",FALSE, $DPE+":_address.._direction","\2", $DPE+":_address.._drv_ident",_drv_ident); - On the last tab, Source code, you can view the script of the created
PowerConfig and check its syntax. A new section containing the settings for the new
PowerConfig is added to the
powerconfigfile (you can find more information on the structure of this file on the page Structure of the powerconfig file). The script for this example should look as follows:definition32() { // definition start //_da_address_OPC:BOOL // variables definition string Server; string Group; string Item; string _reference="$$_mp_"+dpTypeName($DPE)+"_OPCITEM"; bool _active; string _drv_ident="OPCCLIENT"; int _direction; // dpGet dpGet($DPE+":_address.._reference",_reference, $DPE+":_address.._active",_active, $DPE+":_address.._drv_ident",_drv_ident, $DPE+":_address.._direction",_direction); // calculate input Server = substr(_reference, 0, strpos(_reference, "$")); _reference = substr(_reference, strpos(_reference, "$")+1, strlen(_reference)); Group = substr(_reference, 0, strpos(_reference, "$")); Item = substr(_reference, strpos(_reference, "$")+1, strlen(_reference)); // variables input //Server //Group //Item //_active // calculate output _reference = Server+"$"+Group+"$"+Item; // dpSet dpSetWait($DPE+":_address.._drv_ident",_drv_ident, $DPE+":_address.._reference",_reference, $DPE+":_address.._direction",_direction, $DPE+":_address.._active",_active); err = getLastError(); if (dynlen(err) > 0) { throwError(err); } // default dpSet($DPE+":_address.._reference", _reference, $DPE+":_address.._active",FALSE, $DPE+":_address.._direction", "\2", $DPE+":_address.._drv_ident",_drv_ident); // definition end } - After the PowerConfig was created, the GEDI has to be restarted in order that the new PowerConfig will be available/visible.
The PowerConfig created in this example can now be inserted at data point elements of type bool in the PARA Module. The PowerConfig can be selected from the list of periphery addresses (see also Inserting a DPE PowerConfig).


