PowerConfig configuration at the data point
By adding PowerConfigs, the user can decide which additional parameter settings are permitted at the data points themselves. Which PowerConfigs are supplied with the software version, and which attributes can be changed at each data point are summarized in the chapter Predefined PowerConfigs.
If you left-click on a PowerConfig of a data point element (located at a data point that has been derived from the master data point) then the standard configuration panel opens. You cannot make any changes in this panel, however (the OK and Apply buttons are grayed out).
Changes to the data point are made by means of PowerConfig configuration. This can be the situation if you have not selected the Fixed option in the settings for the master data point, but instead have chosen another option that is meant to remain variable (dynamic attributes). Right-click on the data point element of a data point or on the root node of a data point (when inserting a PowerConfig - containing dynamic attributes - covering a data point type) and select the option PowerConfig configuration.
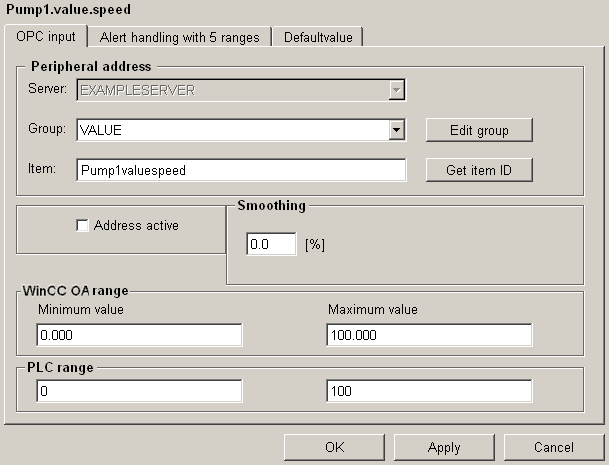
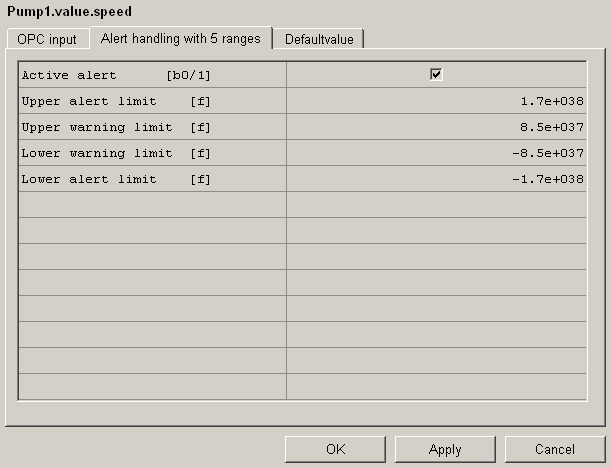
This panel displays the information that can be changed if required for each data point. The screenshot shows two PowerConfigs (OPC input, Alert handling with 5 rangesandDefaultvalue), which have been set for the master data point "_mp_PUMP1". The user can now configure and enable the driver that transfers the values. This means that when creating the PowerConfig Peripheral address settings for the master data point, the fixed parameter (Fixed - one driver for all data point elements) was not used, but instead the peripheral address setting (the parameters of the _address Config can be changed subsequently for each data point element). Each PowerConfig (if variable, i.e. can be changed) is displayed in its own tab with the values that can be set. Configuration itself is performed either via a configuration panel (see first screenshot - OPC input) or by entering the parameters in individual cells of a table (see second screenshot - Alert handling with 5 ranges). The modified values of the dynamic attributes are adopted automatically at the specific data point element. You can find more information on the configuration panels in the section Data point configs, basics.
PowerConfig configuration using a DPT PowerConfig is performed in a similar way to that described above. The modified values of the dynamic attributes are adopted for all data point elements that have been defined in the PowerConfig script (in the Output section).
The buttons at the bottom of the panel do the following: OK saves the changes and closes the panel, Apply saves the changes without closing the panel, and Cancel closes the panel without adopting any changes.
This panel is also used for the standard symbols in the GEDI. Once a STD_symbol has been inserted from the catalog, a data point can be created using reference configuration. The data point is configured using the panel shown above (see also STD_symbols - configuring objects). The dynamic attributes can be configured as soon as the standard symbol has been inserted in a panel. For configuration, the individual Configs are grouped together in a tab (for example, periphery, smoothing and conversion each need one tab in symbol configuration).


