Example of mass configuration
This page provides a simple example as a further illustration of how to use mass configuration. Before looking at this example, it is worth working through the whole Mass configuration chapter in order to get an overview of the specific functions used with mass configuration. This example provides step-by-step instructions, and is based on a purely fictitious situation. Of course, you can also use other names, PowerConfigs etc. when working through this example.
Example
You will create a data point type TrafficLights having 4 data point elements. Then you will configure the description, peripheral address and alert handling for the elements of the DPT. You will create a data point in the PARA module and generate multiple data points using the Excel tools.
- Create the data point type TrafficLights in the PARA module. The DPT might
have the following structure (The chapter Native PARA/Creating a data point
type also contains information on creating a DPT):
Figure 1. Possible structure of the "TrafficLights" DPT 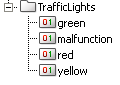
- Then define a master data point for this type (right-click on the DPT and select Create master data point from the context menu - more information under Data point type, master data point and data points).
- Insert a PowerConfig ("Var: Description") at the root node of the master DP. Insert at each element a Periphery-address PowerConfig ("OPC input") and a PowerConfig ("Fixed") having no dynamic attributes and implementing automatic description of the data point elements. In addition, add a PowerConfig for alert handling ("Fixed") to the malfunction data point element.
- Configure the created PowerConfigs and sub-PowerConfigs at the master data point as you require. The variable Description at the root node can be configured at each data point if required, and is used for composing the description for the data point elements - see point 6. of these instructions). The configured description at the leaf elements should be unique and might contain the name of the data point element concerned (for example, "- TrafficLights red", "- TrafficLights yellow", etc.). The parameters set for the periphery address obviously depend on the driver used or the OPC server (the settings that can be made with the configuration panel are listed in the specific drivers section of this Online Help - for OPC see OPC address panel). The parameters for alert handling at the malfunction element also need to be configured with the range text, valid range and alert class (for example, "TrafficLights OK" for TRUE and "TrafficLights failed" for FALSE, valid range would be TRUE in this case, and selection of 060_alert for the alert class).
- Once you have set all the parameters at the master data point, you then create a DP
in the PARA module. Right-click on the DPT TrafficLights and select Create data
point. Enter the name of the data point (for example, "TrafficLights_01") in
the dialog box that opens and click on OK.
Figure 2. Creating a data point in the PARA module 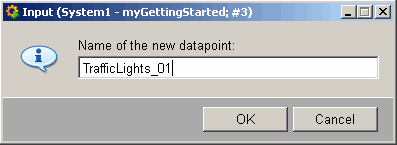
- The data point created has the same properties as those of the master data point.
All PowerConfigs and settings have been adopted. You can change the variable
Description set at the root node of the DP "TrafficLights_01" to define how the
description of the individual elements will read. Open the panel for PowerConfig
configuration (see also PowerConfig configuration at
the data point) at the root node and enter for example, "North
crossroads" as the description. Then click on the data point itself to open an
information panel. The table contains all the data point elements, either with their
name or description, their values (contents), status (bits) and source time. The
cells containing ... open detailed information on the event or alert. In this
example the description for the data point elements is composed from the
configuration at the root node of the data point and from the settings made at the
element concerned.
Figure 3. Information panel for TrafficLights_01 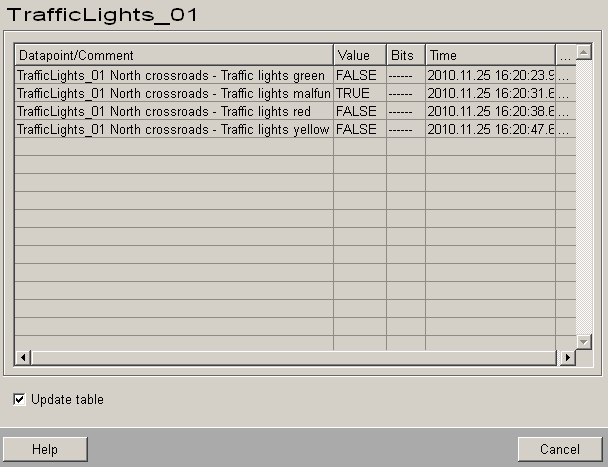
- Often creating just one data point is not enough. So it is important to be able to generate quickly and easily multiple data points that already have suitable settings for the dynamic (changeable) attributes of the PowerConfigs. This is done using the Excel tools.
- First create a DP list specifying in an ASCII file, in the ASCII format V 3, all
the available data points and defined PowerConfigs (variable attributes).
Right-click on the DPT TrafficLights and select the option Create
dplist (more information on templates is given in the chapter Templates/DP lists, basics).
Figure 4. Creating a DP list 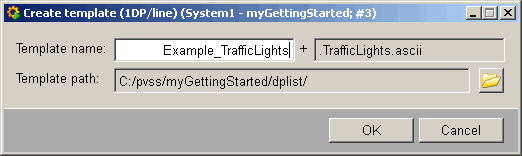
- Give any name to the DP list, which is saved in the directory <proj_path>/dplist.
- Open MS Excel together with the tools for mass configuration (information on adding
and using the tools is given in Excel Tools,
basics). Import the previously created DP list into a workbook and edit
as you see fit (in this example, 3 additional TrafficLights data points have been
added to the list with the parameters that have already been set at
TrafficLights_01).
Figure 5. Creating multiple data points using the Excel tools 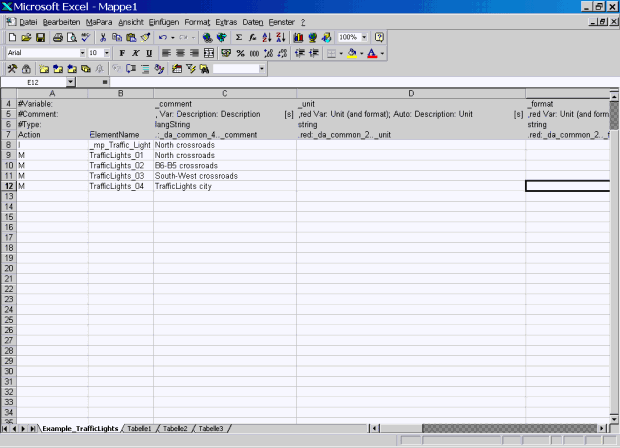
- Once you have made your changes, save the workbook and import the edited lines into WinCC OA. The result is the creation of 3 data points (TrafficLights_02 to TrafficLights_04) having the parameters for the dynamic attributes of the PowerConfigs that are set in the list.
A large number of data points already containing the correct Periphery address, Description and Alert handling have been created in the system.


