Configuration - Menu Items
All the settings that normally need specifying just once at the time a project is set up can be accessed through the menu option Report->Configuration . These settings are password protected.
- Frequently used control elements
- Change password
- Options (Configuring the options for the COM Manager)
- Importing the archive structure
- Viewing of and confirming base values (e.g. daily values, hourly values)
- Selecting report types
-
Status bits for assigning formats (for example, for invalid values, correction values)
- Creating, editing and deleting tariffsets
- Creating, editing and deleting cost centers
- Creating, editing and deleting mediums
Frequently used control elements
Frequently used control elements or buttons in the Configuration screens are described in the table below:
| Button | Description of function |
|---|---|
|
|
Create a new record |
|
|
Edit an existing record |
|
|
Delete an existing record |
|
|
Display the name of the computer you are working on |
|
|
Open or import an existing file |
|
|
Select a data record |
|
|
Retrieve values from WinCC OA |
|
|
Change the order of elements |
Change password
You can change the password with this dialog. You have to change the default password ("erAdmin") after the first start, to provide security for your data.
Enter the old password in the text field:

Verify the new password on the second line. Different users are not distinguished. The password does not apply to the sheet protection of the created protocols. The settings for this can be found in the Options panel below.
Options
In the Report/Configuration/Options menu you can make general settings and specify default values relating to communication between the COM Manager and WinCC OA (TCP/ IP).
The settings can be made for each computer. The Default setting applies to all computers for which no specific setting has been made. Excel report itself attempts to define the correct computer name here.
Specific settings can be made or deleted using the control buttons (see Frequently used control elements). You can
make a specific setting for the actual computer you are working on using the ![]() button.
button. ![]() lets you create a setting for any computer. In this case the user must ensure that a valid computer name is used. The
lets you create a setting for any computer. In this case the user must ensure that a valid computer name is used. The ![]() button deletes the currently selected setting.
button deletes the currently selected setting.
General tab
A host for the schedule can be selected in the general settings.
Only one computer can be employed for time control for the whole WinCC OA project.
The language for the WinCC OA Report can be switched online (English, German, French, Italian, Polish and Russian). Default is the language of Excel. If you have an English Excel installation, the Report is displayed automatically in English. This simply affects menu options and dialog boxes of the Report AddOns (see also under Layout of WinCC OA Excel Report). All other menus and dialog boxes in MS Excel are displayed in the installation language of Excel. Comments and descriptions for WinCC OA are shown in the language in which the data point list has been written in WinCC OA.
It is strongly recommended to stick to one language for all parameter settings (in particular for importing the archive structure and the data point list).
The day changeover point can be defined as other than 00:00:00 hours. When a new report is generated, we recommend that time periods are synchronized to the day changeover point set here. For more information on this refer to the section on protocol types and the figure Configuring the report type.
Use the ![]() button to read and display the day changeover point set in WinCC OA (type: _
config, data point element: _ config.StartHour).
button to read and display the day changeover point set in WinCC OA (type: _
config, data point element: _ config.StartHour).
ComManager tab
The selected Config file determines what WinCC OA project the COM manager connects to. The file can be selected from within the entire network through the File Browser (file selection window). By default, the config file of the local project will be used.
Additional parameters can be set in the command line. For more information see the chapter General options in the WinCC OA Online Help.
We recommend, at least for client installations, to specify the paths for the Data Manager and Event Manager in the command line, because "data" and "event" are not entered by default in the config file of WinCC OA.
Example of a command line entry:
- data datahostname - event eventhostname
Please refer to frequently used control elements for details of button usage.
If WinCC OA data is to be accessed simultaneously by separate Report installations, the ID of each computer involved must be unique. The number of different IDs depends on the WinCC OA license.
HTML tab
In Report Versions 3.1 upwards (with Excel version 2000 upwards), finished reports can be generated automatically as HTML pages using the Schedule option. An HTML page can also be generated manually from an opened report (see Creating HTML pages).
Mailing list
For Report version 3.1 upwards it is possible to send reports by email. Once again, the finished report can either be sent automatically using the schedule or manually (see Mailing list).
Importing the archive structure
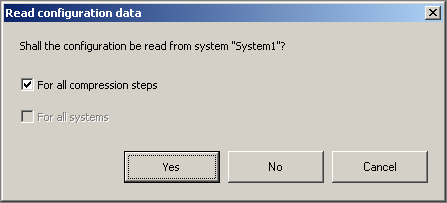
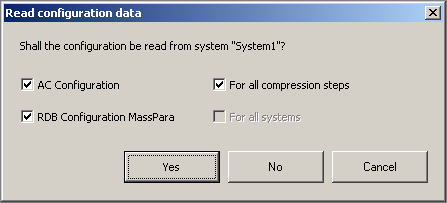
The menu point Report/Configuration/Archive Structure starts the import of the archive structure. Following archives can be selected:
- AC Configuration => The HDB archive structure will be imported
- RDB Configuration MassPara => The RDB archive structure will be imported*
- For all compression steps => All compression steps will be imported
- For all systems => The archive structure of all connected systems will be imported (e.g. distributed systems).
*Only available when the use of RDB archives is configured.
New or modified archive structures (data point types) are adopted in Excel Report and confirmed with a message.
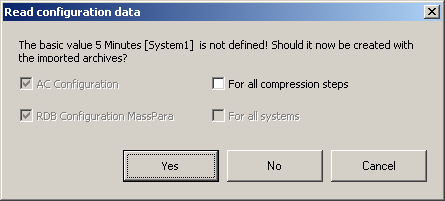
If new data point types are adopted in the database, then base values and report types may be created automatically for the default intervals 5 minutes, hour, day and month. The names are based on the language currently set (in Report).See also AC configuration panel and RDB Compression Configuration Panel
- Rename the DPT and add an additional character e.g. Straße => StrasseQ. Import the archive structure. Rename the DPT again StrasseQ => Strasse and import the archive structure again.
Due to technical restrictions in ADO no difference between ss and ß can be made. This problem can be seen when trying to rename a DPT from using ss to ß and vice versa. Excel Reports will not apply the changed name except when using following step:
Basic values
From the various compression structures of different data point types, those elements that contain similarly compressed data, for example, hourly values or daily values, are collected together into a group of base values. You can choose any name for these base values.
All the compression levels for the standard intervals of interest can be derived automatically just from the archive structure. The automatically generated base values are created by WinCC OA when the structure file is imported and simply require confirmation by the parameter setter. Normally base values do not need to be changed.
The following screenshot is an example of all base values defined for a project.
Please refer to frequently used control elements for details of the button functions.
The base value configuration window shown below is used for editing or creating a record. In case of distributed systems, you can select between several systems.
You can use the magnifying glass to select other data records to assign to the base value that has been opened for editing.
The Interval is used both as a filter criterion for selecting the archives and as a default value for the period (result) or the interval (data) for the report types.
Filter settings can be made in the top section of the window. These then affect the lower part of the display. The data point element within a data point type is defined in the DPE column beside the data point type (important in type-in-type DP structures). In the adjacent columns, the selected compression level and associated interval are displayed.
Special case: Groups with different archiving intervals
Even archives of different data point types can be grouped into a base value with different memory intervals. For instance it is possible to display a laboratory value entered once a day in the same daily report as hourly recorded measured values by using the same laboratory value for each hourly value (for example, a sum of a day is divides to a 1/24. with a mean the value is copied directly).
On the other hand, measured values and count values for instance might be displayed in a weekly report as a four-hourly mean value (or sum value), even though the values might have been archived half-hourly.
The sole requirement is that the ratio of the converted values to the archived values is an integer, and that a common synchronization time can be found for them. Since the required calculation of the values is performed in Excel, only the functions Min, Max, Sum and SumNumber (arithmetic mean) return valid results.
Report types
The connection between the data point names (represented by the base values) and their archive values is established by the report type.
Just as for base values, the report types can also be derived automatically from the archive structure for the standard intervals of interest. Therefore it is rarely necessary to make any changes to the report types.
The screenshot below shows a list of configured report types.
The settings for the base values are divided into a data and a result area (see, for example, Example of use).
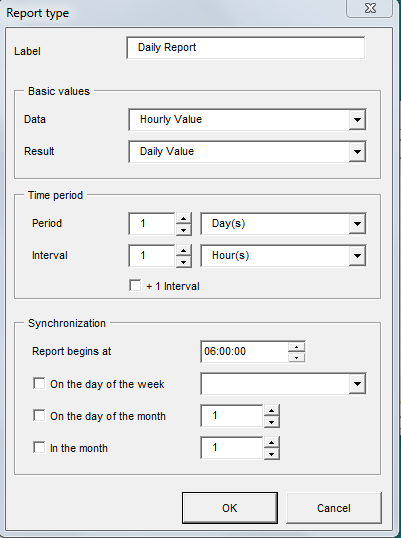
The period that is set represents the time period displayed in this report. Each data record is displayed at a time interval based on the interval for a time period.
The synchronization settings are used to offset the start time for the report, for example, if a day changeover point is set to 06:00 hours and a daily report with a period of one day and an interval of one hour is opened, the first value is entered at 06:00 hours and the last for 05:00 hours of the following day.
Special case: report covering several periods
Reports can be created that extend over several periods. The results, however, are always expected for a data point at the start of the time period, and are not retrieved over the full period. Thus even at the template creation stage you must ensure that the results (values from the footer or result area in column-oriented reports) are not retrieved from WinCC OA, but are calculated from the retrieved data held in WinCC OA Report.
Special case: report with configured interval
These base values need not necessarily be based on the time ranges from the WinCC OA archive (can be seen from the base value settings) but the display can be configured. For instance an "hourly values" base value may be specified for the data area that while it must contain real values need not contain hourly values but 30-minute values instead. However, the report would then be defined here to display a value only for every other hour. This value is set in the Interval field.
With the option + 1 Interval you can extend the interval, for example, a day from 24 hours to 25 hours. For a daily report with a 15 minutes interval, the protocol is not only displayed from 0.00 - 23.45 but also the interval of the next day (0.00-0.15) is shown in the report. For a monthly report with daily intervals, the first day of the next month is also displayed.
Status bits
For every value entered in the WinCC OA database, a 64-bit data word is also saved that contains the so-called status bits that represent the saved value (see PARA module/Data point configs/DP function/Bit tab). The information held in the status bits ranges from flagging up invalid values, through identification of range violations right up to labeling of correction values.
These status bits can be used for formatting the values in a report. Simplifications can be made here to avoid having to handle all theoretically possible status bit combinations (2^64). The 64 status bits are mapped onto 5 different status designations recognized by Excel (valid, substitutional, invalid, corrected, default) by a bit-wise comparison of the status bits with a bit pattern. If a match is found, the relevant cell is formatted according to the identified status. The actual formatting corresponds to the Excel standard. For instance invalid values or correction values can also be highlighted in a suitable way in the Excel reports.
The status bits in the standard version have logical definitions and should not normally be changed. It is however very easy to rearrange these status settings or to add to them.
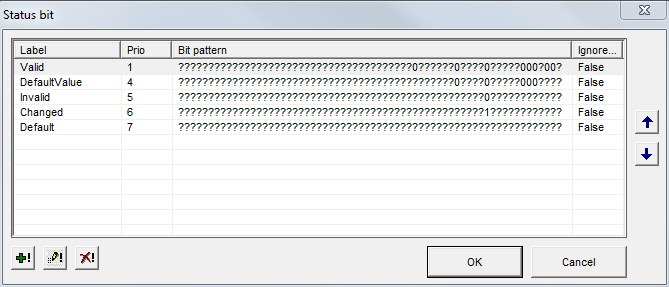
The figure below lists the defined status bits with their meaning. When evaluating the data, the bit-pattern list is worked through from top to bottom until the first match is found. This formatting is then applied to the row. It makes sense to place those bit patterns expected to occur most frequently (for example, "valid") as close to the top of the list as possible.
A zero in the bit pattern means that the bit must not be set. A one indicates that the bit must be set. A question mark labels irrelevant status bits whereby it is irrelevant to the comparison whether these bits are 0 or 1.
The column Ignore values indicates whether a value identified for this status should be included in the statistical function, or whether it will be ignored (applies to calculations in MS Excel).
Please refer to frequently used control elements for details of the button functions.
New entries in the list, or changes, can be handled as follows:
Formatting is assigned to the selected status designation via the ![]() button (see figure Defining a format). Please refer to the WinCC OA documentation for the meaning of the individual
status bits ( PARA module/ Data point configs / Original attributes or reference tables / Data point configs / _original).
button (see figure Defining a format). Please refer to the WinCC OA documentation for the meaning of the individual
status bits ( PARA module/ Data point configs / Original attributes or reference tables / Data point configs / _original).
Clicking on an individual element in the comparison bit-pattern changes the value in the sequence ?-1-0.
The check box Ignore values sets whether a value whose status matches this bit pattern should be included in the statistical calculations or ignored. The format template is saved in the Report (Report.xls). After changing this template you have to update each template. Use the menu option Report/Update templates.
Only templates located in the "Template" directory can be updated!
If the error message RuntimeError 450 : "Wrong number of arguments or invalid property assignment is shown when closing the Style window, add the style Standard to Excel via .

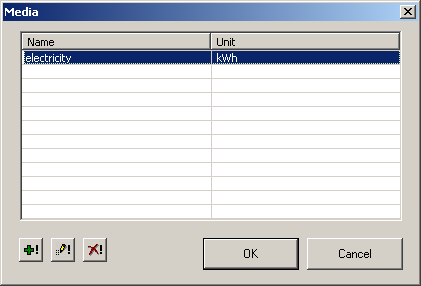
Media
For the creation of a medium the following data is needed:
- Name: The name of the medium which describes the type of media, e.g. electricity.
- Unit: The unit of the medium which gives information about the measured unit
Click the Media option in the Configuration menu to open theMedia window that provides the creation of a new medium or the editing or deletion of an existing one.
Click on the button to create a new medium. This opens the following window:
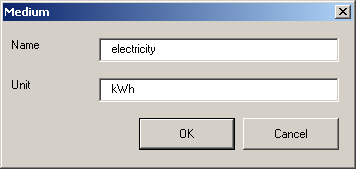
Enter in the Name input field a name for the Medium and in the Unit input field enter the unit of the medium.
Confirm with OK to create the cost center.
Tariffsets
For the definition up to 6 tariffs, which shall be valid for a specific day of the week at a specific time, Excel Report allows tariffsets to be configured.
Click on the Tariffsets menu option to open the following window:
![]() - Opens the Tariffset Details form for editing the selected tariffset.
- Opens the Tariffset Details form for editing the selected tariffset.
![]() - Deletes the selected tariffset. Caution: This also deletes all cost centers that use this tariffset.
- Deletes the selected tariffset. Caution: This also deletes all cost centers that use this tariffset.
Click on the ![]() button to create a new tariffset. This opens the Tariffset Details form which
allows the configuration of a tariffset.
button to create a new tariffset. This opens the Tariffset Details form which
allows the configuration of a tariffset.
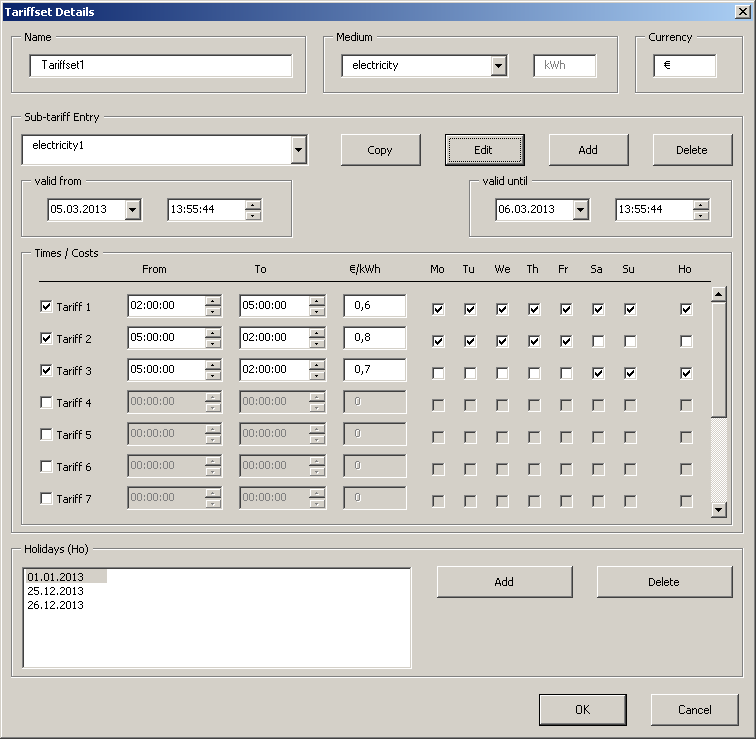
The window provides the following configuration settings:
Name
The tariffset name (max. 50 characters).
Medium
The medium of the tariff set. The mediums specified under Medium are available.
Currency
The currency of the tariff set.
Sub tariff entry
Allows to specify a sub tariff entry, which will be sued inside the tariff set. Multiple sub tariff entries can be specified and will be separately configured. The buttons Copy, Edit, Add and Delete can be used to either copy the selected entry, rename the selected entry, add a new entry or delete the selected entry.
Valid from/until
Allows to specify the time range in which the sub tariff entry is valid.
Times / Costs
In one tariffset up to 6 tariffs in time segments of whole hours (i.e. each tariff has to begin and end on clock hour) can be defined. All selected tariffs (the check box on the left is ticked) have to cover together each hour of a day at least once. That means that a tariff has to exist for every possible time of day. Otherwise the tariffset cannot be saved (error message is shown).
Example
Example of an invalid tariffset:
The tariffset cannot be saved, because Tariff 1 and Tariff 2 do not cover the full 24 hours of a day.
Either the "To"-time of Tariff 2 has to be changed to 02:00:00 or Tariff 3 has to added, which covers the one missing hour. The second solution is shown in the following figure:
As each day of week does not have to have the same tariff, it is allowed that the tariffs' times overlap:
Example
Four tariffs with overlapping times are defined in the figure above (sum of the hours of Tariff 1 + Tariff 2 = Tariff 3 + Tariff 4 = 24 hours).
Such a definition is possible as long as Tariff 1 and Tariff 2 will be assigned to different days of week than Tariff 3 and Tariff 4 (for the assignment of tariffs and days of week see below).
Assign Tariffs
After the assignment of tariffs to days of week it is necessary that a tariff selection has been made for each day of week (Monday to Sunday). The tariff selection for a holiday (Ho) is optional. For each day here, the tariffs also have to be chosen so that they cover the whole day (24h).
If an active tariff has been deselected in the Times / Costs area, the settings for this tariff in the Assign Tariffs area get lost.
Holidays (Ho)
The holidays from the list will be considered when the check box "Ho" for a tariff is ticked in the Assign Tariffs area. Even if the tariff selection for a holiday is optional, the sum of hours must also cover the whole day (24h), when this check box is ticked.
It is also possible to define holidays without assigning them to a tariff. In this case the tariff is calculated for the day of week, the holiday is ignored.
Click on the Add button to define a new holiday. This opens the "Insert Date" dialog.
Enter the specific date directly in the input field or use the calendar to do so. The calendar is opened by a click on the combo box. Click OK to add the selected date to the holiday list.
Click Delete to delete a selected holiday from the list.
OK
Click OK to create the configured tariffset. During the save process of the tariffset a plausibility check is performed. Thereby the saving of an interval sequence with breaks is avoided.
Once a tariffset has been created this is available in all templates.
Cost Centers
For creation of a cost center report the following data is needed:
- Consumption data: All data that is required for reporting is saved in the WinCC OA database. The consumption values are calculated in the tariff interval of 15 minutes and are subsequently compressed to hours.
- Tariffs including their tariffset with cost center and validity (HT / NT, ..)
The tariffs are created in the WinCC OA Report and thus they are not known in the WinCC OA database. The tariffs are configured in a special window.
Click the Cost Centers option in the Configuration menu to open the CostCenter window that provides the creation of a new cost center or the editing or deletion of an existing one.
Click on the button to create a new cost center. This opens the following window:
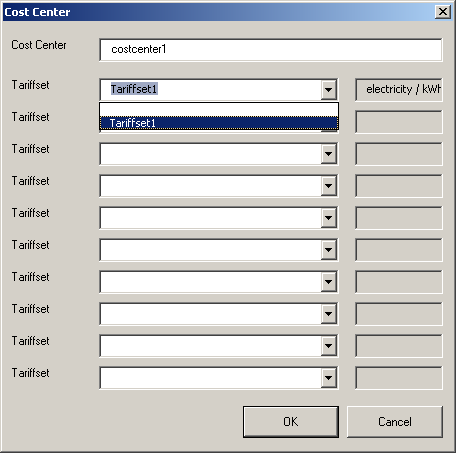
Enter in the Cost Center input field a name for the cost center and select from the Tariffset combo box one or more existing tariffset for the cost center.
Confirm with OK to create the cost center.
Cost center report
For information about linking data points with the configured cost center and analysis of the data, please refer to Creating templates with WinCC OA Excel Report, Adding a data point or Creating a report.
In the cost center report the the consumption and the costs of several media or cost centers are calculated. As soon as a measuring point is assigned to the medium, the costs are calculated for the media inside the cost center. Dependent on the report type, all consumption values of the measuring point within the selected time period are queried (e.g. every hours value of one day).
For the calculation, the tariff is determined for each consumption value and the costs for each consumption value are calculated in consideration of consumption value, weighting and tariff. To determine the appropriate tariff, the corresponding tariff set is determined on the basis of the assigned medium and the cost center which is assigned to the consumption value.
The corresponding sub tariff can be determined on the basis of the time stamp and the validity of the sub tariff. The tariff within the sub tariff results from the time stamp of the consumption value.
On the basis of this single costs and consumptions the following values are calculated and displayed in a table as well as a diagram:
- Overall costs of a medium within a cost center
- Overall consumption of a medium within a cost center
- Overall costs of a medium across all cost centers
- Overall consumption of a medium across all cost centers
- Overall costs of a cost center
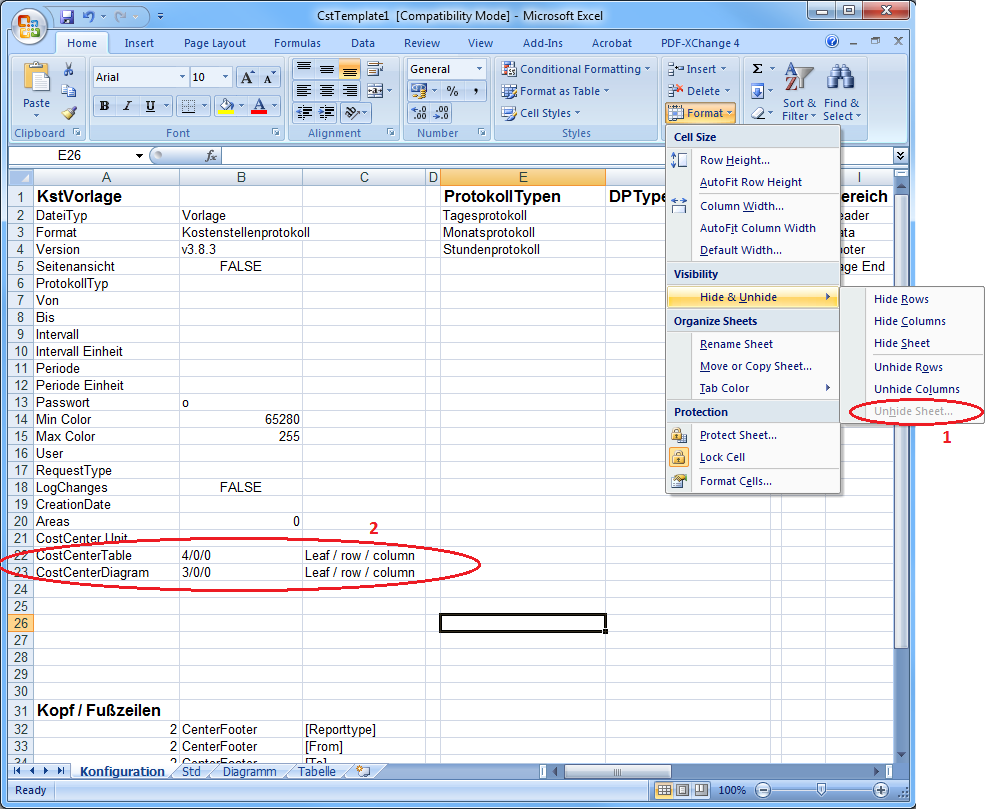
If you want to change the order of the sheets or to insert more sheets, change the first value of field B21 and B22 to the appropriate sheet index in the hidden configuration sheet "Configuration" (see figure below) of the Cost Center template.