A&E-Row/Screen
Via the configuration panel for the table configuration, see also View of the alert and event panel, you can configure a user-defined alert and event panel. The panel contains three tabs: General AES settings, Alerts and Events. Different settings can be made on each tab. The panel opens through the AES settings button behind the Settings tab of the System Management.

General AES settings tab
The General AES settings tab is divided into three areas, AES configurations, Global settings and Type of filter.
AES configurations
Here you can define settings for both the alert and the event panel. These settings apply project wide when using this configuration. You can configure the following settings:
- Activity: If only one table is active, the alert and event panel works in the full screen mode and only one query is executed. Thus, you can select either one table only or both.
- Type: (Alerts or events)
- Proportion: This sets the height of both tables in the alert and event panel. The height can be changed through the Proportion button in incremental steps or by manually editing the text field.
- Properties: (initialization properties for the selected type). These properties are specified in the property panel (for more information, see properties of the alert table). Select an existing property set from the combo box. The default property set is aes_propAlerts.
- Screen configurations: Allows selecting from the predefined configurations
aes_default, aes_alerts,
aes_events and aes_command as
well as the self created configurations.
- aes_default: This configuration shows the alert and event panel in split mode.
- aes_alerts: Shows only the alert table in the full screen mode (events are deactivated).
- aes_events: Shows only the event table in the full screen mode (alerts are deactivated).
- aes_command: Commands from a visualization and control system are generally transferred to the periphery. For this purpose, own command data points are used (see chapter state signal simulation). This configuration shows all the command data point groups with users. The data point group "Commands" is used for the configuration aes_command. This group contains all the cmd data points (see also the chapter DP group administration panel).
_AESConfig, AEScreen and AESProperties!![]() Creates a new configuration.
Creates a new configuration.
 Saves
the configuration.
Saves
the configuration.
 Changes the name of the current
configuration.
Changes the name of the current
configuration.
 Deletes the current configuration.
 Opens the property panel.
Global settings
In addition, the following settings can be made independent of the type of the table:
- Visibility of the slider elements (changing the height, maximizing the table size).
- Deny "all visible alert" acknowledges that you can acknowledge all alerts individually. The common confirm button cannot be selected (appears dimmed and is not available). Without this option, you can acknowledge alerts also through the button, in addition to the option in the context menu, together with alerts of other data points.
- Defining whether the printer selection window is opened for printing or the standard printer is directly used. The current filter settings are used for the printout.
- Hide empty rows (bottom/top table): The empty rows are not shown in the alert/event screen (top table: alerts, bottom: events).
Please note that this is a project solution and ETM does not guarantee that after the installation of a new patch or an upgrade to a current WinCC OA version your solution will work as before.
Type of filter
In the area Type of filter the user can decide which other users/groups are allowed to modify the properties in the AES table configuration. The following types of filter are available:
- None - no type of filter will be define
- Global - all global (root/admin) users are allowed to make modifications
- Group - only users of a defined group are allowed to make modifications. The group can be selected from a combo box.
- User - only the selected user is allowed to make modifications. The user can be selected from a combo box.
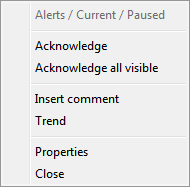
Context menu settings
Here you can specify which options are available in the context menu of the alert and event panel:
- Title
- Acknowledge: acknowledge the selected alert/warning
- Acknowledge all visible: acknowledge all visible alerts/warning
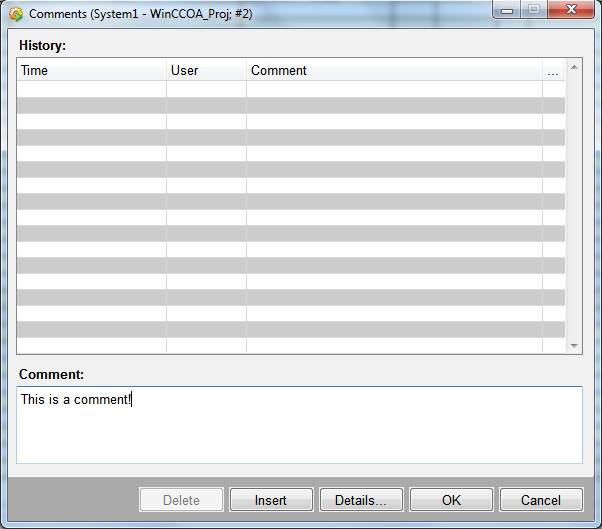
- Insert comment: Opens the following window, which allows you to add a comment:
- Process panel
- Trend: Opens the panel variable trend
- Details
- Sumalert details
- Display help info
- Properties: Opens the properties panel
- Close: Closes the context menu
- Change priority/alert class
![]() The system checks
what UIs are running at the moment and the AES runtime data points (data point
_AESProperties) of those UIs that are not running at the moment, are deleted. You
have to have administrator rights to delete the data points.
The system checks
what UIs are running at the moment and the AES runtime data points (data point
_AESProperties) of those UIs that are not running at the moment, are deleted. You
have to have administrator rights to delete the data points.
![]() Allows editing the
configuration of the alert row. The configuration created here can be selected for
the alert row (see chapter STD_PANELS). Only the upper table (alerts) can be changed for the alert
row.
Allows editing the
configuration of the alert row. The configuration created here can be selected for
the alert row (see chapter STD_PANELS). Only the upper table (alerts) can be changed for the alert
row.
![]() Loads the standard
configuration of the four default configurations aes_default, aes_alerts, aes_events
and aes_command. If you have, for example, executed changes and want to use the
original configuration after all, use this button.
Loads the standard
configuration of the four default configurations aes_default, aes_alerts, aes_events
and aes_command. If you have, for example, executed changes and want to use the
original configuration after all, use this button.
Alerts and Events tab
The alerts and events tabs are divided into two areas, Table settings and Column settings.
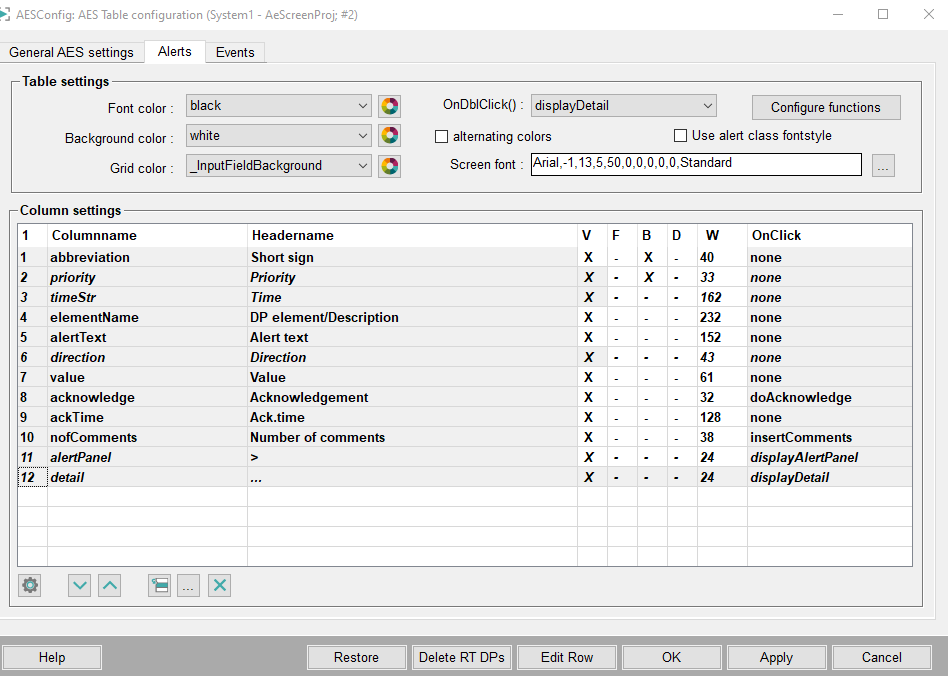
Table settings
The following general settings can be configured per table type (alerts or events):
- Font color
- Background color
Select a defined color from the combo box or set the desired color manually via the color selector (click the button next to the combo box ). By selecting the option "alternating colors" you can select which colors the background of the individual rows should alternate in order to increase the readability of the alert and event screen. Select the colors via two color selection dialog windows.

- Grid color
Select a defined color from the combo box or set the desired color manually via the color selector (click the button next to the combo box ).
- OnDblClick()
Function call when you double-click a row. The following options are available in the combo box for alerts:
- None
- DisplayDetail: Shows the details of the alert.
- displayAlertPanel: What panel should be shown is configured when the alert handling on the data point element (see _alert_hdl (Alert handling parameter tab) is configured. The panel is specified on the alert handling parameter tab.
- DisplayAlertHelpInfo: This can be a panel
(*.pnl), a HTML file (*.html) or a text file (*.txt). The panel that will open, is specified at the configuration of the alert handling on the data point element (see alert_hdl (Alert handling) and parameter tab). The panel is specified on the alert handling parameter tab. If you want to open an HTML file, you have to copy the HTML file (for example,. AlertInfo.htm ) toPROJ_PATH/help/lang/Webhelp.The same HTML file also has to be selected in the alert class. - doAcknowledge (acknowledge alerts through double click).
- Use alert class font style: This activates the font properties (bold and italic) for the alert class. The alert class configuration (meaning the font in the alert class) has to be set accordingly (see _alert_class (alert class)). This setting is valid for alerts only.
- Screen font: This sets the font for the tables in the alert and event panel. A different font can be set for each language. You have to open the Table configuration panel in the desired language and set the desired font (you have to switch once between the languages in a multilingual project so that the fonts are applied). The alert and event panel opens using this font. If you do not set a font for a language, the default font will be used. The default font is also used if you open the font selector and close it immediately via OK.
bin directory of the version. Execute the following steps:
- Install API if it had not been installed together with the WinCC OA version (see chapter API installation).
- There is a sub directory SampleTabUtil in the API directory. Compile the example.
- The
TabUtilEx.dllis generated. Copy theTabUtilEx.dllinto thebindirectory. - Open the Table configuration panel via System Management.
- Create API (C++) functions (for an example of API functions, see
the
SampleTabUtil.cxxfile in theAPI/SampleTabUtil directory) and then create the corresponding functions (that correspond to the API functions) via the Alerts/Edit functionspanel (see figure below).CAUTION:When creating new functions via the Alerts/Edit functions panel, the names and types of the functions as well as the parameter numbers for the functions HAVE to correspond to the names, types and the number of parameters for the API functions, otherwise a crash can occur. New functions should only be created by experienced WinCC OA users. - The created functions can be selected under Value/API functions in the column configuration panel.
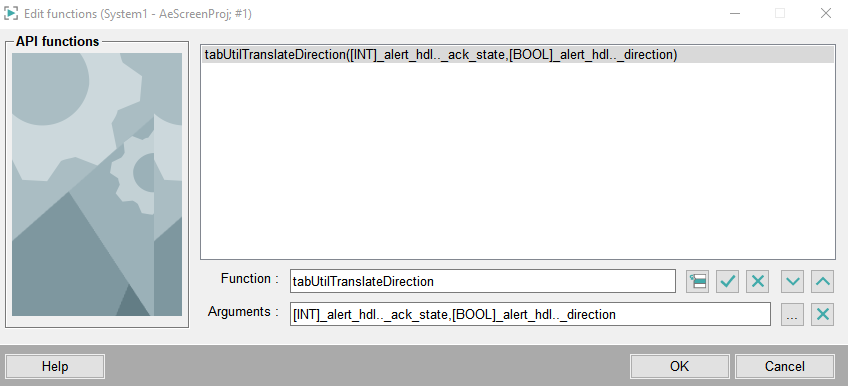
 Adds a function to the panel. Define first the function name and add it via the
button to the table. The function is shown in the view area (see figure above).
Adds a function to the panel. Define first the function name and add it via the
button to the table. The function is shown in the view area (see figure above).
 Adds the arguments selected via the ... button, to the function.
 Deletes the selected function.
 Moves the function in the table one line up.
 Moves the
function in the table one line down.
Moves the
function in the table one line down.
 Opens the Alerts / edit functions panel (see below). By means of this panel, you can
add arguments (parameters) to the function.
Opens the Alerts / edit functions panel (see below). By means of this panel, you can
add arguments (parameters) to the function.

Column settings
Settings such as the order of the columns or the properties of the columns can be made here. The settings are configured in the Column configuration panel and shown in the column settings panel. You can configure the following:
- Create/Delete/Rename columns
- Change the column positions
- Define the column visibility (column V)
- Set the alert class font color for the font (column F).
- Set the alert class background color for the columns (column B).
- Dynamic column width (D) (see table configuration).
- Definition of the column width (table column W).
- Properties of columns. You can define what should be shown when you click on a column (table column OnClick).
There are available and visible columns per table type. The italic font means availability. The visible columns define the order in the table of the alert and event panel. There are also protected columns. These columns are predefined and appear dimmed. Both lists contain already predefined columns.
The following buttons are available for the settings described:
Opens the column configuration panel for changing the
properties of a selected column (this panel can also be opened by double-clicking on
the desired column). See chapter column
configuration for more information.
 Creates a
new column. A maximum of 45 columns can be added.
Creates a
new column. A maximum of 45 columns can be added.
Moves the row in the table one line up.
Moves the row in the table one line down.
Changes the name of the column.
Deletes the selected row.


