System Management
The system management is built dynamically and therefore it can be project-dependent designed.
You can open the configuration panel for the System Management through System Management panel -> Settings tab -> System Management.
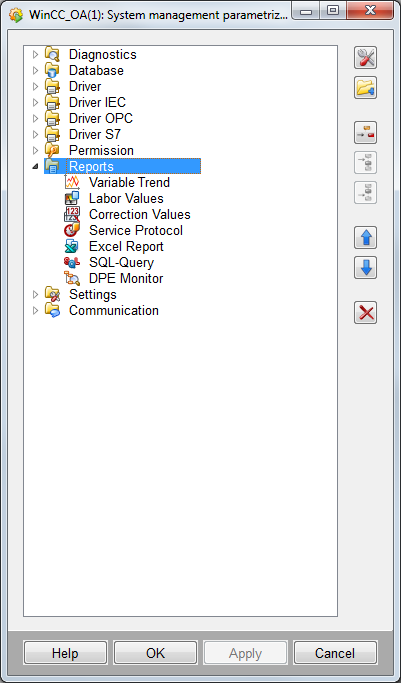
In the configuration panel it is possible to edit the view and settings of available tabs (here categories) and buttons (here items), to delete them and to create new categories and items. To do so use the buttons on the left of the configuration panel or the context menu of a selected category / item in the tree view.
All changes made in the System Management settings are taken over only after restarting the System Management panel or the GEDI, so that the changes are also visible in GEDI menu.
Adding, editing and deleting categories
The categories in the System Management panel and GEDI menu are displayed in alphabetic order.
The order of categories in the System Management panel can be changed via the ![]()
![]() buttons of the
configuration panel.
buttons of the
configuration panel.
Adding a new category
A new category can be added by clicking on the ![]() button in the configuration panel or via the context
menu option Add new category ....
button in the configuration panel or via the context
menu option Add new category ....
This opens the following panel:
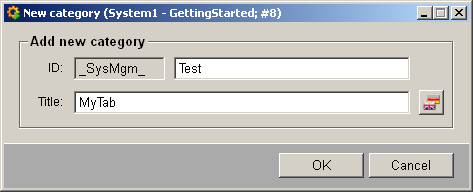
In the ID input field, enter the internal module ID of the new category, via which the this can later be addressed e.g. in scripts.
In the Title input field, enter the title for the category, which will be displayed language-dependent in the configuration panel, as tab title and in the GEDI menu. Click on OK to confirm.
Edit the category to set additional settings.
Editing a category
The panel for editing a selected category can be opened via the ![]() button in the configuration
panel or via the context menu option Edit .... Here it is possible to define
additional settings, which could not be set when adding the new category.
button in the configuration
panel or via the context menu option Edit .... Here it is possible to define
additional settings, which could not be set when adding the new category.
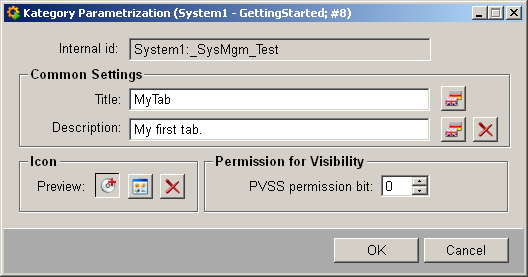
The Internal Id was specified during the category creation and this it is not possible to change it here.
In the Common Settings area the title of the category can be changed and a
description can be added or deleted (![]() ).
).
In the Icon area optionally an icon can be added to the category. This will be shown only in the System Management configuration panel and must have the size of 16x16 pixel.
In the Permission for visibility area the permission bit for the visibility can be set (default = 0). For further information see Authorization levels and Config "Authorization".
Deleting a category
To delete a category, right click the category and select Delete or click the
![]() button.
button.
Adding, editing and deleting items
The order of items which are later displayed in the System Management panel or in the
GEDI menu can be defined within a category using the buttons ![]() and
and ![]() of the configuration
panel.
of the configuration
panel.
Adding an item
To add a new item to a category select the category and click on the ![]() button in the configuration
panel or open the context menu of the category and select the option Insert child
item ....
button in the configuration
panel or open the context menu of the category and select the option Insert child
item ....
This opens the following panel:
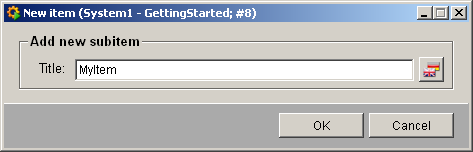
Enter the title of the item. This will be shown language-dependent in the configuration panel, as button subtitle in the System Management panel and in the GEDI menu. Click OK to confirm.
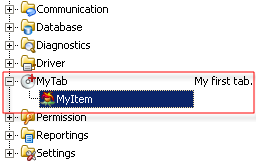
The added item is shown in the tree view of the configuration panel as follows:
If items are already available in a category, the buttons ![]() (insert item) and
(insert item) and ![]() (append item) can be
used. Select an item and click on one of these buttons.
(append item) can be
used. Select an item and click on one of these buttons.
Edit the added item to set additional settings.
Editing items
The panel for editing a selected item can be opened via the ![]() button in the configuration
panel or via the context menu option Edit .... Here it is possible to define
additional settings, which could not be set when adding the new item.
button in the configuration
panel or via the context menu option Edit .... Here it is possible to define
additional settings, which could not be set when adding the new item.
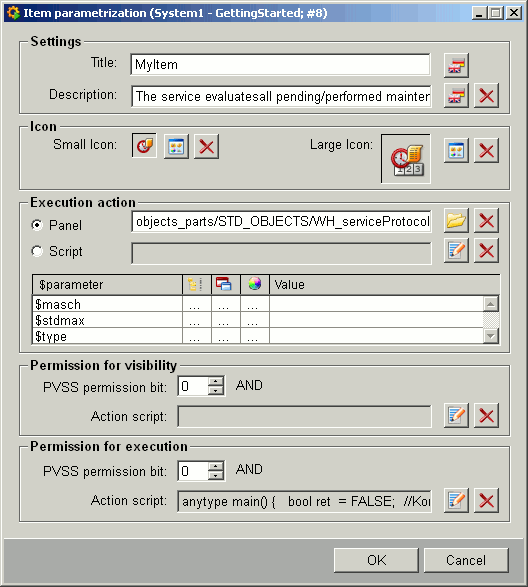
In the Settings area the item title can be changed and an item description can be added.
In the Icon area optionally a small and a large icon can be defined. The small icon must have the size of 16x16 pixel and is shown in the System Management configuration panel and later also in the GEDI menu. The large symbol must have the size of 40x40 pixel and is shown later in the System Management panel on the corresponding button of the item.
In the Execution action area an action can be defined. This will be executed
when the corresponding button was clicked in the System Management panel or the
option was selected in the GEDI menu. Either a panel can be opened or a script can
be started. Choose one of these options in the radio boxes. If Panel was
chosen, click on the ![]() button the specify the path to the panel. If Script was chosen, click on the
button the specify the path to the panel. If Script was chosen, click on the
![]() button to open the
script editor.
button to open the
script editor.
In the table beneath the $parameters of the panel or script are shown and the value for these assigned. It is not possible to add here new $parameters, these are only read out from the (panel) script. The display of the $parameters in this table will be updated after restarting the System Management panel and its settings.
In the Permission for visibility area the WinCC OA permission bit is defined, for which the item should be visible in the System Management panel and in the GEDI menu (see also Authorization levels and Config "Authorization"). Additionally an action script for the visibility can be added.
In the Permission for execution area the WinCC OA permission bit is defined, for which the item should be executable in the System Management panel and in the GEDI menu (see also Authorization levels and Config "Authorization"). Additionally an action script for the execution can be added.
Deleting items
To delete an item, right click the item and select Delete or click the ![]() button.
button.


