OPC A&E Client Configuration
Open the configuration panel of the WinCC OA OPC A&E client via the system management panel:
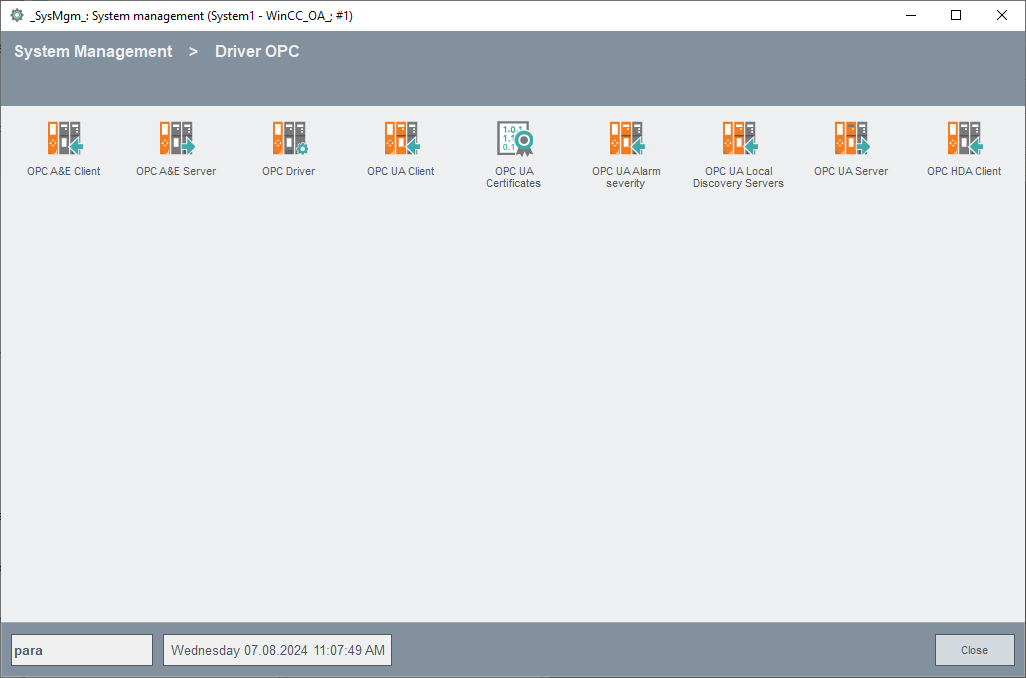
Click on the OPC A&E Client button on the OPC Driver tab. All the data that the OPC A&E client of WinCC OA needs for the communication with an OPC A&E server is set.
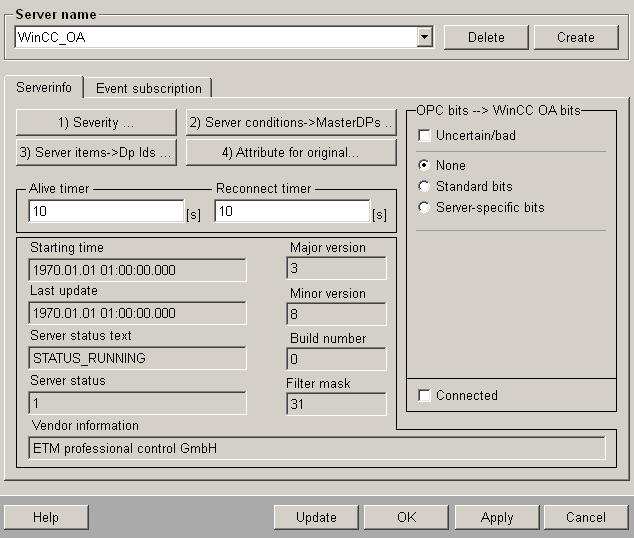
First you have to select the OPC A&E server to which the client wants to establish a connection. Therefore, click on the Create button. The following panel is opened:
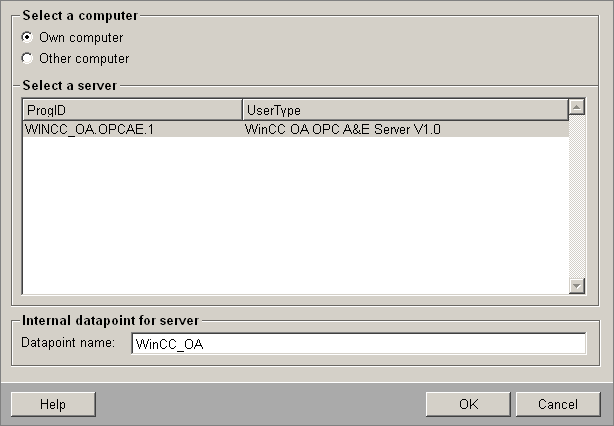
This panel allows to scan the own computer or other computers in the network to find installed OPC A&E server. These are shown in the list beneath. When selecting an installed OPC A&E server a data point name is automatically shown (suggested) for the internal data point of the server. This name can be changed arbitrarily (for further information on this panel see also Panel OPC Server of the WinCC OA OPC Data Access documentation of this Online Help). The internal data point is created and the following information is shown via click on OK:
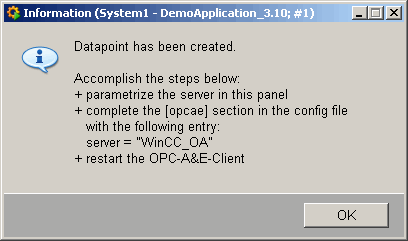
Before starting the WinCC OA OPC A&E Client add an entry to the [opcae] section of the config file (the entry server = "..." in the config file depends on the created data point name of the OPC A&E server. The name was configured in the panel that was shown above. In this example "WinCC OA" was defined as data point name). For further information on the config entries of the WinCC OA OPC A&E client, see paragraph Possible config entries of the OPC A&E client.
If you have not created a server name yet and the server name is missing, create the name and restart the server!
If you configure an OPC A&E client, alert classes with "acknowledge deletes" are created automatically through the panels. These, are not, however, the same classes as in the OPC A&E server.
Before starting the client, note:
If the client connects to several OPC A&E servers some server items may be identical in the used OPC A&E servers. So that you can differentiate the items in such cases you can define a string (Default = "AE_") that is put in front when configuring the server item in the client (automatic generated DPEs). The string is defined via the config entry prefix = "..." in the [opcae_<Servername>] section. If a prefix is configured at runtime, the client has to be restarted so that the items are assigned correctly!
The client is started by adding a manager to the console and starting it.
WCCOAopcAE [-num 2]
For the further steps it is necessary that the OPC A&E client (and thus also the OPC A&E server/s with which the client communicates) are started. When the WinCC OA OPC A&E client is started the panel for OPC A&E client configuration looks as follows:

Assumed that the server item has 5 alarm ranges: LOLO, LO, GUT, HI, HIHI. If the value of the server item changes from HIHI to HI, without HIHI was acknowledged before, also HI is shown but without the corresponding comment. This is missing because HI receives no server OnEvent (change triggered because of a certain event). This will not be triggered until an acknowledge of the HI range has taken place.
Alive Timer : Editable, second interval (Default is 10) that defines how often the server state is queried. When a server is created this value is automatically set to 10.
Reconnect Timer : Editable, second interval that defines after which time the client tries to reconnect to the server when the connection was lost. The here defined interval begins from the moment when the client notes that the connection to the server was lost. The value 0 means that when the OPC A&E server crashes the client does not try to reconnect to the server. When a server is created the value for reconnect Timer is set to the 10 by default.
Starttime : Not editable; start time of the server.
Last Update : Not editable; Time of the last update via server.
ServerStateText : Not editbale: Status of the server as text.
ServerState : Not editable; state of the server as number.
VendorInfo : Not editable; specific information of the server producer.
MajorVersion : Not editable; Major version of the software.
MinorVersion : Not editable; minor version of the software.
BuildNumber : Not editable; Build number of the software.
FilterMask : Not editable; filter possibilities provided by the server (ordered bit by bit).
Thereby the bits have the following meaning:
-
1: Filter by Event type
-
2:Filter by Event Category
-
4: Filter by priority
-
8: Filter by area
-
16.Filter by server items
The value 31 (as shown in the figure above) means that the server allows to filter by all criteria.
OPC Bits --> WinCC OA Bits : The figure of the OPC quality information is adjusted to the WinCC OA user bits. The settings are the same as at OPC Data Access (for further information see chapter Panel OPC Server).
Connected : Not editable; This check box is checked when the client is connected to the server.
Update : Via click on this button all current server data (Event Categories, Conditions, Server Items) are transferred to the client at once. This function is called automatically when the client is started. A further call is necessary only when the configuration of the server is changed when the OPC A&E Client is running and the data should be available on the client.
You should be careful with the changes of the server configuration: new data can be added without problems. The conditions or sub conditions that are used in the client should, however, not be changed in the server. Existing master data points that were generated for conditions and sub conditions are not updated during the update!
For the next steps it is important that the order is maintained as described.
1) Severity ... : The OPC A&E specification contains alert priorities but the priority is sent first together with the alert and cannot be determined earlier. Thus, the priorities have to be set in WinCC OA since they are needed for the creation of the alert classes.
Furthermore, you cannot find out automatically how the alert handling, which results from the sub conditions, has to be built. This means: the OPC A&E server sends only the sub conditions to the client but not the information about whether the conditions are above or below the valid range. Therefore, also this has to be defined in the client.
These both settings are set in the following panel by click on the 1) Severity ... button.
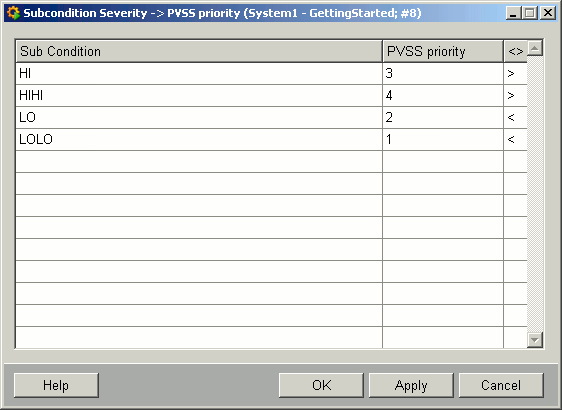
The values shown in the figure above are values passed by the server. You have to adapt these values so that the system generates the right alert handling in the client.
The alert priorities for the single sub conditions can be added in the Priority column. In the column < you define whether the alert range for the sub condition is above or below the valid range. ? is the default value and means "the alert range is above the valid range". A click on the column switches between > (means "alert handling is above the valid range") and < (means "alert handling is below the valid range").
With these settings the alert handling for which a sub condition is created later, is specified unique.
The following rules apply to the settings in the priority and <> columns:
- A priority may occur only once within the range > or <.
- Within the range > the system places the sub condition with increasing priority, further above.
- Within the range < the system places the sub condition with increasing priority further below.
The following figure shows the required settings to adapt the alert handling in the client to the alert handling of the server (see the alert handling of the server above). As you can see, you have to adapt the priority of the sub condition LO and LOLO (lower alert limit).

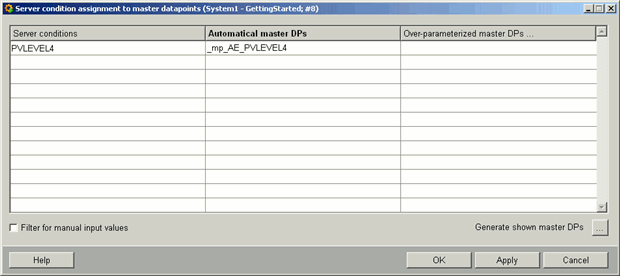
2) Server Conditions --> MasterDPs ... : With this step the data points for the definition of the conditions are configured. The OPC A&E Client creates for each condition in the server automatically a master data point unless you want to use a self defined DPE for it. The following values are shown in the following panel:
-
Column: Name of the condition in the server.
-
Column: Name of the automatically created master data point. The name is composed of _mp_<Server-Prefix>_<Name of the condition>.
-
Column: The user can use a self defined DPE with a correct alert handling for the definition of the condition. Correct alert handling means that the amount of alert ranges and alert texts have to correspond to the sub conditions of the condition. A panel with data point selector is opened via click on a row.
The check box Filter for manual input values allows to reduce the amount of the table entries for clearness (better overview). If this check box is active, only entries with an over-configuration are shown. The button Additional Dps ... becomes visible simultaneously. The following panel is shown via click on this button:
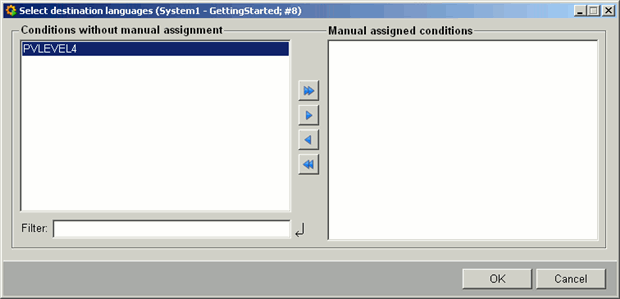
Via this button additional (not over-configured) conditions can be added to the table of the panel above. This can be done although you filter manually assigned (meaning over-configured) values.
Generate shown master DPs creates the master data points that are marked purple but only when there is no configuration in the third column for them. A new alert class is also created simultaneously for each sub condition. The name of this alert class looks as follows: <Server-Prefix>_<Sub Condition Name>. Default settings are used for the type of the acknowledgement and for the colors. These settings should be checked and changed if necessary.
An automatic generated alert handling (for a master data point) looks, for example, as follows:
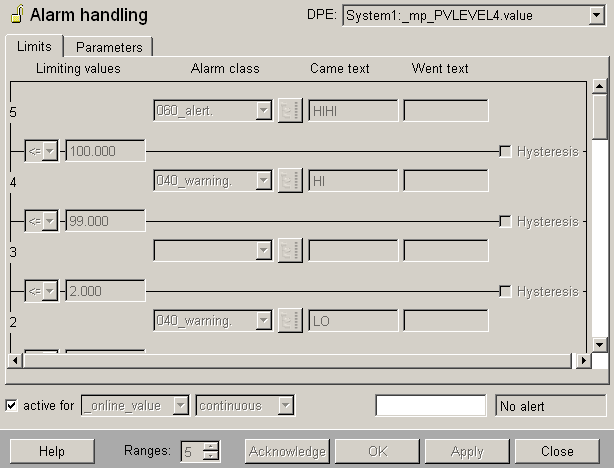
It is important that handling active is set to _original_value. The OPC A&E pf WinCC OA only works correct when this setting is set. In this case the alert can be triggered by setting an alert range explicit (not as usual via a value). The alert ranges are created automatically from the sub conditions. The range limits are not provided by the server and have to be assigned automatically by the OPC A&E Client of WinCC OA. The client standardizes the ranges as follows: everything that is above the valid range, has limit values bigger than 0, everything that is below the valid range, has limit values smaller than 0. The range limits are integer values.
3) Server items --> Dp Ids ...: After defining the conditions you define the items. The items are defined by using the following panel:
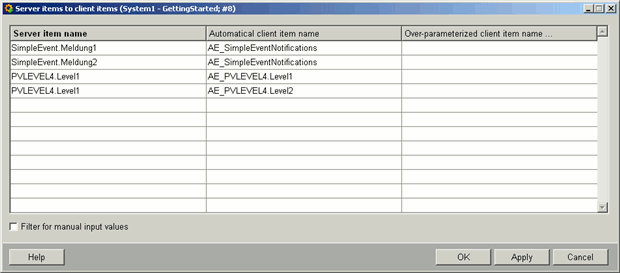
1. Column: The items, which are provided by the server, are shown here. Several conditions can be defined for one server item. Therefore, the shown name is composed as follows: : <Condition Name>.<Name of the server item>
2. Column: The OPC A&E client can generate a data point for each of these server items. The data point name is composed of <Prefix>_<Condition>_<Name of the server item>. Thereby, special characters (like ".") are replaced by "_". Note that the data points are not created via this panel since otherwise all data points would be created regardless of if they are used in a subscription or not. The necessary data points are generated first when used in a subscription.
For all data points assigned to a simple event category, the common used WinCC OA data point <Server Prefix>__SimpleEventNotifications is entered. A possibly available entry simpleEventDp in the config file of the client is ignored here since the content of the configuration file is not known when the data points are configured (see also config entry simpleEventDp of the OPC A&E client). This also applies for subsequent figures.
3. Column: If a data point should be generated, you can also select an existing data point. Thereby, it is important that this data point contains an alert handling and the amount of the alert ranges corresponds to that of the condition data point. The data point selector is shown via click on a row of this column.
For conditional events you can specify another data point (in the column manual client item name) to which a server item is mapped on the client. For simple events you cannot specify different data points and only one data point is used (simple events are mapped to one data point on the client). This data point is AE_SimpleEventNotifications by default or you can default or you can define a data point by using the config entry [opcae_servername] simpleEventDp.
The Event information can also be written in JSON-Format to a string
data point element.
For Simple Events the data point element, specified with the config entry [opcae_servername] simpleEventDp is used. To enable the JSON format, the config entry ../config_entries/sections/opcae_servername.html#opcae_servername__useJsonForSimpleEvent must also be set.
For Conditional Events the data point element specified with the config entry [opcae_servername] conditionEventDp is used. Here the JSON format is automatically used.
4) Attribute for original ...: According to the OPC A&E specification the server can send also values with the alerts/events but it does not have to. For passing the values attributes are used. Each server producer can use own attributes. Therefore, you have to define in the client which attribute should be mapped to the original value. The following panel is used for this purpose:
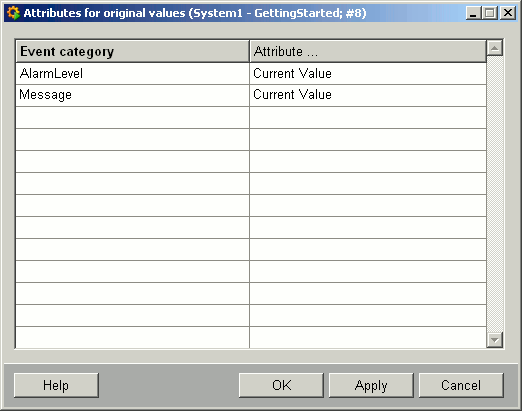
A combo box with all attributes provided by the server is shown when clicking on a row of the right column (column Attribute ...):
It is important that this attribute is chosen per Event category. If no attribute is defined for an Event category, no values are transmitted for the concerned server items - the original value always remains 0.
In case of a category of type simple event, this setting is ignored since an alert text is always shown in the original value (see config entry [opcae_servername] simpleEventDp of the OPC A&E client). In case of a subscription ALL_<Server name> (see next section), this setting is also ignored and thus no attributes are requested.
If the value is transferred, not only the number of alert ranges but also the limits of the alert ranges have to match in the server and in the client.
The last step is to define an event subscription. This corresponds to a registration at specific server items. Therefore, use the Event Subscription tab in the OPC A&E Client configuration panel.
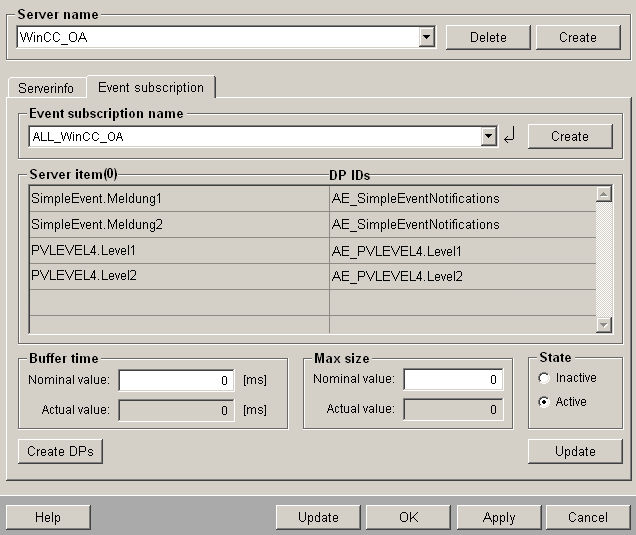
The name of the subscription has to be defined first in the Event Subscription Name field. The corresponding internal data point is created via <Enter> and Create.
All items, which are included in the subscription, are shown in the table.(thereby the name of the server item as well as the WinCC OA DPEs are shown).
The same item may not be present in several subscriptions.
The subscription with the name ALL <Servername>, in the example ALL_WinCC_OA, always contains all available items
Buffer time should : Editable: time in msecs (Default is 0) during which the server should buffer the data before sending it to the client. When an Event subscription is created, the value is automatically set to 0. 0 means that the server does not buffer.
Buffer Time Is: Not editable; Time in msecs during which the server actually buffers the data before sending it to the client.
Max Size Should : Editable; maximum amount of alerts/events the server should buffer before sending them to the client. Then an Event subscription is created, the value is automatically set to 0. 0 means that the server does not buffer.
Max size is : Not editable; maximum amount of alerts/events the server can buffer.
Status : The Event subscription can so be set active or inactive. Alerts/Events are transferred from the server to client only for active event subscriptions. CAUTION: If an item (in the server) is assigned to more than one subscription, alarms/events are transferred automatically if at least one of the assigned subscriptions is active.
If an item (in the server) is assigned to more than one subscriptions, the alarms and events are transferred automatically if at least one of the assigned subscriptions is active.
Refresh : The states of all conditions of all server items of this event subscription are updated by clicking this button. This means that the current states are queried from the server and updated in the client. When the OPC A&E client is started this refresh is executed automatically.
According to the OPC A&E specification, the items that are active in the server or that are not active and not acknowledged, are transferred at refresh from server to client.
Filter and create missing data points...: By clicking this button, a panel is shown. How the panel looks like depends on the name of the subscription. If the name is ALL_<Server name>. This means, for example, that for ALL_WinCC_OA, the following panel is shown.
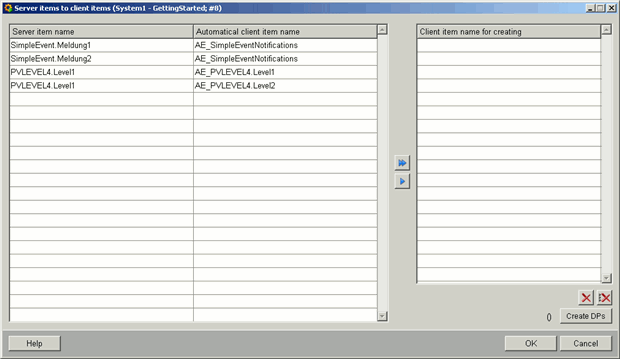
For the subscription with the name ALL_<Server name> the following filter criteria is valid:
- Event types OPC_SIMPLE_EVENT, OPC_CONDITION_EVENT
- Event Categories all
- Priority 1 - 1000
- Items all
- Attributes no
Data points that do not exist in the client yet, are shown purple. In order to create these data points, the data points have to be moved into the table "Client item name for creation" first.
Test and create missing data points... By clicking this button, the following panel that shows the data points to be created, is shown. Since all simple events are mapped in WinCC OA to one data point, only one data point is generated for simple events. The name is <Server prefix>_SimpleEventNotifications. This data point is used by the driver only if the entry simpleEventDp is defined in the config file of the client (for more information see the config entry simpleEventDp of the OPC A&E client).
The data points are created by pressing OK.
For all subscriptions that do not start with ALL , for example, Subscription1, the following panel is opened by clicking the filter and create missing data points... button
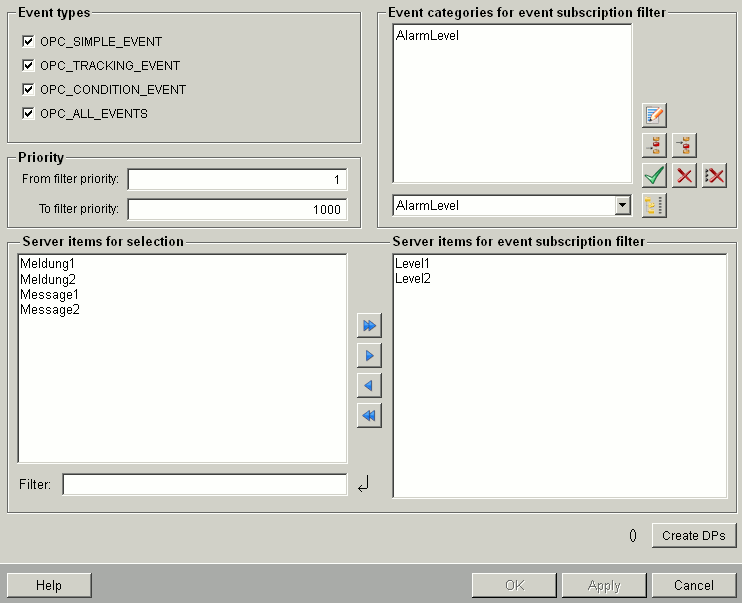
Event types : Is used for selecting the Event types that are passed from the server to the client. You should always select OPC_ALL_EVENTS here since some servers have problems with a further restriction.
Priority : Editable; Is used to set the priority range. Only alerts and events with a priority within this range are sent from the server to the client. Default values: 1 for the lower limit, 1000 for the upper limit (these are also simultaneously the lowest and highest limit).
Event Categories for Event Subscription Filter : Editable; only alerts/events of the selected Event categories are passed from the server to the client. If this list is empty, alerts/events for all event categories are sent according to the OPC A&E specification.
Available server items : Not editable; items that are provided by the server.
Server Items for Event Subscription Filter : Editable: used to select the server item, that should be used in the subscription.
Test and create missing data points...: Until now there are no data points for the server items in WinCC OA (unless they were over-configured). By clicking this button, the following panel is opened:
The data points on the purple marked rows do not exist yet and have to be created for the use of the event subscription first. Create the data points by pressing OK.
For simple events the system only creates one data point, as already mentioned.
The buttons OK and Apply in the Event Subscription - Filter panel are active first after creation and the event subscription can be generated.


