_alert_class (Alert class)
The alert class groups together the parameterizable properties of alert ranges of data point elements. These ranges are intervals in your WinCC OA value range that cover the entire range. The appropriate data point attributes can be found in the Appendix.
Alerts are triggered by value in the original value or valid online value of a data point element from one alert range to another. Depending on their direction, we can distinguish between "CAME" and "WENT" alerts for each range.
- Alert classes make it easier to configure alert handling of a data point element as they provide patterns.
- Alert classes can be defined for individual variables and can be used by referencing them in the alert handling for other variables.
In order to make it easier to reference classes, it is recommended that you link alert classes to data points specially designed for this purpose.
Use the alert classes already provided by the internal data points of the "_AlertClass" type. This will save you having to configure an alert class.
"_AlertClass" type data points
Data points of the internal "_Alertclass" type are intended to allow you easy allocation of alert classes to alert ranges. There are 7 default alert classes.
- advanceAlarm (priority 20)
- alert (priority 60)
- danger (priority 80)
- disturbance (priority 100)
- information (priority 10)
- scAlarm (priority 90)
- warning (priority 40)
When calling alert handling from the panel, specify priorities and name components (e.g. 040_warning or 100_disturbance). You can create other alert classes as required.
Alert class panel
The configuration panel Alert class shown below allows you to adjust settings for a data point variable alert class. This is done with attributes from the config _alert_class . The panel comprises two tabs.
Since WinCC OA release 3.9 it is possible to change the parameters of an alert class without the need to deactivate or acknowledge the alert handling of the data point element, where this alert class is used. The changes at runtime are possible only then, when alert handling of discrete values with RDB is used and both alarm classes (the old one and the new one) are different only in alert priority, short sign, alert color, font and alert action (scripts will not be re-triggered). Connections to the alert are updated, if they are affected by the change of alert class (e.g. the alarm color). For more information see Changing the Alert Class at Runtime.
The alert classes can be configured different on each system in a distributed system.
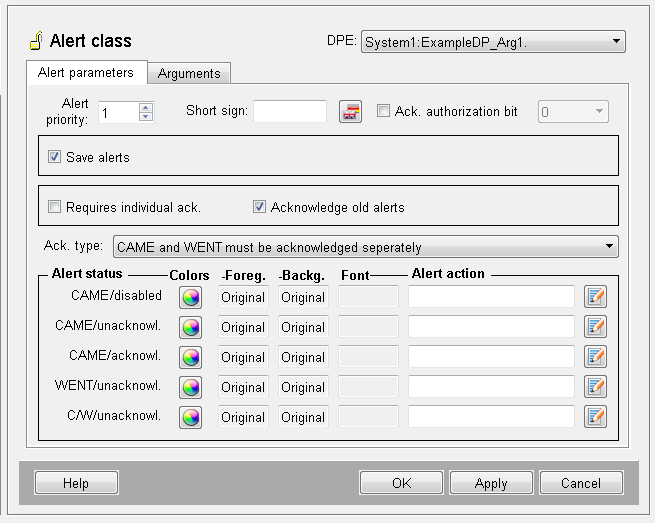
Alert parameters tab
The name (and description or alias) of the data point element to be edited is displayed in the top field.
Alert priority/short sign
With the aid of a spin button (whose display you can override with keyboard input) you can set alert priority.
- It is specified as a number between 1 and 255 and is a gauge for the urgency of alerts.
- The valid range has zero priority. No alert class is assigned to this range.
- You can also use priorities to filter alerts.
For process alerts, VDI/VDE directive 3699 distinguishes between priorities "advance warning", "warning" and "alarm" and, for control alerts, "disturbance".
The short sign is entered in the priority box on the right that indicates the priority on the alert panel. VDI/VDE directive 3699 assigns "V" to "advance warning", "W" to "warning", "A" to "alarm" and "S" to "disturbance".
Acknowledging Author
Clicking the check box enables the combo box with the authorization levels for your selection. Only a user with the according authorization may acknowledge an alert of this alert class. Note that there are predefined authorization levels for some users. Therefore e.g. user guest may not acknowledge an alert (see chapter Authorization levels and _auth (Authorization)).
Acknowledge mode
In the combo box Acknowledge mode you can specify what alert states an alert range can have.
- Depending on the acknowledge mode, an alert range can be in one of many states.
- One of them is always the state "CAME/disabled". This means that there is a pending alert for a data point for which the alert handling was deactivated.
In order to open the list, click on the arrow at the right edge of the box. The following options are available:
- Acknowledge deletes: The alert range can only be in "CAME/unacknowledged." or "CAME/disabled" state. Normal state is achieved by a going value change or by acknowledging.
- Not acknowledgeable: The alert range can only be in "CAME/acknowledged." or "CAME/disabled" state. Normal state is only achieved by a going value change, it is not possible to acknowledge!
- CAME is acknowledgeable: Every alert range can be in one of three states "CAME/unacknowledged", "CAME/acknowledged" or "CAME/disabled". Normal state is always achieved by a going value change. An acknowledge puts the alert range into "CAME/acknowledged" state.
- CAME or WENT must be acknowledged: Every alert range can be in one of four states "CAME/unacknowledged", "CAME/acknowledged", "WENT/unacknowledged" or "CAME/disabled". Normal state is only achieved by a going value change AND by acknowledging. For acknowledging either the "CAME" alert must be acknowledged in the state "CAME/unacknowledged" or the "WENT" alert must be acknowledged in "WENT/unacknowledged" state. Only acknowledge ONE of the pairs!
- CAME and WENT must be acknowledged separately: Every alert range can be in one of five states "CAME/unacknowledged", "CAME/acknowledged", "CAME/WENT/unacknowledged", "WENT/unacknowledged" or "CAME/disabled". In order to achieve normal state, "CAME" and "WENT" alerts must be acknowledged separately one after the other (i.e. "WENT" after "CAME").
Save alerts, requires individual acknowledgement, acknowledge old alerts
Save alerts: select this option if you want to save alerts. Then you can view alerts, e.g., from previous months on the alert panel.
For the last two acknowledge modes ("alert pair requires acknowledgement", "CAME and WENT require acknowledgement") the following options are available:
- Requires individual acknowledgement: this option specifies that all data point element alerts must be acknowledged separately. Without this option, you can confirm alerts together with alerts of other variables (acknowledge all).
- Acknowledge old alerts : if this option is set you must acknowledge all alerts in order to get to normal state. Start with the oldest up to the most recent.
Alert color and font
In the fields under Alert color you can specify what color the various alert states are displayed on screen. You can only assign colors to alert states that are possible according to the selected acknowledge mode.
Alert colors are selected via a
- combo box: from a list of predefined colors
- color and font editor:In the color editor, displayed by clicking the button on the right in the alert color box, you can also specify the color names to be displayed in the combo box. Here you can also specify thefontfor alerts. The font can be either bold or cursive
Suggested colors that conform to VDI/VDE directive 3699 are
- light blue for advance warnings
- yellow/back flashing or yellow for (unacknowledged) warnings and acknowledged warnings
- red/white flashing
- red for (unacknowledged) alarms or acknowledged alarms
- disturbances are displayed yellow/black flashing or black.
The flashing frequency as per VDI/VDE 3699 is two hertz for "CAME" states and half a hertz for "WENT" states.
Alerting
If you want to trigger certain actions when an alert state is reached, e.g. switch on an acoustic alarm signal, you can trigger them from a control script. To do this, open the Script Editor by pressing the button to the right of the Alerting field and write a script.
The address of the respective data point, alert time and a counter are automatically passed to the main() function of the script that configures alert actions. The data point address is a string, alert time is a time, and the counter distinguishes between alerts that occur at the same time is an int.
The alert class scripts run in the Event Manager. Thus, waiting control functions and UI functions are not supported (with exception of dpGet())!
Arguments tab
The Arguments tab is used to pass additional arguments to the main() function of an alert action.
Example
main(string dp, time t, int i, string text, bool value)
{
  PagerAlarm_EveryTime(dp, t, text, value);
  //Calls function
  //from libs
}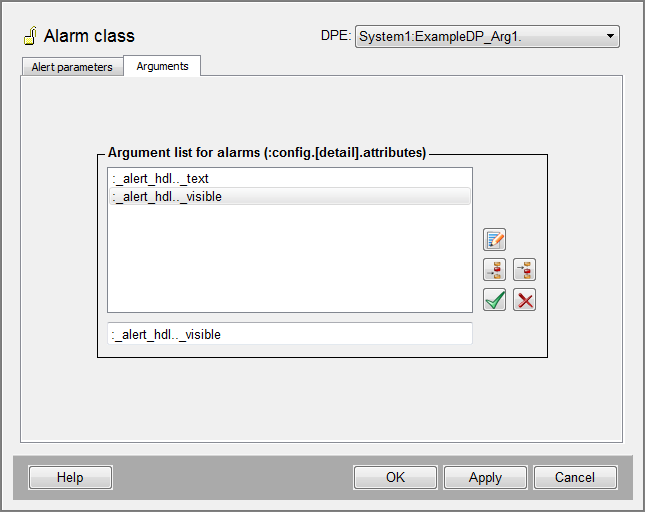
- Enter the arguments in the input box below the list of arguments (e.g. for string altext :alert_hdl.._text).
- The arguments must be entered in the input box in the form ":_alert_hdl.._text", ":_alert_hdl.._visible".
- The Buttons to the right add arguments to the list and allow you to edit or delete list items.
Changing the Alert Class at Runtime
It is possible to assign a new alert class to an alert at runtime (de-/escalation of the alert) without the prior necessity to deactivate or acknowledge the alert of the data point element, in which this alert class is modified. This means that it is not a re-configuration, but specifically a temporary reclassification of the alert class.
A de-/escalation is possible if:
- The alert is an alert handling of discrete values
- RDB is used
- both alert classes (the new as well as the old) are different only in terms of alert priority, abbreviation, alert color, font and/or alert action.
For further relevant requirements and limitations see here.
WinCC OA alert classes define how a certain alert is displayed, how it reacts (Ctrl scripts) and its priority. If the user de-/escalates a certain alert, a WENT event with the old alert class and a CAME event with the new alert class is triggered. Both alerts have the same alert time like the original alert, only that the counter of the alerts is counted up. For the user it seems as if the alert class of the alert has been changed.
Example
- 04/01/2010 4:37:00.000 p.m. - the shutdown of a fan triggers an alert with a priority of 90. This means that the urgency to solve this problem is very high. The fan can however, not be brought back into operation, as a certain replacement part is not in stock and it will be two weeks until it is delivered. Therefore, measures are carried out that should temporarily minimise this problem.
- 04/01/2010 5:13:03.000 p.m. - the WinCC OA operator deescalates the alert by reducing the priority. He does this by assigning another alert class with priority 40 to the alert. This triggers information reports (hotlinks) to all of the connected panels and the changes are saved in the database.
- 04/14/2010 10:13:03.000 a.m. (two weeks later) - the replacement part has been delivered and installed – the fan is functional again.
The change to the alert class has only been carried out for the specific alert that was triggered at 4:37:00.000 p.m., so that the next alert from this fan is displayed with a priority of 90 again. In case the alert that should be modified is not the last, or is in a state other than CAME, the modification is prevented with an error message.
Current mode
The following is given in the alarm/event screen in the current status:
04/01/2010 4:37:00.000 p.m. an alert with priority 90 and color red CAME.
04/01/2010 4:37:00.000 p.m. an alert with priority 40 and color yellow CAME.
04/14/2010 10:13:03.000 a.m. -
Historical polling
During a historical polling of the historical data of this alert, the following results are given:
04/01/2010 4:37:00.000 p.m. CAME alert with priority 90 and color red.
04/01/2010 4:37:00.000 p.m. WENT alert with priority 90 and color red.
04/01/2010 4:37:00.000 p.m. CAME alert with priority 40 and color yellow.
04/14/2010 10:13:03.000 a.m. WENT alert with priority 40 and color yellow.
Example: This is how you escalate an alarm
- Open the alert and event panel, which shows the alarm, whose alert class shall be changed, in the alert row.
- Right-click the row of the alarm to open the context menu.
- Click the Change priority/alert class option.
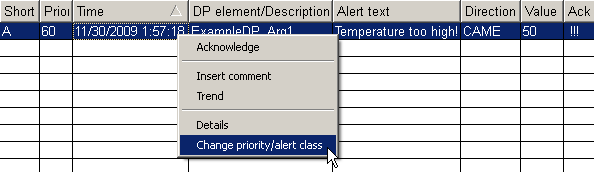
- This opens the following dialog with all available alert classes:
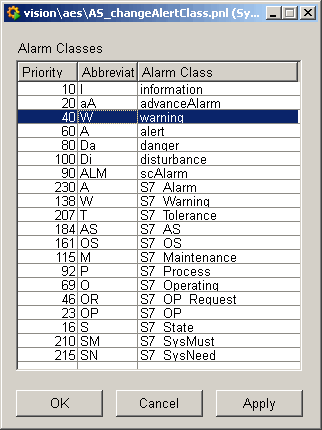
- Here choose the alert class and click on Apply.
- The change of the alert class is displayed in the alert panel by means of the
changed priority, abbreviation, alert color, font and/or alert action (all other
attributes remained the same).

Further requirements and limitations
- No more than 128 modifications may be carried out on any one alert (for example, it is allowed to de-/escalate the alarm at 04/01/2010 4:37:00.000 p.m. from the example above only 128 times. The next alarm on the same fan at 04/01/2010 5:13:03.000 p.m. can be also de-/escalated 128 times).
- It could be, that a WENT alert is still visible, because it must be first be acknowledged so that it goes away. It is not possible to de-/escalate a WENT alert.
- A de-/escalated alert is given a copy of the commentary of the original alert.
In case the commentary is changed, the original commentary nevertheless remains.
Thus, a historical query returns:
04/01/2010 4:37:00.000 p.m. - CAME, priority 90, "Fan shutdown" 04/01/2010 4:37:00.000 p.m. - WENT, priority 90 04/01/2010 4:37:00.000 p.m. - CAME, priority 40, "Fan shutdown; waiting for replacement part" - Only the last alert of a data point element can be de-/escalated.
- Only discrete alerts can be de-/escalated.
- It is only possible to de-/escalate alerts, which are configured with the time range (mode) "Actual".
- It is not possible to poll the times of the alerts, i.e. when they were de-/escalated. Only the times of CAME and WENT alerts are available (these are identical to the times from the times when the alert first appeared). The time of the de-/escalation can however be written in the commentary by the user.
- Only alert classes that do not have the option “acknowledge old alert” checked are permissible.
- The alert classes for the de-/escalation can only differ in the following
attributes:
_alert_class.._prior
_alert_class.._abbr
_alert_class.._color_none
_alert_class.._fore_color_none
_alert_class.._font_style_none
_alert_class.._color_c_nack
_alert_class.._fore_color_c_nack
_alert_class.._font_style_c_nack
_alert_class.._color_c_ack
_alert_class.._fore_color_c_ack
_alert_class.._font_style_c_ack
_alert_class.._color_g_nack
_alert_class.._fore_color_g_nack
_alert_class.._font_style_g_nack
_alert_class.._color_c_g_nack
_alert_class.._fore_color_c_g_nack
_alert_class.._font_style_c_g_nack
_alert_class.._ctrl_none
_alert_class.._ctrl_c_nack
_alert_class.._ctrl_c_ack
_alert_class.._ctrl_g_nack
_alert_class.._ctrl_c_g_nack
_alert_class.._arg_list
Note, that these attributes are not directly connected or polled.
It is connected to:
_alert_hdl.._prior
_alert_hdl.._abbr
_alert_hdl.._alert_color
_alert_hdl.._alert_fore_color
_alert_hdl.._alert_font_style
For the colors and the font, the value corresponding to the status of the alert is assigned (color_c_nack, if the alert is a CAME alert that has not been acknowledged).


