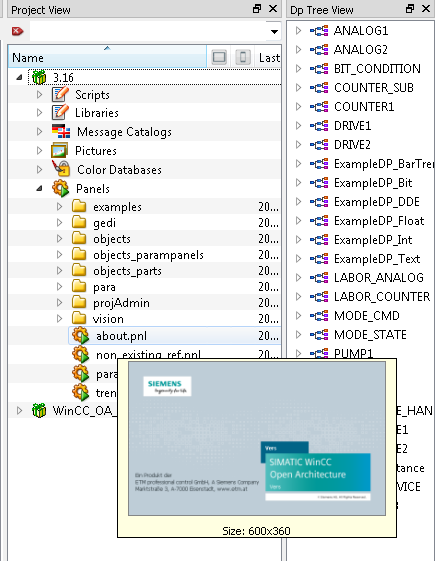
Project View
The project view shows you the panels, scripts, libraries, message catalogues and pictures of your project, embedded subprojects or the WinCC OA installation directory.
Furthermore, the project view offers
-
VCS functionalities (VCS = Version Control System) for a faster version administration of your project files (see Version control).
-
Encryption functions for panels and CTRL scripts/libraries (see Basics on Encryption).
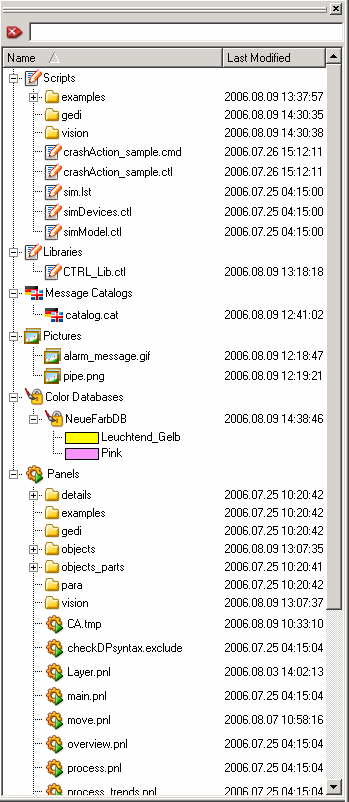
The text field at the top of the view can be used for searching panels, scripts, libraries and other elements of the project in the view. The focus changes to the text field by clicking F3 and selects an already written text.
Panel Search
Panels are searched in the project and version directory. If both formats, *.pnl and *.xml, exist, the *.pnl file is searched. If a file with the same name exists in both - the installation and the project directory- the panel is searched in both directories. If a *.pnl file with the specified name does not exist (neither in the project nor in the installation directory), an *.xml file is searched.
Search for Scripts and Libraries
The scripts and libraries are searched in both - project and installation directories.
Preview Window
Panels and pictures can be shown in a pop-up preview window. This preview will be triggered, while the cursor is located upon a panel or picture.
A double-click (or pressing the enter key) on a panel, script, library or an other element in the project view opens this element automatically and you can edit it.
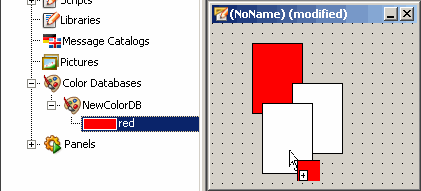
Pictures, colors from the Color Databases and complete panel references can be put via drag&drop directly from the project view onto a panel from the project view onto a panel or shape (see example in figure
The project view allows you to execute different actions depending on the selected option.
Context Menu - Projects
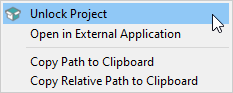
- Unlock Project
-
To make saving multiple changed files within a subproject easier, the subproject itself can be unlocked. Any changed files from the subproject will then always be saved in the subproject.
This behavior can be activated or deactivated with the config entry [ui] subprojectsWritable.
Note:- The operations within the Subproject are limited to saving the files. Other file operations (e.g.: Renaming or deleting a file) are not usable.
- The unlocking functionality is restricted to subprojects and does not include the installation itself.
- In addition to panels, message catalogs, libraries and scripts can be saved in subprojects as well.
- Copy path to clipboard
-
Copies the path of the selected file to the clipboard, e.g. "D:\WinCC_OA_Projects\highSpeedProgramming\scripts\libs\library1.ctl".
- Copy relative path to clipboard
-
copies the relative path to the clipboard, e.g. "scripts\libs\library1.ctl".
Context Menu - Scripts
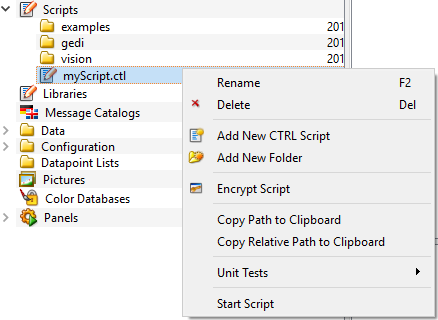
- Add New CTRL script
-
Right click on the area under Scripts and select the option "Add New CTRL script". Specify a name.
Figure 6. Specify a name 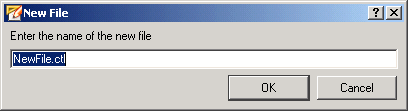
A new CTRL script will be created. To edit the script, double click on the script. The script opens in the script editor.
- Add new folder
- Right click on the area under Scripts and select the option "Add New Folder". Specify the name.
- Encrypt script
-
see chapter Encryption of CONTROL scripts/libraries.
- Copy path to clipboard
-
Copies the path of the selected file to the clipboard, e.g. "D:\WinCC_OA_Projects\highSpeedProgramming\scripts\libs\library1.ctl".
- Copy relative path to clipboard
-
copies the relative path to the clipboard, e.g. "scripts\libs\library1.ctl".
- Unit Tests
-
-
Start test - starts a unit test of this file.
-
Start all unit tests (recursive) - starts all tests, when other tests are linked to the selected test.
-
Start script - starts the selected script.
-
- Examples
-
Start Example - starts an example script from the examples directory.
Context Menu - Message Catalogs
- Add New Catalog
- Right click on "Message Catalogs" and select the "Add New Catalog" option. Specify the name. The Add new catalog option can be used to create a new catalog file and the CTRL function getCatStr() can be used to read out catalog entries. A WinCC OA message catalog contains error messages or descriptions (texts) of a feature. Thus, the error messages and descriptions are not hard-coded. The WinCC OA message catalogs are located in wincc_oa_path\[Version]\msg\[language].
- Message catalog editor
-
Inside the message catalog editor, the first column contains the keyword, which defines the entry. The other columns contain the message text in the respective languages.
Figure 7. Message Catalog Editor 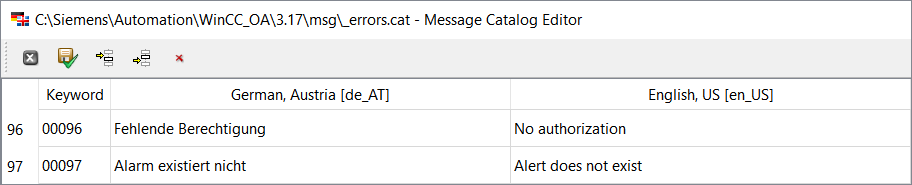
The message catalog is restricted to a string size of 2048 per line. To use longer strings for the message catalog you can use the continuation line syntax, e.g.:
msgKey,this is a looooooooooooooooooooooooooooooooooooooooooooooooooooooooooooooo..\
ooooooooooooooooooooooooooooooooooooooooooooooooooooooooooooooooooooooooooooooo..\
ooooooooooooooooooooooooooooooooooooooooooong message!
The first character of a continuation line must be a space character and is removed automatically.
Icon Themes
Icon themes can be specified as a subdirectories of the pictures directory. The specific icon theme can be defined for the project in the config entry [ui] activeIconTheme or set at runtime with the function setActiveIconTheme(). The currently used theme can be retrieved with getActiveIconTheme()
When an icon theme is active, the lookup order changes. First the UI will search in the icon theme subdirectory, then in the unthemed directories.
E.g.: In case of an icon theme such as "themes/one" and a search pattern "subdir/pic.png", the Ui searches in "pictures/<theme>/subdir.png" first and only then moves to "pictures/subdir/pic.png".
Icon themes can be used for:
- All fillable Shapes, e.g. rectangle, circle, etc. (via the property "fill")
- PushButton (via the properties "fill", "buttonDownPixmap", "buttonUpPixmap")
- Trend area (via the property "backgroundImage")
- Tree (via the methods setIcon(), setIconAdjusted())
- Label widget (via the properties "image", "fill")
- panel (via the property "background")
- Although it is not mandatory, we recommend to create icon theme subdirectories below the pictures/themes directory. E.g. an icon theme called "themes/one" will have a subdirectory: pictures/themes/one
- Icons with the same name in different themes should have the same size. E.g. themes/one/pic.png should have the same size as themes/two/pic.png
- When using non-shared icons (e.g. you uncheck the "shared" checkbox in the fill type selector), then no icon theme will be used and the file will be loaded from the images subdirectory of the panel.
Color Databases
- Add New Color Database
- This option is used for creating personal color databases and color names. You can create and use your own color databases with any color names for your projects. Right click on "Color databases" and select the "Add New Color Database" option. Now you can add a new color using the option"Add New Color". The color editor opens and you can specify new colors (for the description of the color editor, see chapter Properties of graphics objects (Standard tab). The color file is saved in the project directory, for example, "<project directory>/colorDB/".
- Add New Alias
- Aliases are used as color identifiers. You can specify and use an alias name in the same way as you define an RGB code. Aliases are used already e.g. in theIcon catalog.Right click on "Color databases" and select the "Add New Alias" option. Specify the name.
Panels
All project panels are shown under Panels. The option "Show backup panels" (right mouse click) can be used to show the backups of the panels. The option "Open in QuickTest Module" opens a panel in Quick View mode (runtime mode).
Deleting / renaming panels, scripts, libraries, catalogs, pictures, colors
To delete a panel or a script etc. use the DEL-key or right-click on it and select the option "Delete". To rename a panel use the F2 key or right-click on it and select the option "Rename".
Expandability of the project view
The project view can be extended. New columns and contents can be added. Thereby, the following functions can be used: pvAddColumn(), pvAddSeparator(), pvConnect(), pvSetItemText().


