Functionality of the Device Oriented Data Object - Configs
In addition to the value, unit, description etc., there are a number of further properties of a data point element in the automation technology. On the one hand, there are attributes that are only informative. On the other hand, there are attributes which are used to define processing and alerting methods.
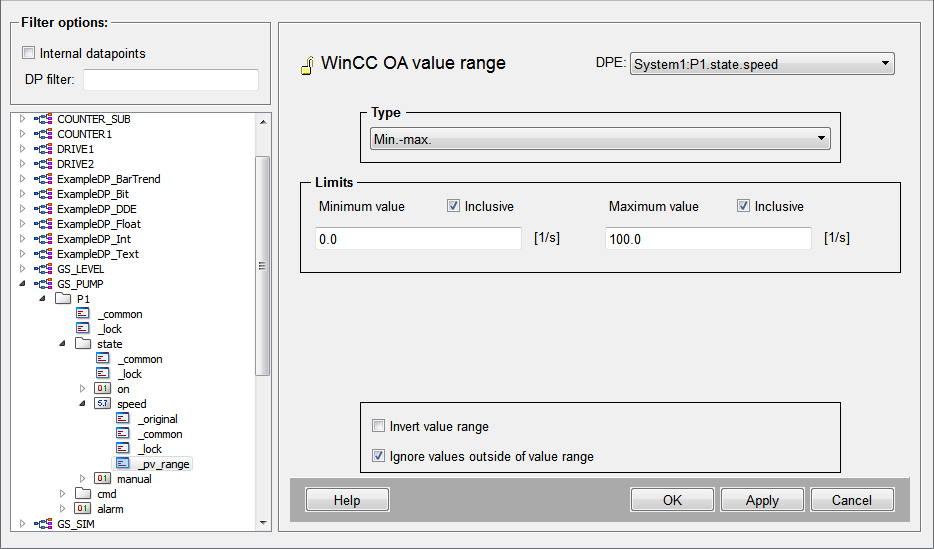
These additional configurations of a data point element are called "Configs" in WinCC OA. The meaning of configs is described in the following example for data point P2. Using configs, a monitored value range is defined for the actual or reference value of the rotation speed and a binary alert handling is defined for the element .alarm.
Therefore, select the element "P2.state.speed" using the mouse, open the context menu by a [rigthMouseClick] and select theInsert config > WinCC OA value range entry. Open the sub structure of ".speed" in the tree view and click on the "pv_range" config in order to set the value range.
Follow the same procedure for the reference value of the rotation speed ("P2.cmd.speed").
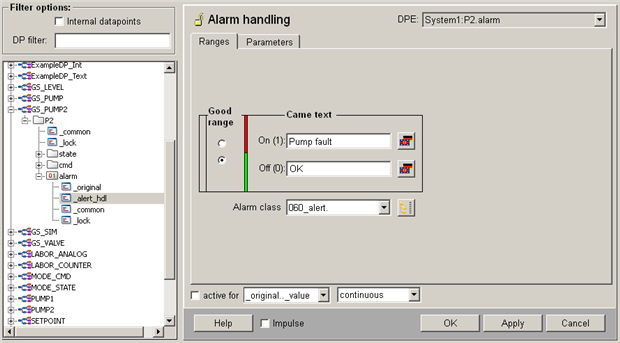
Specify the value ranges as shown in the figure above and configure the alert handling for the data point element "P2.alarm". For detailed description of an alert handling configuration, see chapter Definition of an Alert Handling for a Data Point.
-
Select the data point element "P2.alarm" in the tree of PARA.
-
Select "Insert config" > "Alert handling" in the context menu [rightMouseClick].
-
Open the config structure of "P2.alarm" (double click on the element or click on "+" in front of the element) and select the "alert_hdl" config.
-
Make all the settings as shown in the following figure.
a. Select the alertclass "060_alert“ (alarm of priority 60).
b. Enter the range texts "Pump fault" for the alarm range (1) and OK for the valid range.
c. Select that the alert handling should be executed for the _online.._value".
d. In a final step, enable the alert handling by selecting the check box (Handling active for) in the lower-left corner.
These rules are valid for the data point P2 as soon as those steps are executed - the settings were adopted online and can be tested immediately. Restarting the system is not necessary.
Attempts to enter values outside the enclosed value range [0...100] in the original value dialog of the both speed elements is going to fail now. If the value of the "P2.alarm" element is set to 1/TRUE, the alert state is displayed view in the field alert text of the original value. In the configuration window for the alert handling (see figure above), the Alert state color is shown additionally.
All necessary steps for the direct visualization of the pump P2 in a process display have been performed. If we would work at the level of typical visualization packages, we could proceed with the chapter Creating Process Images - The Graphic Editor. However, to benefit fully from the object orientation, it is advisable to work through the following chapters for creating the data model as well!
Generally, each data point element possesses an individual set of configs. You decide where you need a value range monitoring or an alert handling and prepare the data model accordingly. This way the memory structure is more scalable and the CPU and memory resources are spared.
Even the same elements on the data points of the same data point type can have different configs. This way you can design more flexible structures. However, the engineering load is higher and the clarity is reduced. As a result, this kind of structures are avoided in most cases.
Therefore, there is the possibility to configure all data point instances of a type consistently and centrally by using the master data point.
For more information of possible configs and their attributes, see chapter Data point configs, basics in the online help. For a comprehensive reference table of all configs and attributes, see online help chapter Data point configs.


