Define device types
Before the specific devices for the transmission of errors to the users can be created, the types/media have to be configured for the devices. The devices can also be created in this panel. The creation in this example is, however, described on the next page where also the users are defined (the devices are usually created and assigned when the users for the Communication Center are created)
The following example shows the panel "Device management" that is opened via the ![]() button.
button.
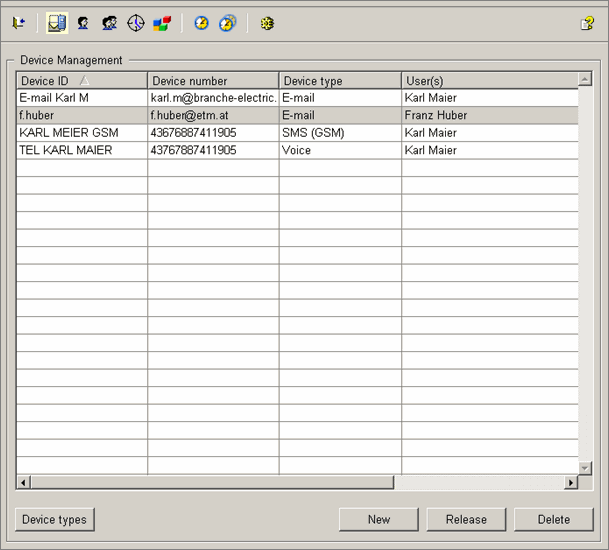
In this panel you can see a panel with the configured devices. The devices can be created using the New button. Normally, the available devices are created when defining users (see also Create users and assign devices). Devices that you define using this panel are mostly devices that can be assigned to several users, this means so called "Pool devices". With the button Release a device selected from the table can be shared again. This means that the affected device is deleted at all users to whom it was assigned and is not available anymore (for example, if a device is broken, it can be set inactive temporarily via click on this button). If the device is shared and should be used for one or several users again, the device has to be added for the user manually. Before you, however, define different devices, the device types have to be created.
For the configuration of device groups use the following panel which is opened by clicking the Device types button.
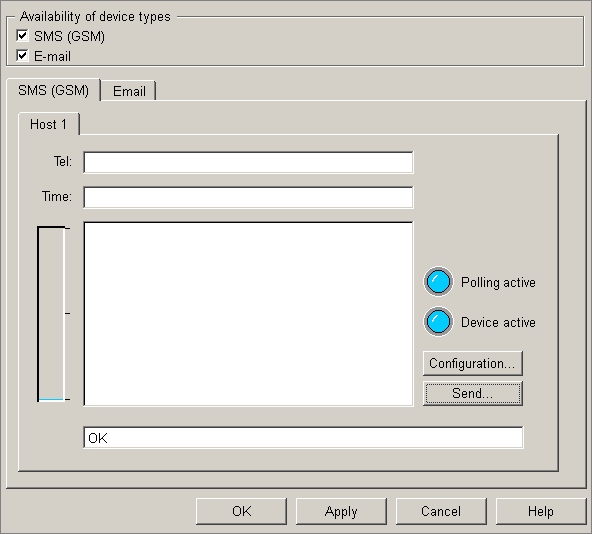
With the check boxes at the top you can define the desired device groups with the associated settings. By activating a check box, tabs, which allow further settings, appear.
After each change of device settings, the CONTROL manager with the script "ccController.ctl" has to be restarted!
The different settings that can be configured for the individual types are already covered via other chapters of this online help. Thus, the possible settings are not described in more detail. Please refer to the specific pages.
-
SMS (GSM)- when sending longer alarm texts (the length is limited to 128 characters) using the Communication Center, the message is divided into several SMSes. The parameter settings for the sending and receiving of SMSes are set via the Configuration... button:
-
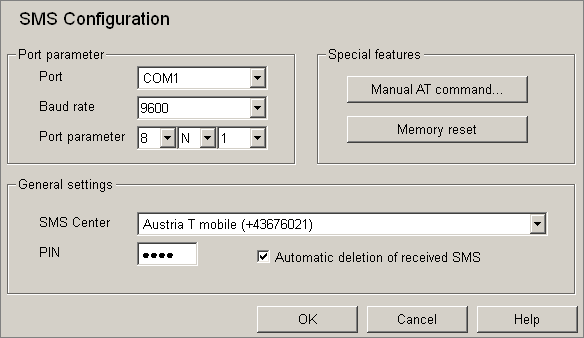
Fore more information on the settings created here, see chapter SMS configuration. If you do not find the number of the SMS center of your provider in the predefined selection, you can define the number in the text line of the combo box (consider the right indication of numbers as shown in the figure above).
If you send texts with special characters using the SMS feature, accent-bearing letters, for example, words with french "Accent grave" or, for example, ä,ö,ü might not be shown correctly when received. Therefore, a character replacement table was implemented. You can find the replacement table under CommCenter_<version>\data\_default_smsTrans.txt". The file is available as of version 3.7. Change the name of this file to the name of your provider, for example, 'SwissCom_smsTrans.txt'. The structure of the file is described in the following:
The first character is the character to be replaced, the second is the character that the replaces the first one, the third is a comment. The fields have to be separated by ':' and no blanks (except as comments) are allowed.
0xDF:0x1E:LATIN SMALL LETTER SHARP S
0xE4:0x7B:LATIN SMALL LETTER A WITH DIAERESIS
0xF6:0x7C:LATIN SMALL LETTER O WITH DIAERESIS
0xFC:0x7E:LATIN SMALL LETTER U WITH DIAERESIS
0xC4:0x5B:LATIN CAPITAL LETTER A WITH DIAERESIS
0xD6:0x5C:LATIN CAPITAL LETTER O WITH DIAERESIS
0xDC:0x5E:LATIN CAPITAL LETTER U WITH DIAERESIS
0xF1:0x7D:LATIN SMALL LETTER N WITH TILDE
0xE0:0x7F:LATIN SMALL LETTER A WITH GRAVE
0xD1:0x5D:LATIN CAPITAL LETTER N WITH TILDE
0xE8:0x04:LATIN SMALL LETTER E WITH GRAVE
0xE9:0x05:LATIN SMALL LETTER E WITH ACUTE
0xF9:0x06:LATIN SMALL LETTER U WITH GRAVE
0xEC:0x07:LATIN SMALL LETTER I WITH GRAVE
0xF2:0x08:LATIN SMALL LETTER O WITH GRAVE
0xC7:0x09:LATIN CAPITAL LETTER C WITH CEDILLA
0x5F:0x11:LOW LINE
The config entry SMSConfirmPrio in the [sms] section, for example, [sms] SMSConfirmPrio = 21 can be used to specify that all alarms with the alert priority less than the config value, are acknowledged automatically after the lapse of the set time period of "Timeout confirmation" (see chapter General settings). Note that the user logged on at the moment has to possess the acknowledgement rights. The message "User <name> has confirmed and acknowleged the alert'" is shown.
The text for an SMS is composed of key words. The text can be adapted via changes in the file "<wincc_oa_path>/CommCenter_version/msg/[Sprache]/cc.cat". The following keywords are used by default: MsgTemplate_Sms,([MsgSessionId]) [AlertDescription] [AlertText] [AlertState] um [AlertTime]. Wert: [AlertValue]. [MsgState] .
Note that when a user does not confirm an alarm via an SMS, the following applies:
-
An alarm is generated
-
Message is blocked (blocking time according to the setting in the CC configuration panel)
-
The system tries to send the SMS with the alarm message to the user1
-
Await the confirmation that the SMS was sent successfully to the User1
-
The message is not confirmed by the User1 -> Timeout for the confirmation runs
-
Message is blocked (block time according to the setting in the CC configuration panel)
-
The system tries to send the SMS with the alarm message to the user2.
-
Await the confirmation that the SMS was sent successfully to the user2.
-
The message was not confirmed by the user2 --> timeout for the confirmation runs.
-
The whole process restarts with the step 2.
-
E-mail- When using this device type, the following settings should be defined on this tab:
Figure 3. Device Types - E-mail 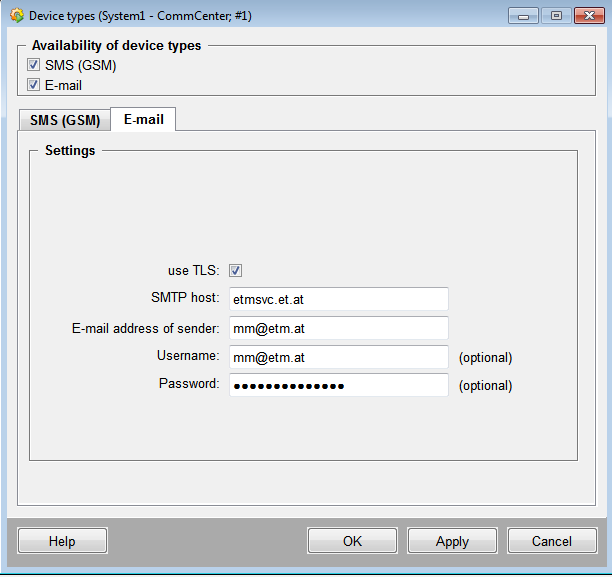
The check box "use TLS:" specifies that encryption and authentication is used for the SNMP (The /bin/Sendemail.exe is used ) . Enter the host name of the SMTP server in the text field (either by specifying the IP address, for example, 192.168.140.65 or by specifying the host name, for example, etmsvc.etm.at) as well as the email address of the sender (for example, mm@etm.at) and the password. Optionally also the domain name/IP address of the client can be specified and serves for the identification of the client on the server (SMTP host and email address of the sender have to be entered so that the sending of a message works).
For the example configure the device types E-mail (adapt the specific settings to your configuration for sending and receiving of e-mails).
When you confirm an alarm via SMS, note that you have to send back the whole eight-digit code consisting of the user pin + the received confirmation code.


