Start and stop project
The console panel allows to start and stop a selected project. The following buttons are used for this purpose:
![]() Start project.
Start project.
![]() Stop project.
Stop project.
These buttons are also available in the Project Administrator and start and stop a
project (the console panel is automatically opened). A project is stopped by the Pmon
(the Pmon stops the single managers of the project). When a project is started
successfully the registry key "actualProject" is set in the
pvssInst.conffile.
When the project is running the state and error messages are shown via the log viewer. The log viewer is opened automatically when the project is started. For more information on the log viewer see chapter Log Viewer.
To start multiple project consoles, it is possible to open them separately using the start menu.
Note that a project cannot be started if a network connection is not available. This is a Windows problem and can be solved by activating the DNS caching!
If you want to start a project with other settings use some of the following options:
-
A separate project can be registered for each config file (the proj_path entry can be the same in all config files).
-
The additional settings can be saved in an additional config file and can be loaded with the new option +config. See chapter Configuration file for more information on the config option.
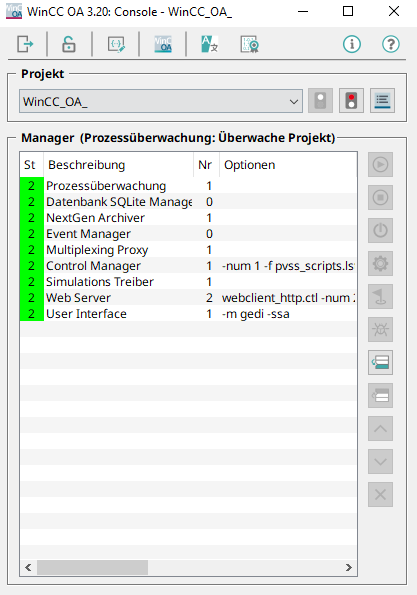
The connection between the managers in the console panel is shown graphically (first column in the start list):
| Display | Status of the connection |
|---|---|
| White | Manager does not run - Manual start is configured. |
| Red | Manager does not run - automatic start configured |
| Yellow | Manager starts |
| Green | Manager was started successfully or runs already - connection exists |
| Red-yellow blinking | Connection error between the managers or manager was stopped early |
| Violet | Manager blocked - no alive sign since 30 seconds |
| Blue - yellow blinking | The manager was restarted too often within the allowed time and is not restarted longer |
| Gray |
The console has lost its connection to the PMON. The same behavior occurs if WinCC OA has been started as a service and is terminated over the service (e.g. for Linux "/etc/init.d/WinCC_OA stop"). Thus, in all consoles that are still open the state "0 / gray" is displayed. Since the WinCC OA console has lost the connection to the PMON, the information displayed (e.g. project started or stopped) is no longer valid. Therefore, the console must be stopped and restarted. |
If a manager/driver is not started via the WinCC OA console but via the command line, make sure that the right WinCC OA project is specified for the manager/driver. This can be done by setting the appropriate environment variables or by specifying the appropriate command line options. The project can be specified via the -proj/-PROJ name option. How to specify the project when starting a manager via the command line is described in detail in the chapter Administration of managers.
Note that the -currentproj (for more information see chapter Administration of managers) is not user specific when there are several users on one computer. When e.g. the user X starts the project A and user Y starts the project B and user X starts afterwards with the option -currentproj not the current project of user X (project A) but the project that was started last (project B) is started. This can be prevented under Linux when each user sets his own PVSS_II_ROOT.
How to start a project
-
Open the console panel.
-
Select a project from the appropriate combo box. The start sequence of the managers (of this project) is shown in the manager section.
-
Click on the "Start project" button to start the selected project. The managers are started in the specified order and the connection statuses are shown. Note that when the console is opened the project that was started last, is shown.
A configuration where several WinCC OA projects are running on the same computer is unfavorable and thus not recommended. Note that you bear the responsibility for several WinCC OA projects running on the same computer.
Note that it is possible to speed up the project start. Define the entry waitTimeForBGStart in the [data] section of the config file. Via this entry the DataBG is started first after the initialization of the managers. The DataBG unburdens the Data Manager and takes care of operations, which are not time-critical. With the command line option -noDataBG the Data manager can also be started without the DataBG.
Some managers are started parallel when the project is started (e.g. archive managers). Thus, the project is started faster!
If WinCC OA does not start, check if the following environment variables (Start > Settings > System > Environment variables) are set correctly:
-
PATH=<WinCC OA installation directory>/bin;<PATH until now>
-
PVSS_II_HOME=<WinCC OA installation directory>
If the Event manager is stopped, you cannot access the database. This means DPs cannot be changed. Note also that the Event manager does not reconnect.
SPLASH SCREEN
In the figure below you can see the standard WinCC OA splash screen. The splash screen can be changed. See the description further below and in the chapter Branding of the WinCC OA MSI Installation. Note that the if you are not branding your product, change the slash screen as described below.

WinCC OA provides the possibility to change the WinCC OA splash screen.
The system searches for a file "splashscreen" with the endings .png, .xmp and .bmp in all pictures directories (hierarchical search). If a file is not found, a hardcoded WinCC OA file is used.
How to stop a project
-
Click on the "Stop project" button in the console panel to stop a running project.
-
A confirmation request is shown. Confirm it with Yes. All running managers beginning from the last one until Pmon are stopped properly.


