Change project properties
A chosen project in the project administrator panel can be edited afterwards. Via the panel you can edit different settings of an existing project afterwards.
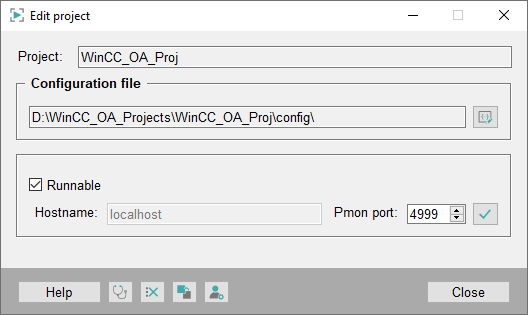
The following information of the current project is shown:
- Project name
- The path of the configuration file (<proj_path>/config/config).
- Display if the project is runnable. This means that all directories and files for the start of the project exist. A sub project (e.g. info server) would not be runnable alone.
- The host name on which the project runs.
- The port number of the PMON. This number can be changed afterwards. The settings are applied via the button for changing the port number on the right next to the spin button.
For administration of several projects in the Project Administrator panel or in the console several port numbers must be assigned to the projects. A PMON with a specific port number can only serve one project! If you select a project with the same port number as the running project a pop-up window informs you about this state.
The different configuration files
config,config.level,config.redu
etc. can be edited with the aid of a text editor. A file selector is opened by clicking
the button on the right next to the config file path. The selector allows to select an
arbitrary config file from the directory<proj_path>/config/. The
config files are subdivided into sections. The headings of the sections are included in
brackets. The sections contain central settings of WinCC OA. Further
configuration files are used for announcement of CTRL libraries for different managers
(<proj_path>/config/config.level). More
information on the configuration file and on the different sections see chapter Reference tables - Configuration file and To load a Control
library.
When a project is running no other settings in the project except the config files can be changed. When a project is running config files should, however, only be changed by advanced users!
The buttons in the lower part of the panel provide the following functionality:
 Opens the WinCC OA
Diagnostic Tools.
Opens the WinCC OA
Diagnostic Tools.
- Deletes all log files in the directory
<proj_path>/log/. Before the log files are deleted a confirmation is required. If a log file is locked (meaning a manager writes at that time to the file) the log file cannot be deleted. In this case an indication of the log file that could not be deleted, is shown in the log file<wincc_oa_path>/log/PVSS_II.log.  Integrates sub projects in the existing project. See Include subprojects.
 -
 Creates or changes the password
for the project. If no password was specified the text fields Old project
user and Old password are grayed out.
Creates or changes the password
for the project. If no password was specified the text fields Old project
user and Old password are grayed out.
Include subprojects
Sub projects can be included in an existing project via its own panel. Subprojects mostly are not executable alone and have to be included in an executable WinCC OA project (also complete executable WinCC OA projects can be included in an existing project). After including, all files (e.g. panels, scripts) of the included project are available in the project the project was included in. The entries in the config file (proj_path = "...") are executed automatically. The panels of the sub projects are found in the search order bottom up. This means that when there are two sub projects SubProj_1 and SubProj_2 and the project SubProj_1 is shown as first project in the sub projects panel the panels of the SubProj_1 are found first.
Note that when you include several sub projects in the main project the sub projects are saved in the config file in the reverse order (than in the panel). This, however, does NOT affect the importance order of the projects.
The config file of sub projects (= not executable) is not relevant for the higher level project. Thus a sub project may not contain any own (cascaded) sub projects!
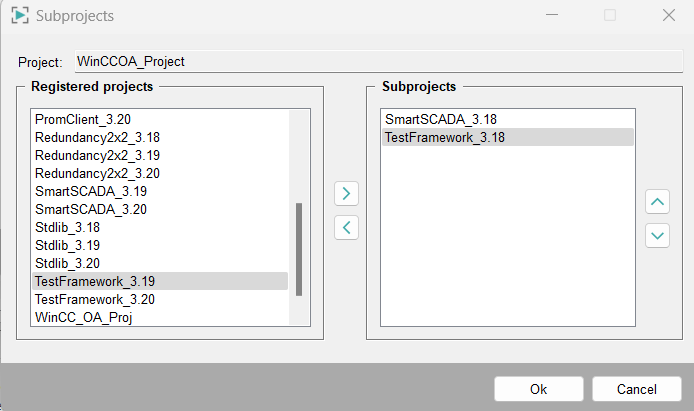
Choose a registered project/sub project (for more information on registering a project see chapter Register project) and add it to the sub projects on the right side. The sub projects for addOns are registered automatically when the WinCC OA is installed. Furthermore, you can remove projects that were added in the same way. The projects can be added or removed via the arrow buttons. All registered projects that are listed in the project administration panel are shown as well as the registered projects that are indicated as "not executable". If sub projects are included in an existing project an entry that specifies the <proj_path> is automatically added into the [general] section of the config file. The order of the sub projects belonging to the project can be changed via the arrow buttons on the right side (move up/down).
If a project that contains sub projects is updated, the suffix of the sub projects in the config file must be adapted or the current sub projects must be selected via the project administration. E.g. SmartSCADA_3.18 -> SmartSCADA_3.18.
Change user and password
The user and the password for a WinCC OA project can also be changed afterwards.
The user and the password in a project are not related to the user and password in WinCC OA. These set user and password are only used by the Pmon for authentication.

If you have already assigned a user and a password enter these in the two upper text fields (Old project user, old password). Enter a new user, a new password and the confirmation for the password and apply the settings.
You can only save one user/password pair! You can also enter an empty password!


