Administration of managers
The managers are added and the invocation parameters and the start sequence of the managers are set directly via the console panel. The associated managers and their start sequence with the call parameters are shown after selecting a project. The buttons for changing specific settings of a manager were already described in the chapter Console panel.
Add a new manager
The programs listed in the manager part of the console are started by default. Further managers can be started as follows:
- It is not possible to add a manager to the list before a running manager! A manager can, however, always be added to the end of the list!
- The maximum number of managers that can be added is 100.


- Click the Insert a new manager button (inserts a manager to a specific position)
or Append a new manager button (adds a new manager to the end of the manager
list) in the console panel. The following window for selecting a manager is
shown:
Figure 2. Append a new manager 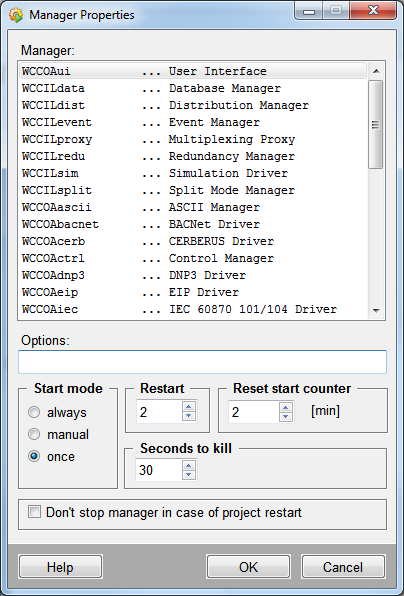
- Select a manager from the list.
Note:It is not allowed to add more than one Multiplexing Proxy manager to a project!
- Set the desired call parameters of the manager in the Options field. The
single managers can be started with optional call parameters. Valid call
parameters for all managers are e.g. (see table)
Note:
The options that are used to specify a WinCC OA project may not be set in the console since they are set implicit when a manager is added to the manager list. These are the following options:
- proj name
- config filename
- currentproj
One of these options has to be specified when a single manager or the Pmon is started explicit (e.g. via the command line or a link) and are listed in the following:
Parameter Description -help Shows all available command line options. -version Prints the own version number and creation date. -proj/-PROJ name Specifies the project via the project name the project was registered with. (beginning from the WinCC OA version 3.0 all projects have to be registered with a unique name). This can be set global via the environment variable PVSS_II_PROJ. The option '-proj' ,however, takes priority. The specified '-proj' option overwrites also the environment variable PVSS_II. If neither '-proj' nor '-config' is specified the environment variable PVSS_II is read first. If it is not specified the environment variable PVSS_II_PROJ is read. When '-proj' and '-config' are specified a check whether they match is executed and the manager start is canceled in case of errors.
'-PROJ name' (old notation), corresponds to the option '-proj name'
-config filename Specifies the project via the project configuration file. This can be set global via the environment variable PVSS_II_PROJ. The '-config' option takes priority. When the '-config' option is specified it overwrites the environment variable PVSS_II_PROJ.
The file name has to have the following format:
'<Project root>/<Project name>/config/config' and has to be assigned exactly to one registered project name.
Projects can also be registered on the fly in connection with the '-config' option. The option '-autoreg' registers the project if it is not registered yet and '-autofreg' deletes an existing registration and registers the project newly. For more information on these options see chapter Register project.
Caution!
The environment variable PVSS_II was set system-wide by the console. Beginning from the version 3.0 it is not set anymore. See option '-currentproj'.
-currentproj Specifies the project that was started last. The project that was started last is noted in the registry file by the Pmon when one manager (or all managers are started) of the console is started. The project that was started last can be started with the manager option -currentproj as follows:
WCCOANV -currentproj -p vision/login.pnl
Caution!
The environment variable PVSS_II was set system-wide by the console for a similar purpose up to now. Beginning from the version 3.0 this concept is replaced by the option '-currentproj'.
The environment variable PVSS_II can, however, also be set to the value '-currentproj'. Thus, each manager is started with the project that was started last. If the project that was started last is not found the installation is used as project. This is relevant if a single manager or the Pmon is started explicit e.g. via a command line or via a link and none of the options '-config', '-proj' or '-currentproj' is specified and neither the environment variable PVSS_II nor PVSS_II_PROJ is set. In this case the manager would not start at all since it would not know with which project to start. Thus you can always specify the option '-currentproj'. In order to avoid the specification of the option each time the environment variable PVSS_II or PVSS_II_PROJ can be set to '-currentproj'. Thus, you do not have to specify the project when starting a project via a command line. If another project is started in the console the manager in the command line dynamically switches to the other project without having to specify an extra option.
Note that the '-currentproj' option is not user specific when there are several users on one computer. When e.g. the user X starts the project A and user Y starts the project B and user X starts afterwards with the option '-currentproj' not the current project of user X (project A) but the project that was started last (project B) is started. This can be prevented under Linux when each user sets an own PVSS_ROOT environment variable.
-user username[:password] Sets the user the manager is running under by specifying the password. The current user specifies the authorization for different activities. Overwrites a user specified with other methods (environment variable and config file). -event [hostname] [:portnumber] Connects the called manager to the Event manager on the specified computer and/or to the specified port number. -data [hostname][:portnumber] Connects the called manager to the Data manager on the specified computer and/or to the specified port number. -distributed {0,1} Has the same functionality like the distributed config entry (see Configuration file for distributed systems). This option is meaningful when the manager number is not given.
0 - local system
1 - two systems (distributed system)
-num managernumber Invocation of the manager with the manager number. -helpdbg Shows the possible dbg levels of the manager. -log [+-][dp|file|stderr] Activate (+) and deactivate (-) different status and error outputs on the internal DP, on the log file or the standard output. -report all Prints all information of a manager. Also the number and type of the configs are shown in the log viewer. -pmonIndex If the manager is started via command line or link, proceed as follows to show the manager state in the console.
Create the appropriate manager in the console (e.g. UI) and pass the matching pmonIndex when starting the manager via command line. The pmonIndex is counted from top to bottom in the console, starting with 0. Note that the pmonIndex is not the same as the value in the smhIndex column (pmonIndex = smhIndex-1).
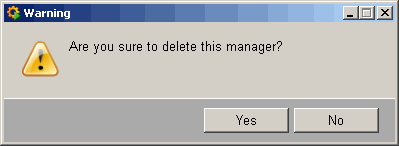
The user interface manager (WCCOAui) can be started using a desktop shortcut. Therefor a new shrotcut with the following oath must be created:
- Windows: <wincc_oa_path>\bin\WCCOAui.exe -proj <projName> -p <panelName> [ + additional optional parameters (see above)]
- Linux: <wincc_oa_path>\bin\WCCOAui -proj <projName> -p <panelName> [ + additional optional parameters (see above)]
Due to the manager not having information about the parameters assigned in the console, all necessary parameters must be declared within the shortcut path.
For more information on the call parameters of single managers see chapter Manager options, basics!
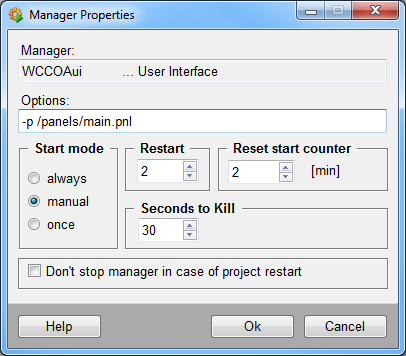
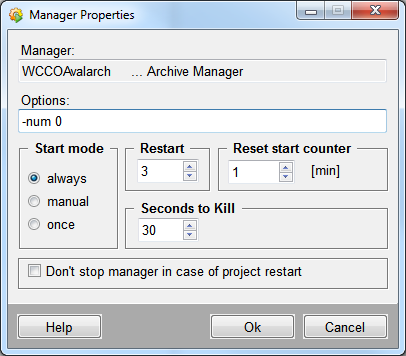
- Specify the other properties Start mode, Restart, Reset start
counter and Seconds to kill. These properties are also set in the
progs file for the Pmon (see also Functionality of the Pmon). These options are described in the
following:
- Start mode: Activatemanualif you want that the particular manager is not started automatically. The manager is started only when you start it manually via the button in the console. The optionalwaysrestarts the manager immediately when a project is started or after crash/stop.Oncestarts the manager only when a project is started (not later). When you add the managers UI, VISION or ASCIIthe start mode is automatically set toonce.When adding other managers the mode is automatically set toalways.
- Restart: Specifies how often a manager is restarted (at most) within the set minutes ofReset start counterafter the manager was stopped or crashed. Note that the number of restarts have to be 1 or above.
- Seconds to kill: Time in seconds which is awaited if a manager of a project is blocked to send a SIGTERM (signal termination) before SIGKILL (signal kill) will be sent.
- Don't stop manager in case of project restart: Does not stop the selected manager when the project is restarted (e.g. the UI Manager is not restarted in a redundant system if an Archive Manager crashes).
First when status of Pmon changes to "Monitor project" the project and all the running managers are definitely monitored. This means that depending on the settings of the manager properties the manager is immediately restarted after a crash.
- Click on the OK button to add the manager with the settings to the console. Cancel closes the panel without applying the settings and without adding the manager.
The maximum number of started managers is 100. A higher number can not be achieved. Depending on the started manager types the maximum number under Windows can be reached with less managers started due to Desktop heap issues. To start a higher number of managers a registry key can be modified to gain a higher number (see problem solution for issue 2 (Desktop Heap)).
Adding a manager per drag & drop of a file
By dragging a file of the GEDI ProjectView and dropping it to the manager list in the console it is possible to add the appropriate manager automatically (CTRL manager for runtime CTRL script, UI manager for a panel). After dropping the file the property panel of the manager is opened. The dropped file is automatically defined as starting option of the manager.
Please note that a manager can only be added for panels or runtime CTRL scripts of the project or ta sub project. If you drop a file from out of the project a warning is displayed.
Change start sequence
In order to change the start sequence of the managers of a WinCC OA project there are two buttons in the console. The start sequence of the single selected managers can be changed (the manager can be moved up and down) via the arrow buttons.


Change the start sequence in your project as follows:
- Choose the project that should be edited from the Project combo box in the console panel.
-
Left click on the manager whose start sequence you want to change.
Note:The selected manager and all managers after the selected manager (in the start sequence) should be stopped so that the sequence can be changed. If the managers are not stopped the buttons for change of the sequence are deactivated. -
Click on the button with the arrow upwards when the manager should start earlier, click the button with the arrow downwards if the manager should start later.
When you change the start sequence of the managers consider that the Data manager has to be started as first!
Delete manager from the start list
A manager can be deleted from the start list in the console via a defined button. Delete a manager as follows:
- Left click the manager you want to delete in your project.
-
Left click the Remove selected manager button.
-
Confirm the deletion with Yes or click No to cancel the deletion.

The selected manager and all managers after the selected manager (in the start sequence) should be stopped so that you can delete the manager.
Change the manager properties
The settings of a manager (e.g. call parameters, start mode, restart,...) can also be changed afterwards. The properties of a manager can be changed by choosing a manager in the console and by clicking the button Change manager properties. A panel is opened and the properties of a manager can be changed. You can alternatively click the manager twice.

The settings in this panel are the same as those described in the paragraph Add a new manager.
Start and stop a manager
The managers of a chosen project can also be started and stopped separately via the appropriate buttons in the console.


Left click a manager in the project to select it and then click one of the buttons above. The first button starts a manager manually, the second sends a SIGTERM to the manager and stops it (saves and closes the data) , the third button sends a SIGKILL to the manager and forces the manager to stop (data are not saved).
- The script for administrating managers (starting/stopping) needs about 30 seconds to verify which manager must be started when starting the system.
-
The manager for using a redundant or split project (WCCILredu & WCCILsplit) can not be started inside a non redundant project.
-
The manager for using a distributed system (WCCILdist) can not be started in a non distributed project
User specific registry
As already described the -currentproj option is not user specific when there are several users on one computer. When e.g. the user X starts the project A and user Y starts the project B and user X starts afterwards with the option -currentproj not the current project of user X (project A) but the project that was started last (project B) is started. This can be prevented when each user sets an own environment variable PVSS_II_ROOT. Thus, via the environment variable PVSS_II_ROOT the "registry" directory and the file (default is pvssInst.conf located in C:\ProgramData\Siemens\WinCC_OA or etc/opt/WinCC_OA) can be changed.
Note that when the registry of a user is changed the user has to have writing rights for the registry file and for the directory. The registry is changed as follows:
setenv PVSS_II_ROOT /Directory name
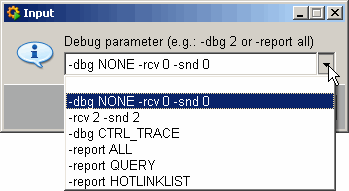
Debug information
When managers are running it is possible to use commands like -report all via the button Activate debug flag(s). A pop-up windows is opened and commands like -snd, -rcv or -report can be entered. These commands return debug information when projects are running. 6 debug levels are already available in the combo box. For more information on the debug levels see chapter Manager options, basics