Console panel
The console panel allows to start/stop created projects as well as to change properties of selected managers. To open the console panel, following options are available:
Graphical user interface
Open the console panel via
-
Windows: Start > Programs > Siemens Automation > Runtime Systems > WinCC OA 3.18 > WinCC OA Console
-
Linux: Applications > WinCC OA 3.18 > WinCC OA Console
or via the Open project console & start pmon button in the Project Administrator panel
-
Windows: Start > Programs > Siemens Automation > Runtime Systems > WinCC OA3.18> WinCC OA Project Administration
-
Linux: Applications > WinCC OA 3.18 > WinCC OA Project Administration
Console
Under Windows as well as Linux, the console panel can also be startedt from the command line using following command:
<wincc_oa_path>\bin>startConsole
See chapter Project Administrator panel for description of the buttons used to open the console panel via the Project Administration panel. Some buttons in the console panel have the same functionality as described in the chapter Project Administrator panel.
When using Windows, it is required that the user is a member of the standard "power users" group.
-
For switching the language you can use the "Switch language" button of the console panel.
-
In order to start WinCC OA processes from a command shell under Linux, the PATH variable has to contain a reference to the bin directory of the WinCC OA version. Additionally, an entry within /etc/ld.so.conf has to point to the bin directory of the WinCC OA version.
If the Event manager is stopped, you cannot access the database. This means DPs cannot be changed. Note also that the Event manager does not reconnect.
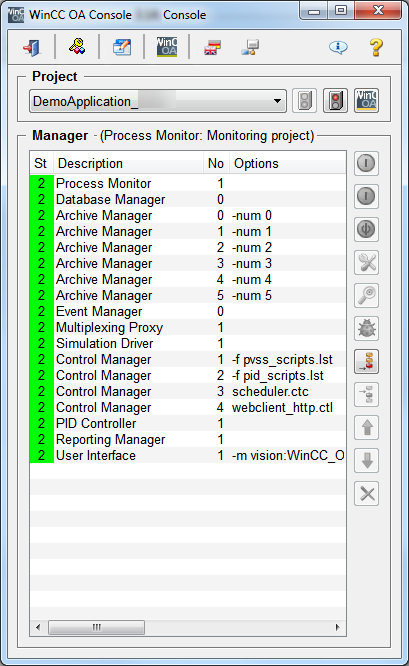
The WinCC OA version is shown in the heading of the console. When the console is opened the first running project is shown (see option -currentproj). If no project is running the project that was started last is shown. Choose a Project that should be started/stopped or edited, from the combo box. If another project is selected from the combo box the project started before is not stopped. The console allows to administer/edit several projects simultaneously although a project is running. Thereby, note that the different projects have to run with different port numbers (the port numbers can be set via the Change project properties button of the Project Administrator panel). In the lower part of the console the managers of the project as well as the associated manager number are shown. The status of the managers is visualized by the use of different colors. Further settings of the managers (e.g. command line options, start time, start type, ...) are shown when you scroll right. Also the process monitoring manager (Pmon) is shown in the list of managers. The manager list shows the mode of the Pmon. Also several consoles can be opened with the same project. The consoles communicate with the same Pmon.
Note that the ports used by WinCC OA have to be open (firewall).
If you select a row/manager in the console and the row disappears from the visible area (e.g. by scrolling down to the end of the manager list) this row will be visible again after the refresh (every 2 seconds) of the manager table.
The settings of a project in the console (manager, start type, command line options, ...) are saved in the progs file (see also Functionality of the Pmon). This file should only be edited via the console.
The Pmon cannot be stopped via the console! The Pmon is stopped first when the whole project was stopped and the console panel was closed. When the whole project is stopped via the Project Administrator panel also the Pmon is stopped (see also Project Administrator panel).
The settings of a project can be changed via the following buttons of the console:
![]() To protect projects
against unauthorized access the project can be provided with a user and a password
(see also Create
project). Via a click on this button the buttons and context menus of the
console can be set to inactive (the buttons Open Log Viewer, Online Help, About and
Close console can be used although the console is locked. Click the button once more
to unlock the console. When you unlock the console the user and password for the
specific project are requested. If a password was defined once the password is
requested always when the project is started. When the project was started it can be
locked without specifying a password since the password was already specified.
To protect projects
against unauthorized access the project can be provided with a user and a password
(see also Create
project). Via a click on this button the buttons and context menus of the
console can be set to inactive (the buttons Open Log Viewer, Online Help, About and
Close console can be used although the console is locked. Click the button once more
to unlock the console. When you unlock the console the user and password for the
specific project are requested. If a password was defined once the password is
requested always when the project is started. When the project was started it can be
locked without specifying a password since the password was already specified.
![]() Opens the config
file for editing. When a project is running the file should only be edited by
advanced users.
Opens the config
file for editing. When a project is running the file should only be edited by
advanced users.
![]() Opens the Project
Administration panel. See also Project
Administrator panel.
Opens the Project
Administration panel. See also Project
Administrator panel.
![]() Switches the language at run time in a multilingual project. All project languages
can be selected.
Switches the language at run time in a multilingual project. All project languages
can be selected.
![]()
Allows to read out the hardware code. You need a hardware code for the fixed UI and PARA Licensing. See chapter Fixed UI and PARA Licenses.
![]() Starts the selected
project.
Starts the selected
project.
Note that a project cannot be started if a network connection is not available. This is a Windows problem and can be solved by activating the DNS caching!
![]() Stops the selected
project. The Pmon of the specific project is, however, not stopped.
Stops the selected
project. The Pmon of the specific project is, however, not stopped.
![]() Opens the log
viewer. See also Log Viewer.
Opens the log
viewer. See also Log Viewer.
![]() Starts a selected
manager after it was created or if the manager has to be started manually.
Starts a selected
manager after it was created or if the manager has to be started manually.
![]() Stops a selected
manager. A SIGTERM is sent to the manager via this button (Normal stop, kill
-15).
Stops a selected
manager. A SIGTERM is sent to the manager via this button (Normal stop, kill
-15).
![]() Stops a selected
manager. A SIGKILL is sent to the manager via this button (stop is forced, kill
-9).
Stops a selected
manager. A SIGKILL is sent to the manager via this button (stop is forced, kill
-9).
![]() Opens a panel, which
allows to change the properties of the selected manager. See also Administration of managers.
Opens a panel, which
allows to change the properties of the selected manager. See also Administration of managers.
![]() Opens a window for activating a debug flag for a selected manager (e.g. dbg 2,
-report all). Note that when you assign a debug flag to a manger, the manager has to
run. See also Administration of
managers. The information (of report all ) is also shown in the log
viewer of the project. When you assign a debug flag the dbg file (contains the debug
flags that were assigned) is saved in the log directory of the project.
Opens a window for activating a debug flag for a selected manager (e.g. dbg 2,
-report all). Note that when you assign a debug flag to a manger, the manager has to
run. See also Administration of
managers. The information (of report all ) is also shown in the log
viewer of the project. When you assign a debug flag the dbg file (contains the debug
flags that were assigned) is saved in the log directory of the project.
 Opens the CTRL Debugger Panel. Control (CTRL) and
UI managers can be debugged.
Opens the CTRL Debugger Panel. Control (CTRL) and
UI managers can be debugged.
![]() Adds a manager to
the end of the list.
Adds a manager to
the end of the list.
The length of a manager name is limited to 19 characters.
![]() Adds a manager to
the selected position.
Adds a manager to
the selected position.
![]() Moves a selected
manager one line up.
Moves a selected
manager one line up.
![]() Moves the selected
manager one line down.
Moves the selected
manager one line down.
![]() Deletes a selected
manager from the list.
Deletes a selected
manager from the list.
The last four actions can be executed only when the selected manager is stopped and no manager with a later start sequence is running! In addition, moving a manager one line up is only possible if the manager above is stopped. If the entire project is stopped, these actions are available without restrictions. Refer to Administration of managers for further information.
If you want to add own managers to the console and the managers are not named WCCOA*[.exe] you have to add the managers manually to the progs file in proj_path\config.
If you have created a project with the panel topology and want to open the base panel of the project, click the option Tools -> Start RunTime (<project_name>) of the GEDI menu to open the login panel (see also Panel topology/Group alert example).
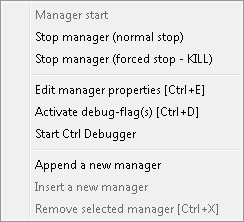
The functions available via the buttons are also available via a context menu in the console. Right click on an arbitrary manager to set settings of single managers via this context menu. Also hotkeys are available. These allow to open the single panels for the administration of the managers (e.g. Ctrl-L to lock the console, Ctrl-D for activating debug flags etc.). These hotkeys are visible in the tooltips of the buttons, in the context menu and in the heading of the particular panel.
There is a separate button for closing the console (see also Standard buttons of the project administration). The project is not stopped although the console is closed.
The hotkeys used for opening single panels via the console panel are only available under Windows!