Project Administrator panel
There is the entry Start > Programs >Siemens Automation > Runtime Systems >WinCC OA <version> > WinCC OA Project Administrator menu for the project administration in WinCC OA under Windows. The Project Administrator panel is opened. Under Linux use the following command to start the panel:
<wincc_oa_path>\bin>startPA
This command can also be executed under Windows to open the Project Administrator panel. Like under Windows the panel can be started via the entries of the start menu (as described above). If you use the graphical interface KDE under Linux, you can also find entries in the start menu for opening the Project Administrator panel.
Note that the projects are searched under Linux in /etc/opt/WinCC_OA/pvssInst.conf by default. The Windows version of WinCC OA uses the file pvssInst.conf which is located under C:\ProgramData\Siemens\WinCC_OA. This file must not be edited or removed manually and will not be deleted when removing WinCC OA! If the variable PVSS_II_ROOT, is set, the projects are searched in this path (and shown in Project Administrator panel).
The Project Administrator panel is located in the directory
<wincc_oa_path>/panels/projAdmin/project_admin.pnl .
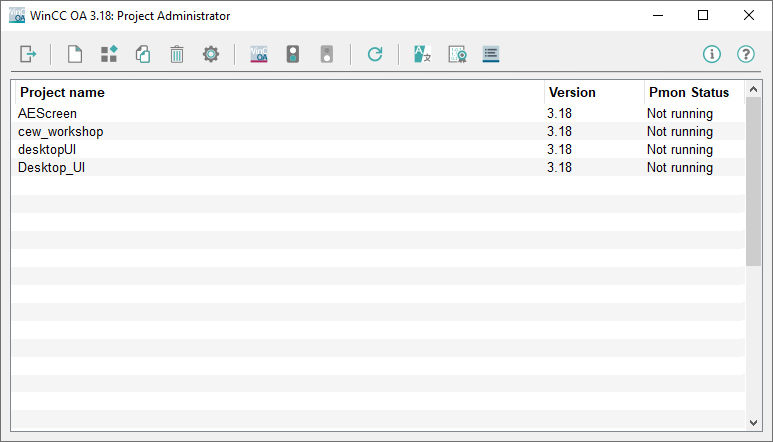
The panel shows an overview of the created and registered projects of the current WinCC OA version (the list of older projects is displayed with a doubleclick). The Project name, WinCC OA Version the project was created with and status (Running, Not Running, Unchecked) of the Pmon that handles the particular project are shown. When opening the panel a list of the projects is presented and the project statuses are checked.
Note that information on a project can be shown (via the project administration panel) although it may be protected via a password. The protected project can, of course, not be managed. The remove functionality can be activated so that another project can be removed.
The erroneous projects (e.g. if the project directory was removed via Windows Explorer but is available in the Project Administration or an erroneous config entry is available in the config file) are detected and shown in a list when the Project Administration is opened. The message "Error reading the project list! Would you like to correct the invalid projects?" is shown and you can correct the config file of the erroneous project (via the button down right) or remove the erroneous project (via the button with the waste paper basket symbol). Note that when editing the config file you have to set the name config in quotation marks "Config" (in the notepad) since otherwise the file is saved as a text file. Under Linux the file in Vi has to be specified with an absolute path (e.g. w:/<proj_path>/config/config).

The error message: "Missing or erroneous progs- or config file!" when selecting a project, is shown because of the following reasons:
1.) A wrong "wincc_oa_path" was entered into the config file. Check the config file of the project and set the right "wincc_oa_path" when needed.
2.) The progs file in the <proj_path>/config/ directory is erroneous or is entirely missing. Copy a backup of this file to the <proj_path>/config/ directory or copy the file from the version (<wincc_oa_path>/config/progs) into the directory <proj_path/config/>. Afterwards the manager settings should be configured newly if needed. This should, however, only be done by advanced users!
The reason of the error is also written in the WCCILpmon.logfile inwincc_oa_path/log.
The functionality of the buttons is described in the following:
![]() Opens a panel for creating a new
project. See also Create project.
Opens a panel for creating a new
project. See also Create project.
 Registers a chosen project. See also Register project.
![]() Copies an existing project. See also
Copy project.
Copies an existing project. See also
Copy project.
 Removes a selected project. See also Delete project.
![]() Edits a selected project (e.g.
update to current version, edit config file). See also Change project properties.
Edits a selected project (e.g.
update to current version, edit config file). See also Change project properties.
![]() Opens the console panel and starts the
Pmon for a selected project. See chapter Console
panel for more information on it.
Opens the console panel and starts the
Pmon for a selected project. See chapter Console
panel for more information on it.
![]() Opens the console panel and starts the
whole project.
Opens the console panel and starts the
whole project.
Note that in order to start the project and to start the graphic editor GEDI, the DHCP client service has to run.
![]() Stops the whole project (including
Pmon).
Stops the whole project (including
Pmon).
![]() Via click on this button the status
of the Pmon is queried for all shown projects and the list is updated. A cyclic update
process may be started (the button cannot be pressed during the cyclic update anymore
and is greyed out). The update is visualized by displaying a little green bar next to
the project name on the left side. The update interval can be set via right mouse click
on the button. The menu shown below is opened and the interval can be selected. You can
either update once or select the interval (2 seconds, 5 seconds or 10 seconds).
Via click on this button the status
of the Pmon is queried for all shown projects and the list is updated. A cyclic update
process may be started (the button cannot be pressed during the cyclic update anymore
and is greyed out). The update is visualized by displaying a little green bar next to
the project name on the left side. The update interval can be set via right mouse click
on the button. The menu shown below is opened and the interval can be selected. You can
either update once or select the interval (2 seconds, 5 seconds or 10 seconds).
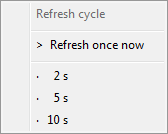
Note that a regular update will cause a higher system load.
You can stop the cyclic update by selecting "Refresh once now".
![]() Opens a pop-up window for language
selection. A language for the language switching can be selected.
Opens a pop-up window for language
selection. A language for the language switching can be selected.
The language of the project administration is automatically adjusted to the language of the operating system. If the language is not available for the project administration English is used as fallback. To change the language the "Switch language" button of the console or the project administration can be used.
 Opens the License Information
panel.
Opens the License Information
panel.
![]() Opens the log viewer
and displays the log entries of the project administration that are written to the
PVSS_II.log file.
Opens the log viewer
and displays the log entries of the project administration that are written to the
PVSS_II.log file.
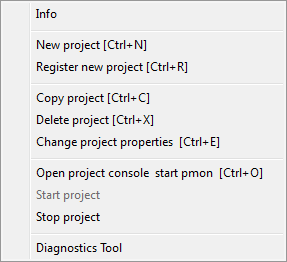
The functions available via the buttons can also be initialized via context menu in the Project Administrator panel. Right click on an arbitrary project in order to create settings for the project via this context menu. Furthermore, hotkeys are available. These allow to open the single panels of the project administration (e.g. Ctrl-N for creating a project, Ctrl-C for copying a project, etc.). These hotkeys are visible in the tooltip of the single buttons, in the context menu and in the title bar of the particular panel.
The hotkeys for opening the single panels from the Project Administrator Panel are only available under Windows!
Doubleclick for list of older projects
A double click on the entry "Doubleclick for list of older projects" opens the management panel for projects of older versions, which allows to edit these projects.
For opening this panel administrative privileges are required!
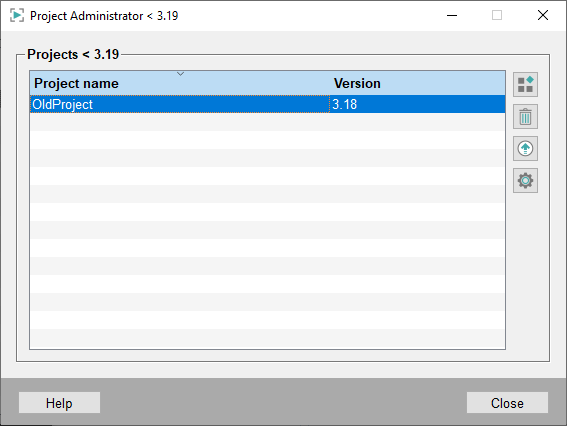
Following options are available for older projects:
-
Registers a
project. See also Register
project.
-
Removes the
selected project. See also Delete
project.
-
 Upgrade project allows to update
existing projects. This comprises all components of WinCC OA like panels, the database etc. Please consider following information:
Notes for Upgrading a WinCC OA Project
Upgrade project allows to update
existing projects. This comprises all components of WinCC OA like panels, the database etc. Please consider following information:
Notes for Upgrading a WinCC OA Project  Edits the selected project (e.g. change the config file).


