Update or patch project
Click the Upgrade project button in the project of older versions panel in order to update existing projects to the new WinCC OA version. The update includes the database and the config/progs file.

The update of the database updates data points and data point types and their configs.
This is usually executed by using the tool WCCOAtoolConvertDb
(state and error messages are written to the convertDb.log file
in the <proj_path>/log/ directory.
Requirements
- A project must be registered, otherwise it cannot be updated.
- Only executable projects can be updated. It is not necessary to update sub-projects (without an executable database).
- Before a project can be updated, the WinCC OA standard libraries in the project directory and in project-specific sub projects must be synchronized with the current libraries or removed temporarily.
- If the project contains custom CtrlExtensions that have not been compiled before the upgrade, they must be commented out in the config file before upgrading.
- The config entry paramLang = "language" must be commented out or deleted before
updating.
Note:Each project that is updated, must contain a "log" directory.
Upgrade Project
To update an existing project, proceed as follows:
- Start the project administration of the new version.
- Open the panel for displaying the projects with an older version.
Figure 2. Upgrade Project button
- Select the desired project from the project list - see the figure above.
- Click the Upgrade project button - see the figure above. Confirm the license warning dialog.
- Check the displayed settings/information:
Figure 3. Upgrade Project Settings 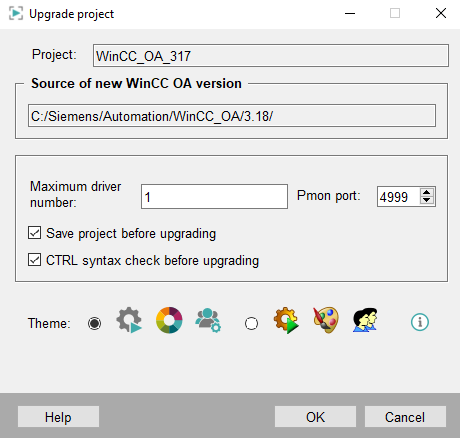
- Click the OK button to apply the settings and to update the project - see figure above.
The project that should be updated is shown in the text field Project. The path of the current WinCC OA version is shown below the text field.
An input of driver numbers via the field Maximum driver number is not required for updating a project.
If the check box Save project before upgrading is enabled, the whole project is backed up before it is updated. The update is saved in the directory where the project is located with the name <ProjectName>.bak. If several backups are made, the .bak files are saved using ascending numbers (.bak, .bak1, .bak2).
The PMON port for the updated project can also be changed via the Pmon port field. If the port is not changed the standard PMON port (4999) is used.
If the check box CTRL syntax check before upgrading is enabled, the CTRL syntax is checked. The CTRL scripts and libraries of the project and the sub-projects are checked as well as the panels of the project. In a new version, variable names may no longer be allowed due to newly defined keywords (see Reserved keywords).
The syntax check is performed before upgrading the database. If one or more syntax errors are detected, a dialog will be opened asking whether to cancel or continue the project upgrade. The project can also be updated if the syntax of the project files is incorrect. The output of the syntax check is stored in the PVSS_II.log file of the project.
Click OK to start the update - see figure above. When the update is started, the Log Viewer is opened automatically and the convertDb.log file is shown. This allows you to follow the update process. Error messages are shown in case of errors.
After the project is successfully updated, it will be displayed in the list of projects in the Project Administrator panel with the current version. When closing the panel with the list of projects of an older version, the project list is automatically updated.
pvss_scripts.lst script and upgrade a project, add the
ngaImporterControl.ctl script to the
pvss_scripts.lst script.Patch Update
Patch Update in a Single Server System:
- Stop the project
- Install the patch.
- Start the project.
- Check the functionality of the system.
Patch update in a redundant system:
- Stop the project at the passive host (e.g.: host2).
- Install the patch on this host.
- Start the project on the passive host.
- Wait until the start up of the project is finished.
- Check if the recovery was successful and the redundant hosts are connected.
- Perform a redundancy switchover.
- Repeat steps 1-5 for the second host.
- Check the functionality of the system.
WinCC OA Upgrade in a redundant system
The upgrade of the WinCC OA version in a redundant project is possible with the following steps. These steps are only necessary if a simultaneous stop of the projects on both redundant computers is not possible.
The following instructions take into account the use of UI machines or remote WinCC OA installations, e.g. for drivers or CTRL Managers. The upgrade order Server1 → Server2 or Server2 → Server1 can be chosen arbitrarily.
- Stop the WinCC OA project on Server1 --> the system on Server2 is now active.
- Execute an upgrade to the actual WinCC OA version on Server1 (eventually incl. upgrade to the current Oracle schema version, if RDB is used).
- Start the WinCC OA project on Server1. Once the start up has been finished, both computers are active.
- A UI will have a connection to both servers.
To ensure that UI Managers of an old version only connect to the non-updated server, the UI must be started with
-data <hostname> -event
                            <hostname>
, referring to the non-updated server. - For the UI clients/remote WinCC OA machines, perform the
upgrade to the latest WinCC OA version. The upgrade includes
the installation of the new version and modification of the config/progs file
(reference to the new version and, if necessary, adjusted executable and WinCC OA Manager names). To ensure that UI Managers for the
new version only connect to the upgraded server, the UI must be started with
-data <hostname> -event <hostname>, referring to the upgraded server. - Start the WinCC OA processes on the UI clients/remote WinCC OA-machines
- Stop the WinCC OA project on Server2.
- Execute an upgrade to the actual WinCC OA version on Server2.
- Start the WinCC OA project on Server2 --> the Server2 executes a recovery and the project starts up.
- Change the configuration for the UI clients so that they can connect to both servers and restart the UI clients.
In case of a WinCC OA version upgrade, possibly changes on the project are necessary, e.g.:
- Compiling of API processes and CTRL extensions with the new version
- Minor adjustments in CTRL scripts, libraries and panels
- Adjustments on the project caused by changed WinCC OA standard functionality, e.g. in AEScreen, Panel Topology, etc.


