Working with correction values
In the following example, use the data point "thermal_output_3" created earlier, retrieve the values for a specific time interval and correct a value for the selected interval.
 Displaying values
You want to check the data for data point "thermal_output_3" in the time interval "yesterday".
-
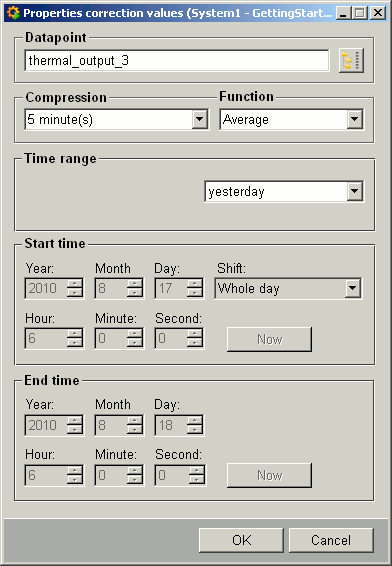
Click on Correction values in the System Management panel/Reports tab.
-
In the Correction Values Settings panel, select "thermal_output_3" as the data point.
-
Select "5-minute" interval under Compression and Average as the Function.
-
Select yesterday for the time range.
-
Click on OK to retrieve and display the data for this interval in the database.
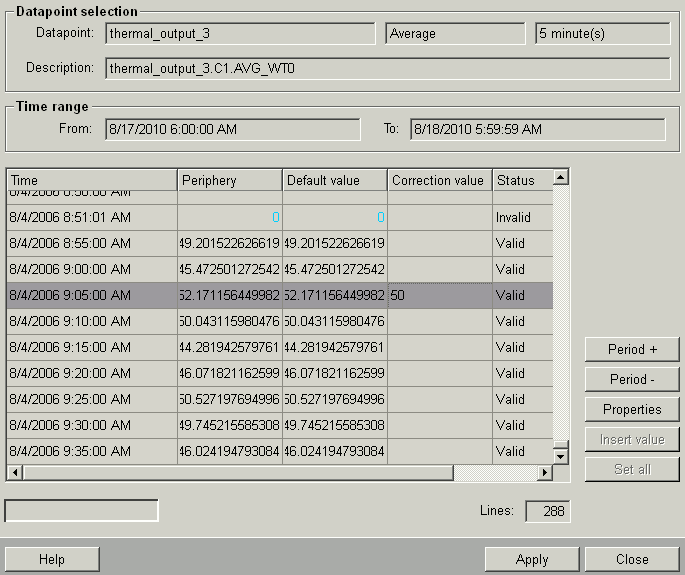
The top section of this panel shows the settings from the configuration panel. The description found for this data point reads "thermal_output_3.C1.AVG_WT0".
Changing a value
After clicking on a cell in the Correction value column, the background of this cell changes to white allowing you to enter a different value.
Change now the average value of the day in question for the time interval 12:55 to 13:00. This value is saved at the time "12:55:00". Proceed as follows:
-
Select the row "12:55:00" by clicking on it anywhere.
-
In this row, click on the Correction value cell. Its background color will change to white.
-
Enter "75" as new value.
-
Click on Apply to set this value in the database.
-
The table displays the new value.
If an RDB database is used, the system waits for 3 seconds before it reloads the data from the database after applying changes into the database.
The Correction Values panel will neither allow you to change values until a DPE has been archived nor to make changes to any future values (an error message will be displayed for any such attempt). Memory breaks in the archive (when the archive was temporarily disabled) are not taken into account and produce an error message in the log viewer. In this case, you cannot write any data to the database.
Changing several values
Now, change all the values between 16:00 and 16:25 to the same value.
-
Select the row with the 16:00 value by clicking on it anywhere.
-
Select all the rows in the interval up to 16:25 by keeping CTRL pressed and clicking with the mouse on each row.
-
Click on the Set all button (now enabled) and a child panel opens. If the Set all button is still not enabled, click again in any of the selected rows but not in the Correction value column.
-
Enter the value to be set (for example, "50") and confirm with OK.
-
The table then displays the values entered. Click on Apply to set these values in the database.
The correction values are saved in the database and the table displays the new values.


