DPE monitor panel
The standard panel for the data point element monitor is located in the directory
<wincc_oa_path> /panels/vision/ dpe_monitor.pnl
. In order to open the panel, click on the Reports /DPE Monitorbutton in
the System management panel.You need authorization level 4 to open the System Management
panel.
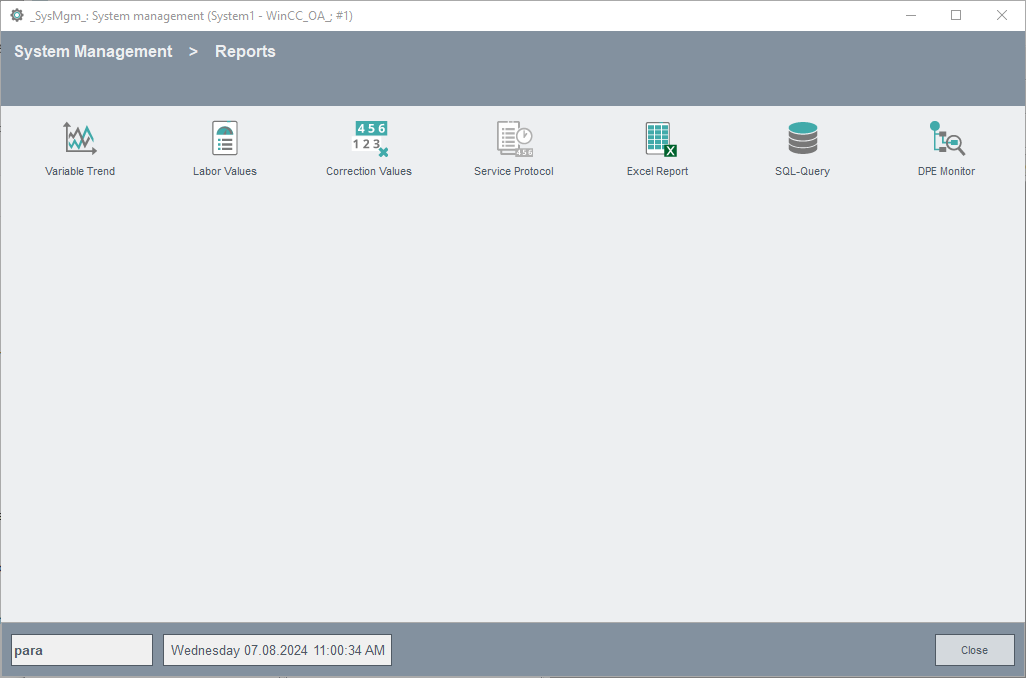
The following figure shows the DPE monitor panel:
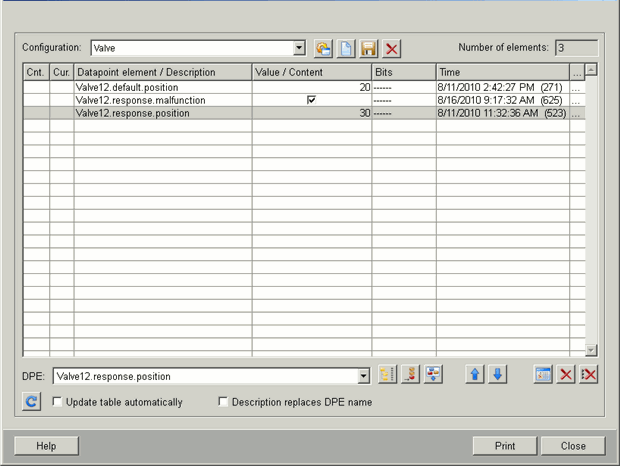
The DPE monitor panel lists the selected data point elements in a table. Under the respective table columns, you can see the data point element/description, value/content, status bits and value change time of the DPE. Further columns display the latest value change of a line ("Act." column) and the number of value changes during the automatic update period ("Cnt." column). The last column "..." opens a panel displaying details for the selected data point element such as DP information. Click on a line in the table to enter a new value. For changing or entering data in the panel, you need the appropriate authorizations.
The DPE-monitoring panel provides the following combo box:
-
-
Configuration : A user can save the DPEs grouped in the table as a configuration. This combo box lists all available configurations.
-
![]() Load selected configuration
Load selected configuration
Loads a configuration selected from the combo box into the table.
![]() Create new configuration
Create new configuration
Creates a new configuration. Click the button and enter the new configuration name into text field shown.
![]() Save configuration
Save configuration
Saves the selected configuration.
![]() Delete selected configuration
Delete selected configuration
Deletes the selected configuration.
-
Number of elements : This field displays the number of lines ( DPEs) for the currently loaded configuration.
-
DPE: This combo box displays the last selected data point element.
You can select data point elements either with the data point selector, by using wildcards or by entering them directly into the corresponding combo box. When you input DPEs manually in the combo box, first confirm the entry by clicking Enter and then append them to the table by clicking on Insert DPE. When using wildcards, another panel opens displaying all DPEs for selection that match a specified pattern (see also. DPE search using wildcards).
![]() Data point selector
Data point selector
Selecting a DPE using the data point selector (see DP selector). When you select a node element instead of a leaf, all leaves below the node will be added to the list. If there are more leaves than can be added to the list, the system only transfers enough leaves until the list becomes full and displays an error message. The data types that could not be listed are not confirmed.
![]() Insert DPE
Insert DPE
Adds the selected DPE to the table.
![]() Insert group
Insert group
Clicking this button opens another panel allowing you to select an existing data point group in WinCC OA (see Add DP Group). You can add either the entire data point group or only a selection to the table.
Only groups with a maximum of 25 entries can be selected through the DPE monitor.
![]() Move line up
Move line up
Moves the selected line up one row.
![]() Move line down
Move line down
Moves the selected line down one row.
![]() Reset count column
Reset count column
Resets the "count" column, that is, deletes the selected number of DPE changes in this column.
![]() Delete selected line
Delete selected line
Deletes the selected line from the table.
![]() Delete table
Delete table
Deletes all table entries.
You can update the table either manually in the panel by clicking the button in the left bottom corner or by activating the Update table automatically check box. Enabling this check box causes a DPE to be continuously updated in the table whenever the value/ timestamp changes. All other function keys (see Figure: DPE Monitor Panel) are dimmed in this option and are unavailable.
![]() Update table
Update table
The updated time shows in the corresponding column in the right upper corner of the panel.
The Description replaces DPE name check box displays the configured DPE description instead of the DPE structure in the table.
In the bottom right half of the panel are the buttons:
-
Print: Prints the table to the default printer.
-
Close: Closes the DPE monitor panel.
-
Help: Opens the online help.
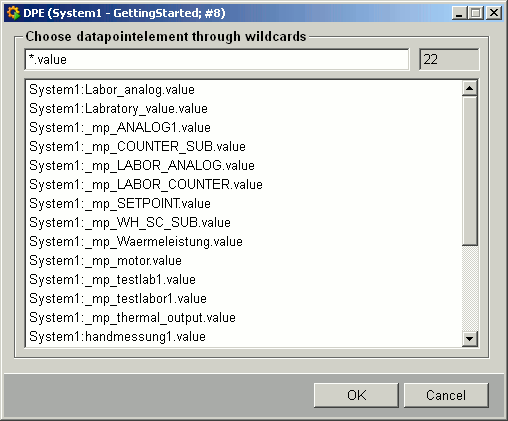
DPE search using wildcards
When you select data point elements, the "DPE" combo box allows you searching by patterns (wildcards). Enter a pattern (for example, "*.value") and pressing Enter opens a panel displaying the data point elements matching the pattern. In this panel, you can select individual DPEs for adding them to a configuration by double-clicking on them or selecting them and clicking "OK". For further information about wildcards, see the section Wildcards.
Add DP Group
Instead of individual DPEs, you can also select either an entire data point group created in WinCC OA or individual DPEs from this group and add them to the table. Clicking on the "Add Group" function key opens the following panel:
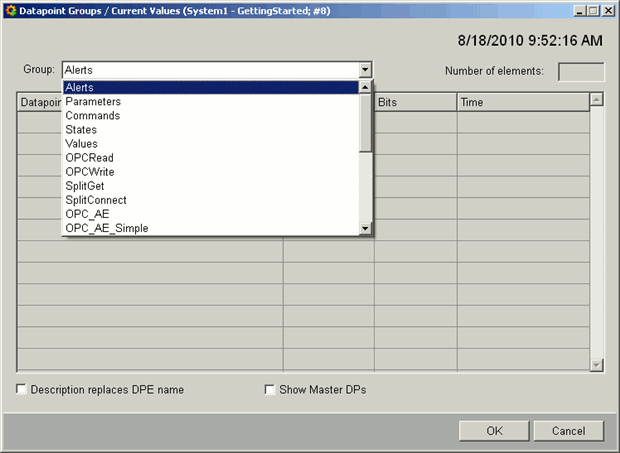
You can select a data point group from the Group combo box and either add the entire list or parts of it to the DPE monitor panel (by clicking OK). The table displays the individual elements belonging to the DP group. You can set further display options by activating either of the Description replaces DPE name and Show Master DPs check boxes. The Number of elements field at the top right shows the number of elements belonging to the selected DP group.
For more details on data point groups in WinCC OA, refer to the section Introduction to data point groups.


