Alert handling of discrete values
Alert handling of discrete values is used when discrete states shall trigger an alert in the value range. Discrete means that a concrete event occurred (e.g. light on) or did not occur (e.g. light off).
The alert handling of discrete values is used for numeric data types of a data point element and the data type bit32. Numeric data types are uint, int and bool.
Discrete alert handling must not be used for float data point elements!
Standard panel of an alert handling of numeric values
The panel for configuration of the alert handling of numeric discrete values (int, uint) is divided into three tabs.
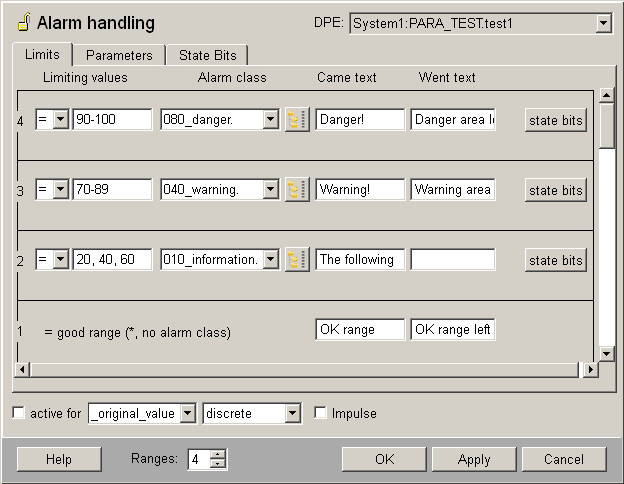
Limits tab
In the Limits tab, up to 20 ranges can be configured. Range 1 (bottom range) is always the good range ("OK" range).
-
Limiting values: Enter for every range the limiting values, which should trigger an alert. The limiting values are scanned from the highest to the lowest range (good range) for a match. If the original or online value matches with a discrete range, the lower ranges will not be checked anymore. No match means that the range is in the good range.
The following entries of the limiting values are allowed:
-
single range value entry, e.g. for integer = 10
-
range value intervals, e.g. for integer = 90-100
-
disjunction of single range value entries, e.g. integer = 10,20,30
-
the wildcard star * - overwrites an "OK range"
-
negative range value intervals, e.g. for integer = (-100)-(-90)
-
Limiting values operators: Two limiting values operators can be used - equal and unequal. Equal "=" means that the alert will be triggered only if the original value does not match with a higher range and the limiting range equals to the original value (online value). Unequal "!=" means that the alert will be triggered always then, if the original value does not match the entered limiting value in this range. The upper range and the bottom range of a good range are defined via the ranges of the WinCC OA value threshold of the corresponding data type.
-
Alert class: select one of the 7 default alert classes (see also chapter _alert_class) or add a user-defined alert class using the DP selector on the right. For the good range an alert class cannot be selected. In opposition to alert handling of continuous values the alert classes do not have to be sorted according to increasing priority. The alert classes can be set arbitrary. The use of the same alert classes in several ranges is allowed.
-
Range texts: Enter a text for each alert range (Came text and Went text); this text will be displayed in the alert panel, e.g.: "Measuring sonde 2: CO content critical". A range text can be also defined for the good range, but it will not be shown in the alert panel.
-
State Bits: By a click on this button a panel is opened, which allows the selection of bits which specify an additionally criterion whether an alert shall be triggered, if the original value matches the limiting value. That means: An alert will be triggered only if the limiting value entry matches the original value.
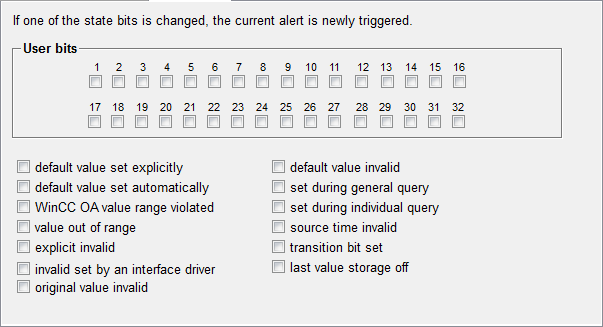
For every threshold, it is predefined that all user bits and status bits are either 0 or 1 and an alert is triggered only if the rule/range value matches.
In the Bits panel, see figure above, the range can be narrowed down by additionally bits. By a right mouse-click on a user bit field or status bit field, the following can be defined:
-
0 - the bit of the original value must be 0 (FALSE)
-
1 - the bit of the original value must be 1 (TRUE)
-
X - the bit of the original value can be either 1 or 0 (thus it is not relevant)
If for a range value threshold bits was set, the icon ![]() is shown next to the "Status bits" button.
is shown next to the "Status bits" button.
For the good range, bits can not be configured, because there is no alert class to define.
Parameters tab
The layout of the Parameters tab is similar to the Parameters tab of a sum alert handling.
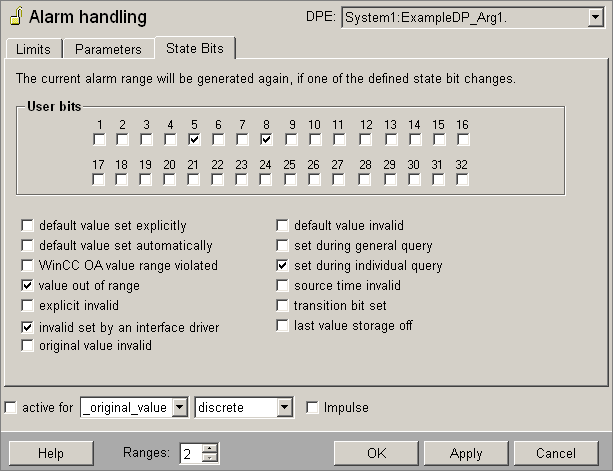
State Bits tab
In the "State Bits" tab bits can be set, which will be trigger the currently alert again, if one of these bits changes on the data point element (original value).
Check the specific checkbox of the bit, if the bit change should trigger the alert or left the checkbox unchecked, if the bit change should be ignored.
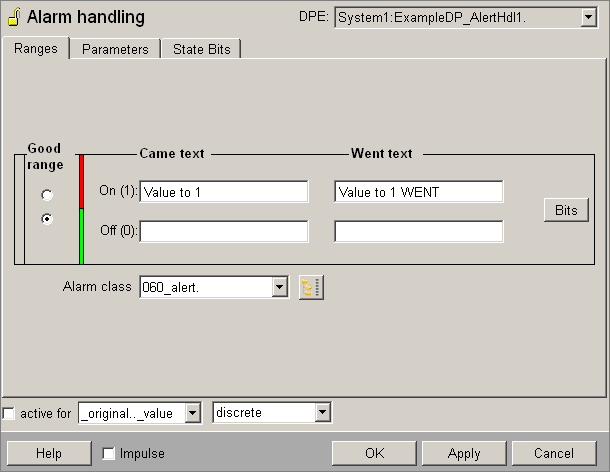
Discrete alert handling of boolean value
There are only three differences between the alert handling of continuous and discrete values of a boolean data point element:
-
A went text can be defined. The came/went text in the good range will not be shown in the alert panel, but can be defined for requests (e.g. for an usage in the enum context).
-
In the "State Bits" tab bits can be selected, whose changes on the data point element trigger the current alert again (see figure and description above).
-
Via the "Bits" button bits can be selected which represent an additional criterion whether a match of the original value (online value) with the limiting value triggers an alert. For further information see
For more information about the alert handling of boolean values see chapter Continuous alert handling of boolean values.
To set discrete alert handling for boolean values inside a ctrl script (using dpSet), the corresponding alert handling for the value must be removed and afterwards newly created (cf. example below).
 Example
rc = dpSetTimedWait(createTime(startTime), dp + ":_alert_hdl.._type", DPCONFIG_ALERT_NONBINARYSIGNAL);
  rc = dpSetTimedWait(createTime(startTime),
  dp + ":_alert_hdl.1._type", DPDETAIL_RANGETYPE_MATCH,
  dp + ":_alert_hdl.2._type", DPDETAIL_RANGETYPE_MATCH,
  dp + ":_alert_hdl.1._class", "",
  dp + ":_alert_hdl.2._class", alertClass,
  dp + ":_alert_hdl.1._text", " GUT/true ",
  dp + ":_alert_hdl.2._text", "false",
  dp + ":_alert_hdl.1._went_text", "[ GUT/true ]",
  dp + ":_alert_hdl.2._went_text", "[false]",
  dp + ":_alert_hdl.1._match", "*",
  dp + ":_alert_hdl.2._match", "0"
);


