Node-RED - Admin
The Admin tab allows you to install Node-RED and provides you with the debug messages during this installation in the same installation window.
Both Node.js and Node-RED are needed to operate the Node-RED Editor. The paths to their installations are specified here. In case an installation for either of these already exists, the path to the local installation can be selected here and will then be used. Node.js is required to use Node-RED and has to be downloaded if no previous installation is found on the device.

Installation
The operation of Node-RED in a standard project requires separate security certificates which will be queried in a separate dialog. If no certificates are specified, the Node-RED control manager is not created or started. However, Node-RED will still be installed and started. After this, the security certificates are queried again at each restart of Node-RED.
Offline Installation
You can also install Node-RED on a machine without internet access. For this, a prior download of the Node.js setup file and a prior installation of the Node-RED application are needed.
Installation on an offline machine:
-
Copy the Node.js setup file (in the "msi" format for Windows or the "rpm" format for Linux) and the complete Node-RED installation folder from a machine containing them to the offline machine
-
Configure the paths to the Node.js file and the Node-RED installation folder in the respective fields in the Admin tab.
-
Disable the "Download Node.js" check box.
-
Then start the installation with the "install" button.
Remote Operation
It is also possible to operate the Node-RED Server and WinCC OA on separate machines. In this case no installation of WinCC OA is present on the Node-RED Server. To do this, you have to follow the next steps.
- Install Node-RED from the Node-RED webpage on the other machine. For installation, follow the instructions in the Node-RED documentation.
- Install the WinCC OA Node package "node-red-contrib-winccoa" (e.g.: in the Menu with "Manage Palette") in Node-RED.
- Create a new WinCC OA User to operate the WebSocket Secure
Server. This User has the following requirements:
- The User should have a Password
- The User can not be root.
- Set up the WebSocket Secure Server on the WinCC OA
Machine:
- Set up a CTRL Manager with the wss.ctl script and the "-user" option, with the newly created user, and start it.
Figure 2. WSSControl Manager Properties 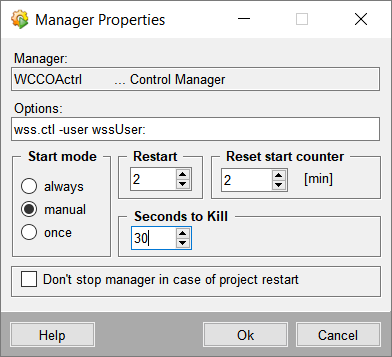 CAUTION:It is necessary to set the ":" after the user name in the manager options, to indicate that a password exists. However, it is not necessary to enter the password itself here.
 -
Connect the Node-RED server to the WebSocket Secure Server:
-
The WebSocket Secure server address is set in the default server configuration or the node configurations directly. If other parts of the address deviate from the default, these parts, have to be adjusted in the configuration as well.
Note:It is possible to change the settings for the WebSocket Secure Server. The HTTPS port the server listens on and the server endpoint name are set respectively with the config entries "httpsPort" and "resourceName" in the [wssServer] section of the config. They can also be passed as parameters in the "wss.ctl" script. Changing the port or name may be required, if the default port is blocked or the server endpoint name is already in use. The default values are port 8449 and "/websocket", resulting in the default WebSocket Secure server address "wss://<hostname>:8449/websocket".[wssServer] httpsPort = 9977 resourceName = "/wssEndpoint" -
Operation on redundant systems
Node-RED can be configured for use on a redundant system. For this, the same Node-RED version needs to be installed on each redundant server, with the exact same configuration and user settings. This will ensure that Node-RED will run the same on both servers. However, only the Node-RED running on the active server will be able to access the WebSocket Server. If the active server crashes, or the passive server is manually switched to active, then Node-RED from the passive server becomes active. If communication between active and passive servers breaks down, then Node-RED on both servers will be active and will work independently of each other. After communication is reestablished, again only Node-RED from the active server has access to the WebSocket Server.
Usage of Node-RED Editor is restricted to the active server. The Editor will not open on the passive server.
All changes to the Node-RED flows should be done on the active server and then synchronized with the passive server. This way all changes in the Node-RED flows from an active server will be propagated correctly to a passive server.


