Installation - Activate TCP/IP Network
On a computer with an already configured Ethernet network interface card, modem or WLAN, the settings for network properties are mostly correct after the installation. In this case you can skip this chapter.
If the computer does not possess network-compatible devices, you have to set the TCP/IP capability manually. Since the IP addresses of the TCP protocol always refer to a device (network adapter), you have to install a virtual network connection in the form of so-called "Loop-Back-Adapter".
-
Open the control panel through Start -> Settings -> Control Panel
-
Open the wizard of the device manager through [doubleClick] on the symbol
 "Add Hardware".
 -
Confirm the first step of the wizard with Next (no input possible).
-
Wait for the automatic search for new installed hardware in the second step of the wizard. The third step will become active after few seconds.
-
Select in the next step "Yes, the hardware was already connected" and confirm with Next.
-
In the first step, select the option "Add new hardware" from the selection window and proceed with Next.
-
Select "Select hardware manually from the list and install (only for advanced users)" and confirm with Next.
-
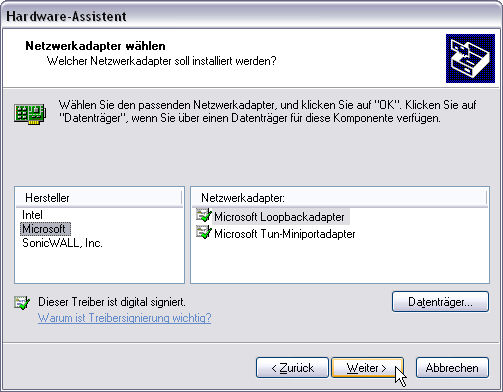
Enter "Network adapter" for the category of the searched device and proceed with Next.
-
Select from the list "Producer" the entry "Microsoft" and select "Microsoft Loopbackadapter" from the network adapter column.
-
Click on Next and accept the default settings for the TCP configuration (see Windows help).
This instruction corresponds to the approach under Windows XP but is almost the same under Windows 2000. See also online help under Installation.


