SNMP Driver Configuration
Before you can use the SNMP feature you have to configure the SNMP manager and the SNMP agents (and thereby create a manager DP, and an agent DP that belongs to the manager DP), via the SNMP configuration panels.
This chapter describes the SNMP configuration panels for manager and agent configuration.
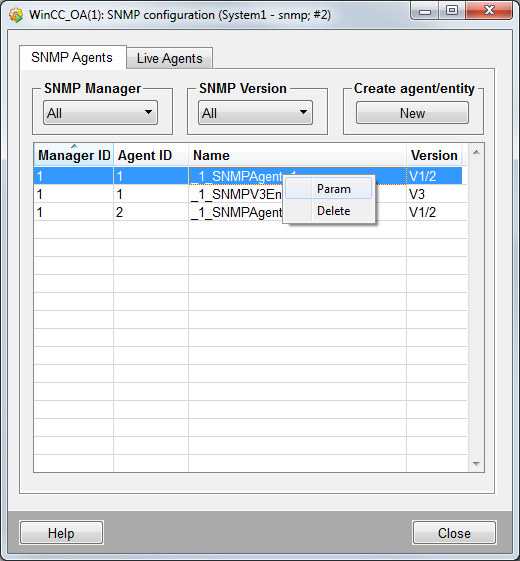
Open the SNMP configuration panel via System Management > Driver > SNMP.
The panel shows the agents for each SNMP manager. Furthermore, you can create new SNMP managers and agents.
SNMP Manager
The agents "SNMPAgent1", and "SNMPAgent2" (see figure above) belong to the manager with the number 1.
A SNMP manager can be chosen from the combo box and the agents belonging to the chosen manager are shown in the table. New managers can be created via the New button. You can create managers with a number from 1 until 255. The manager number 1 exists by default.
The chosen manager can be deleted via Delete button.
Note that when you delete a manager the agents that were configured for this manager, are not deleted!
SNMP Agents
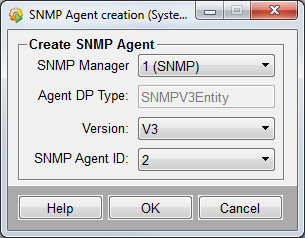
The SNMP agents are queried by the SNMP managers. New SNMP agents can be created via the New button. The new agents are created by using the following panel.
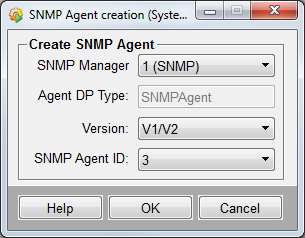
- SNMP Manager
-
Shows the manager for which the agent is created.
- Agent DP Type
-
Specifies the name for the SNMP agent DP. The entry is read from the config file. You have to set the config entry "agentDPName" or in case of SNMPv3, the entry "v3entityDPName". See [snmpdrv]
- Version
-
Defines the SNMP version for the Agent. Possible versions are V1/V2 or V3.
- SNMP Agent ID
-
can be a number between 1 and 255. This means that a manager can query maximum 255 agents. This limit can be modified with the aid of the 'maxAgents' config entry.
To delete an agent select the agent from the table and right click the table. The manager can be deleted via the context menu.
The configuration panel of the SNMP agent is opened via the context menu (right click on the table) or via double click on an agent in the table.
IP Address shows the IP address of the agent , e.g. 192.168.1.13, or a computer name, e.g. eiwrk068. If no IP address was set here or it has been deleted (empty string) the agent is disabled and the internal DPE Status.Timeout (see internal data points) is set to FALSE independent of the state it was before.
Agent/Entity
Name of the agent which is shown in the table on the SNMP agents tab.
- Create
- Creates a new SNMP agent.
- Delete
- Deletes the selected SNMP agent.
Common Settings
- SNMP Version
- Shows the selected SNMP protocol.
- Driver number
- The driver number to which the agent is assigned.
- AgentId
- The ID of the agent.
- Configuration:
-
The checkbox activates a redundant agent (refer to redundant SNMP agent for further information).
If a redundant agent is enabled, a second tab "2. Agent/Entity" is displayed. Switch on defines the condition for the redundancy switch:
-
connection timeout (keep alive check fails)
-
bad read/write request (TIMEOUT status is returned on a read or write request)
-
conn Timeout, bad read/write request (timeout or keep alive failure)
-
- Timeout
- Specifies the time in 1/100s until which the manager has to receive a reply to a SNMP message. The default value is 100. It might ,however, be necessary to increase the timeout in case of longer distances or low networks/agents. Valid values are 100 - 1000 (= 1 - 10sec).
- Retries
- Specifies the number of retries that are executed before an error is shown. If a timeout is reached the message is sent newly. You can configure 10 sending retries at most. (default = 1)
1. Agent/Entity / 2. Agent/Entity
- IP Address
-
The IP address of the agent, e.g. 192.168.1.13, or a computer name, e.g. eiwrk068. If no IP address was set here or it has been deleted (empty string) the agent is disabled and the internal DPE Status.Timeout (see internal data points) is set to FALSE independent of the state it was before.
- Port number
-
Defines the port number via which the SNMP manager tries to connect to the agent, which is configured here. The default WinCC OA Pmon SNMP agent port is 4700. The port numbers for the SNMP pmon agent and for the live agent can be specified via config entries.
- Read / Write community
-
Allows the read and write access to the agent. The read and write community strings are like a password. The community strings are sent with the SNMP request. If the string is correct, the SNMP agent sends an answer (the requested information) to the manager. This entries are only used for the agents to which the WinCC OA system is connecting.
To encrypt or decrypt the access parameter of the SNMP driver the function snmpcrypt_setAccessPassPhrase() can be used. If the access parameter are encrypted the values displayed inside the panel are also encrypted.
SNMP live agents
The live agent provides data point specific data from the DP table of the ETM MIB. The SNMP Pmon agent serves as a proxy for the SNMP live agent. Thus, the data can be provided for external SNMP managers. The Live Agents tab shows the live agents configured for the WinCC OA project.
Further information about the OIDs of the WinCC OA MIB can be found under: MIB - WinCC OA MIB
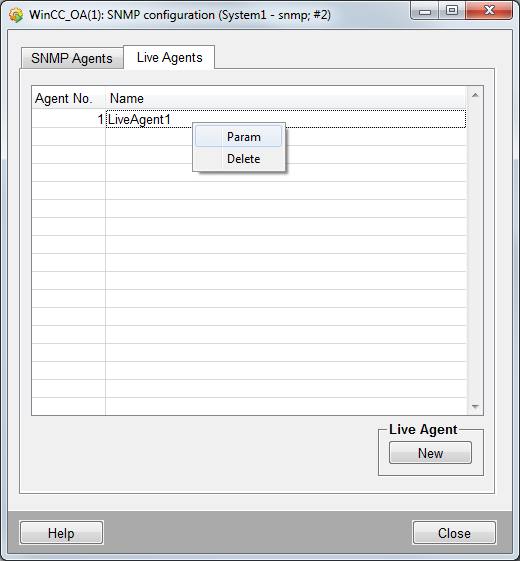
Click on the push button "New" in the SNMP configuration panel (refer to the figure above) and the following dialog pops up, in which SNMP Live agents can be created.
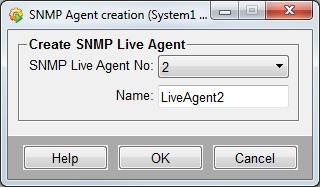
You can create live agents with the number from 1 to 10. The number can be chosen from the combo box.
The SNMP live agent configuration panel can be used for configuring the dp
elements that are queried via SNMP (the DPEs are provided by the SNMP live agent).
The SNMP live agent configuration panel is opened via a double click on the agent in
the table or via the context menu that is opened via right click on the table (refer
to Figure "SNMP configuration" above). Click on the push button "select data point
element" in the SNMP
Live Agent configuration panel to select a data point element which is available to
the Live_Agent SNMP manager.
in the SNMP
Live Agent configuration panel to select a data point element which is available to
the Live_Agent SNMP manager.
Technically it would be possible to write (write access) on these DPEs. Since it is not possible to check the user rights, this was, however, omitted.
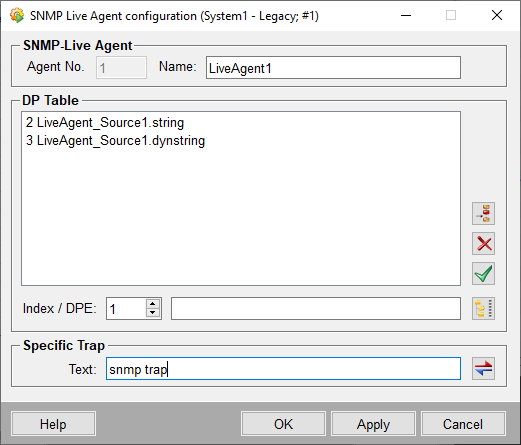
The unique number of the live agent (Agent No.) as well as the Name are shown at the top of the panel.
The DP Table shows the data points that are queried via SNMP. The data points are chosen via the familiar WinCC OA buttons and are added to the table via the Apply button. The data points contain an index, which is used to communicate with the data points via MIB (e.g. (1.3.6.1.4.1.13828.2.1.20.1.2.idx).The queried data point information is presented on other data points to which a peripheral address was added.
enableUserTraps =
"Yes"The traps are sent via the Pmon agent since the Pmon agent serves as a proxy for the live agent. The default SNMP live agent port is 4701.
SNMPv3
In order to use SNMPv3 there are some additional optional config entries. Furthermore, the SNMP configuration panel as well as the address config for the SNMP driver were modified. You can now also configure SNMPv3 entities and set the entity type in the address panel. The config entries and the configuration and address panels are described in the following.
An entity is configured in the panel shown above.
1. Agent/Entity / 2. Agent/Entity
- IP address
-
The IP address of the entity, e.g. 192.168.1.13, or a computer name, e.g. eiwrk068. If no IP address was set here or it has been deleted (empty string) the entity is disabled and the internal DPE Status.Timeout (see internal data points) is set to FALSE independent of the state it was before.
- Port
-
Defines the port number via which the SNMP manager tries to connect to the entity, which is configured here.
- SecurityName
-
The SecurityName describes the user/the program that requires access to the data. The SecurityName has to be unique per SNMP manager.
- ContextName
-
The context name on the target computer. The context includes specific MIB objects.
You can specify a context name per entity. If several context areas should be queried on one entity, several data points should be created.
The Management Information Base is the tree which leaves contain the actual data. You can restrict the user access in the SNMP V3 to an area of MIB e.g. everything under the node 1.3.6.2.1.1. Thus, the user can not access anything else.
- SecurityLevel
-
The security level describes which security measures should be used for the data exchange.
-
noAuthNoPriv (1) No authentication and no encryption
-
authNoPriv (2) Authentication but no encryption
-
authPriv (3) Authentication and data encoding
Default value is (1).
-
- ContextEngineID
-
The EngineID of the target computer. If this is not specified, it is defined during the query of data.
- AuthProtocol
-
There are two protocols available for the authentication of the SNMP users:
-
none (1) no authentication protocol
-
HMAC_MD5 (2) MD5 authentication
-
HMAC_SHA (3) SHA authentication
-
HMAC_SHA2_224 (4) SHA2 authentication
-
HMAC_SHA2_256 (5) SHA2 authentication
-
HMAC_SHA2_384 (6) SHA2 authentication
-
HMAC_SHA2_512 (7) SHA2 authentication
Default value is (1).
An authentication protocol can only be selected, if the setting in the security level is "authNoPriv" or "authPriv".
-
- AuthPasswd
-
The password used for the authentication. This password can only be set, if the setting in the security level is "authNoPriv" or "authPriv".
- PrivProtocol
-
The sent data can also be encrypted in order to increase the security. For the encryption a protocol has to be selected.
-
none (1) no encryption
-
DES (2) Data Encryption Standard encryption (not recommended, use AES encryption instead)
- IDEA (9): IDEA encryption (International Data Encryption Algorithm)
-
AES128 (4) Advanced Encryption Standard encryption with 128 bit key
-
AES192 (20) Advanced Encryption Standard encryption with 192 bit key
-
AES256 (21) Advanced Encryption Standard encryption with 256 bit key.
Default is (1).
An encryption protocol can only be selected, if the setting in the security level is "authPriv".
-
- PrivPasswd
-
The password used for the encryption. This password can only be set, if the setting in the security level is "authPriv".
Note:The snmpcrypt_setAccessPassPhrase() function can be used to encrypt or decrypt the access parameters of the SNMP driver. This also encrypts the display of the values within the configuration panel.


