Creating a redundant system
A redundant system with WinCC OA is created via a wizard. Via the wizard you can specify all relevant settings for a redundant project. The wizard is opened via the New project button in the project administration (For more information on creating projects via the wizard see chapter Create project).
First redundancy partner
Use the following settings to create a redundant project:
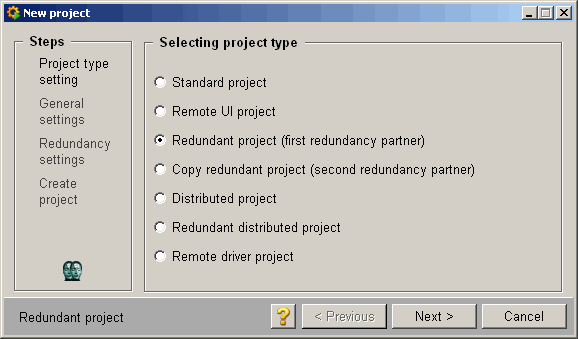
Choose the project type Redundant project (first redundancy partner) and click on Next >. Another dialog for entering the project data is opened.
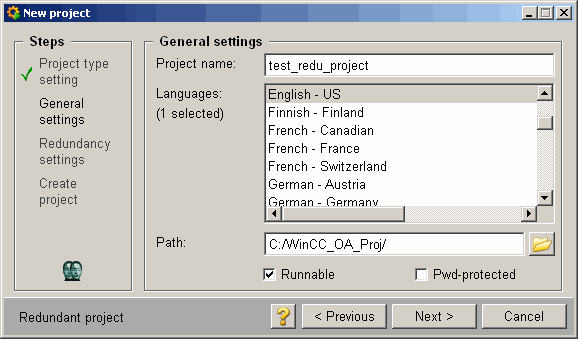
Enter a project name, the desired languages and the project path. You can protect the project by specifying a password if necessary. For more information on these settings see chapter Create project. After entering the settings, click on Next >. Another dialog is opened for entering the redundancy specific settings.
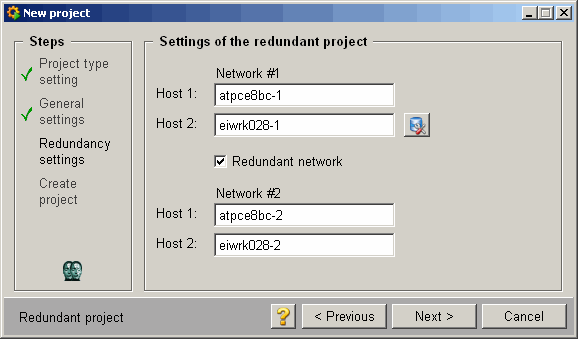
The name of the computer the project is created on is automatically shown in the Host 1 text field. Host 2 defines the redundant partner (the button with the network icon opens a "search" dialog, which allows to select the second computer from the network environment. So that the computer name is inserted into the text field at least a directory that is released on this computer has to be chosen). The settings for redundant network connections can be entered in the lower part. If a redundant network connection does not exist disable the check box Redundant network . Thus, the lower part becomes invisible and only Host 1 and Host 2 have to be defined for the redundancy. The entries for the host names are not case sensitive. Note that no double hosts may exist.
For a redundant network connection two network cards have to be installed per computer. Ensure that the TCP connection and the mapping of the IP addresses to the host names are entered into the "host" file in the C:/Windows/System32/drivers/etc/ directory under Windows or into the /etc/ directory under Linux. The entry "Hostname-1" is used for the first and the "Hostname-2" for the second network card (this definition has to be entered in the wizard when creating the project - see figure above). The "hosts" file has to be configured on both computers! For detailed information on the redundant network connections and the configuration of the "hosts" file see chapter Redundant network connections.
The entries in the "hosts" file have to exist also when using a DNS server or local name resolution in order to guarantee a proper functionality of the redundant network connection!
Example of "hosts" file
1.1.1.11  server1  server1-1
1.1.2.11  server1-2
1.1.1.12  server2  server2-1
1.1.2.12  server2-2
After entering the settings in the wizard, click on Next >. The last dialog shows all settings.
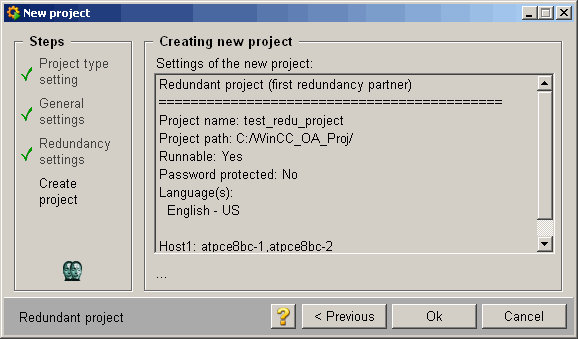
Click on OK to create the redundant project. If you are not satisfied with the settings you can change the settings of the preceding dialogs via the < Previous button.
After successfully creating the first redundancy partner the now existing project directory must receive corresponding sharing permissions to allow access (copy) to the project data while creating the second redundancy partner.
Second redundancy partner
The above described steps for creating a redundant project with WinCC OA apply for the first redundancy partner. The second computer has to be configured equally with the redundancy settings. The redu project created earlier can be copied to the other computer with the wizard. Choose the following project option (the following steps have to be executed on the second computer for the redundant system):
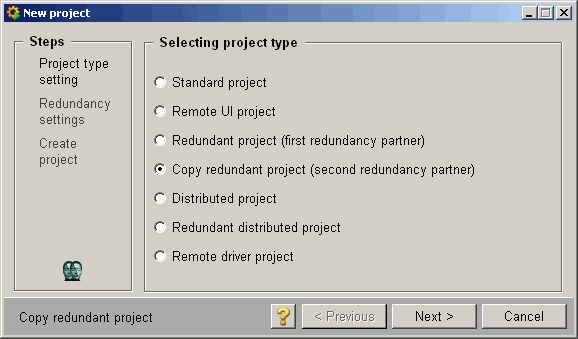
Click on Next >.
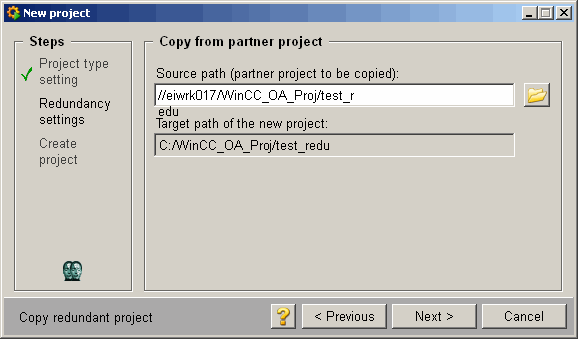
Choose the source path of the redundant project of the first computer via the "Search directory" dialog. The target path is entered automatically into the text field below (since the both projects of the redundant systems have to be saved in the same directory with the same project name). If the target path is not available on the second computer it is created automatically. Assure that the drive to which the target path refers exists and the writing rights are assigned. Click on Next >.

The last dialog again shows the settings made before. Click on OK in order to copy the project to the redundant partner.
Via this steps the redundancy is configured (appropriate entries were made in the config file, all necessary managers with right start type are entered into the console).
Order of manager
In a redundant project the start sequence of the single managers must be the following:
- Database Manager (WCCILdata)
- All Archive Managers (WCCOAvalarch -num 0 until -num...)
- Event Manager (WCCILevent)
- Control Manager (WCCOActrl -f pvss_scripts.lst)
- Redundancy Manager (WCCILredu)
- All other project specific managers
It's very important to stick to the start sequence. The redundancy manager has to be at the end of the start sequence, in the case that the DataBG may be disabled in the config file. Otherwise the following problem may occur:
The starting host accepts the recovery request even though it hasn't finished starting yet. Therefore, the remaining drivers can't be started since the host is already in the recovery mode.
In order to prevent this, the redundancy manager has to be started last or you must ensure that the DataBG is enabled.
If a project already exists and this project should be run redundant the necessary config entries, managers and data point information must be inserted manually. For these changes please contact your direct support.
After creating and starting the redundant project the error weighting has to be configured so that the right behavior (means switching to the computer with the lower error state - see also failure behavior and switching criteria) is executed properly in case of errors. The settings for calculating the error state are executed in the system overview panel (see also Panel system overview in redundant systems).


