Configuring backups
Enter the parameters for your backup in the Configuration tab. The
settings for host and path of this panel apply to both database backup and project
backup. The Online backup can be used for HDB/Raima and SQLite databases. For NGA, use
the Full DB Backup and Restore.
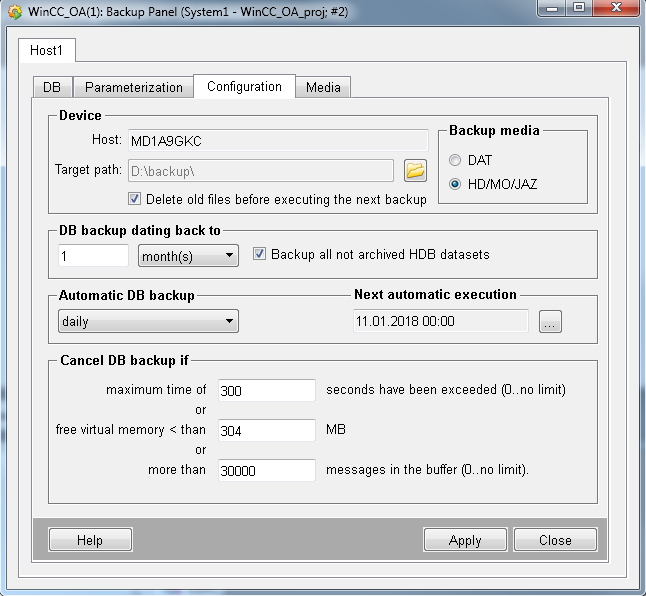
- Host: The input field displays the current host (name of computer). The host name cannot be changed.
-
Target path: Here you specify the path for your backup. Press
the ”Browse for Folder” button and navigate to the folder where you wish to store
your backup.
Note:Ultimately, you should think of storing your backups in a different building or on a remote server. You can also save the back-up on a physical medium, such as a USB drive or CD. However, existing data is not overwritten. Therefore, take care that enough space is available on the medium.Note:Please note that - in the event of a hardware error - there may be problems with the backup if it is saved on the same drive as the original project. It is therefore recommended to select a different drive. In this case, do not forget to set the corresponding access restrictions for the respective target folder accordingly.
- Delete old files before executing the next backup: deletes all
backed up files from the backup directory before creating a new backup. This delete
option is disabled for the backup media "DAT". Note also that the delete option
cannot be used to delete the backup of the configuration data on the
"parameterization" tab.
Note:If the old files cannot be deleted within 300 seconds, the backup is canceled and a message is shown in the log viewer.
- If the target drive for the online backup is a network drive that is used with a network drive letter and the backup is started via the service, the backup does not work. Use UNC paths.
- To backup data on a remote server, the user must have adequate user permissions. A possibility is to add the responsible user to the local administrator group.
- Directories that should be backed up must not contain umlauts or blanks. You can only use 7-bit-ASCII character set for the directories and data files.
- There is also a restriction on the number of characters in the destination folder. If your backup fails with ”ERROR (-5) executing OnlineBackup !!!”, then reduce the number of characters in the entire path name of your output folder, meaning rename or relocate your output folder.
- The target path of the backup might not be the same as the target path of the value archivebackup.. The UNC paths under Windows must have write permissions in the DB directory.
Windows for example, D:/Backup, for Windows Tape 0; see the name in Start > Setting > Control Panel > Tape Devices > Properties
Linux: It is highly recommended to refer to your system administrator, who will know the available devices and their paths. The following issues are essential: append the tape, register driver and drive in kernel, create the device for the drive (different parameters are possible).
Make sure to initialize your DAT device before backup.
Take this table as an example. The following applies, depending on the operating system and the type of storage medium (change path names to suit the system):
| Medium | Linux | Windows | ||
|---|---|---|---|---|
| Device | Mount directory | Backup directory | Drive | |
| Hard disk | /dev/dsk/c201d0s1 | /disc | C:/Directory/ | -------- |
| MO (Magento Optical) disk | /dev/dsk/c201d0s1 | /disc | N. A. | N. A. |
| DAT tape | /dev/dsk/c201d0s1 | -------- | -------- | Tape0 |
-
Medium for backup: Here you select whether you want to save
the data to tape (DAT) or "hard disk (HD), MO (Magneto Optical) or JAZ" (file
system). Note that the medium can be a block device, for example,. /dev/hda3 but
also a directory such as /backup under Linux.
CAUTION:MO (Magneto Optical) drives cannot be used under Windows.
-
DB-backup range back to: Here you define which period your
online backup should cover. You should set the "DB-backup range back to" field to an
appropriate interval. "Appropriate" means an interval that corresponds to the
interval at which you copy your important data to external storage, as specified in .
Note:If you exceed the limit for a selected time range, then the time range is automatically increased. Example: for days: 1,2,3,4,5,6,7 are OK. 7 changes to 1 week. 8,9,10,11,12,13 days are 1 week; 14 days change to 2 weeks and so on.
- Backup all not archived HDB datasets: Select this option to include all archive files that were not swapped out yet to the online- backup. Note that this option is independent of any set backup period.
Planning of backup
It makes sense to set the time for a periodic backup to "off-peak load times" when little data (messages) have to be buffered on the running system.
The system experiences heavier load during online backup than during normal operation. This also applies for a short time after completing the backup when buffered data have to be processed first.
Database queries for historical values such as trends are not processed during this time.
- Automatic DB-backup: Here you set how often automatic
backup is to be carried out (daily, weekly, monthly or annually).
Note:If you activate the automatic backup, make sure that you restart the script "archiv_client.ctl". Otherwise, your backup is not executed correctly. You will also have to restart the script if you deactivate and reactivate the automatic backup, since the
timedFunc()was stopped and has to be restarted. - Next automatic execution: The button opens a dialog that allows the exact backup time to be entered.
- Cancel DB-backup if: Here you can define the following
conditions under which your backup is aborted:
- Abort backup, if maximum time of x seconds was exceeded. The time period is unrestricted for a value 0. Values below 60 seconds are not considered.
- Abort backup if free memory is less than x [MB]. The minimum value is 50 [MB] over the limit with which the Data Manager would go into emergency mode, usually 60 [MB]. If memory is insufficient, an error message is issued.
- Abort backup if more than x messages are waiting in the buffer. If the value is 0, the number of messages is unrestricted. Each change to a value is, for example, a message. Messages in the buffer: for example, 30000 /5 * 60 equals 100 msg / sec. (average). The maximum is 500 msg/sec meaning 150000 messages (for 5 min.).
-
CAUTION:The automatic execution time must not be the same as the execution time of the valuearchive backup.
-
CAUTION:Backup mode does not check the virtual memory if you set checkMemory = 0 in the config file or specify a value < 0 in the DP for the element .EmergencyKBLimit.
Configure Backup
- Select "HD/MO/JAZ" as the storage medium in the radio box.
- Click the button next to the input field for the storage destination.
- In the open dialog, select your desired directory.
- Click OK.
- Specify 12 hours for the backup time.
- Select "weekly" from the selection list for automatic backup.
- Clicking on the ellipsis button, opens the following dialog:
Figure 2. Dialog for Time of Backup 
- Enter 01.15 and click OK.
- Enter 5 minutes for the maximum time for backup.
- Select 58 MB for free memory.
- Specify 30000 for the number of messages in the buffer.
- Click Apply.


