How to Add a Standard Libary Symbol to a Panel
-
Open the Object Catalog of the WinCC OA Library (GEDI menu View -> Catalogs), in order to display available symbols for every data point type of the WinCC OA Library, and add a symbol to a panel via drag & drop.
-
This automatically opens the "Reference definition" panel.
-
Left click on the three dots "..." of the $-Parameter $DP in order to open the "dpSelector".
-
In "dpSelector", select a datapoint whose value/state the symbol should show.
By default, the "dpSelector" displays all available data point types of a WinCC OA project. To show only the data point types for which the symbol should be used, the symbols must be loaded from the file system for the specific data point type in the "Symbols" tab of the WinCC OA PARA (see WinCC OA Online Help chapter "Module PARA -> PARA module -> Standard symbols for DPTs").
-
Confirm both windows with "OK".
$-Parameter of a Symbol
Furthermore, additional settings for the display of a symbol can be configured on the "optional" tab in the "Reference Definition" panel. The additional settings can be configured by using $-Parametersof a symbol. Which $-Parameter can be set for a symbol is specified by the library author. Select the symbol in a faceplate and double-click on it or click on "$-Parameter" in the attribute editor of the GEDI. The following optional settings can be configured via $-Parameters:
| Possible $-Parameter | Data type | Description |
| $_BOOL_ACTION_ENABLE | bool |
Specifies whether a left mouse click on the symbol in the running panel opens the corresponding faceplate. TRUE = Default. Faceplate is opened FALSE = Faceplate is not opened. |
| $_DIRECTION_2 | string | Specifies the position of the symbol image - "vertical" or "horizontal". Used, for example, for symbols that represent a valve or a flap. |
| $_DIRECTION_4 | string | Specifies the direction in which the symbol image points - "up", "down", "right" or "left". Used for symbols with which the direction of a value is represented. |
Context Menu of a Symbol
A right mouse click on a symbol in a running panel opens the context menu. This enables quick access to the most important configuration tools and information about the data point the symbol represents. Every library author and user can extend the context menu by adding entries or delete existing ones. By default, the following options that open specific WinCC OA features, are available in the context menu.
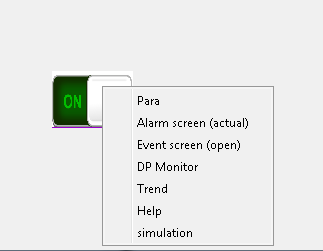
Para
Opens the PARA module filtered according to the corresponding data point.
You can only open the PARA if you have the "para" authorization (see User Authorization in the StdLib and Authorization levels) and the current user interface is running in extended (-extend) mode.
Alert Screen
Opens the alert screen for the data point (the faceplate's "Alarms" tab also offers a limited view of the alarm screen). The alarm screen starts automatically with set filters.
Event Screen
Opens the Event Screen for the data point. The event screen starts automatically with set filters.
DP Monitor
Opens the Data point Monitor in which the values of single data point elements can be directly changed or inspected respectively.
Trend
Opens the variable Trend for the data point.
Configure the curve of the data point elements shown here, via the PARA module. Click on the data point type and select the data point elements whose progression should be displayed here on the "Trend" tab.
Help
Opens the online help for the corresponding data point type.
Simulation
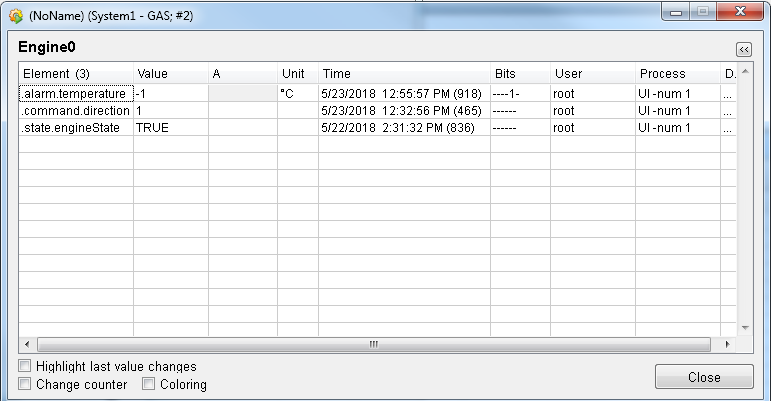
Opens a panel where the value, the alert color, the unit, the number of value changes, the time, the bits, the user and process information of the data point are available.
In the figure below, the check boxes were ticked and the last changes highlighted, the number of changes is shown and the texts are shown in red, black and green color.
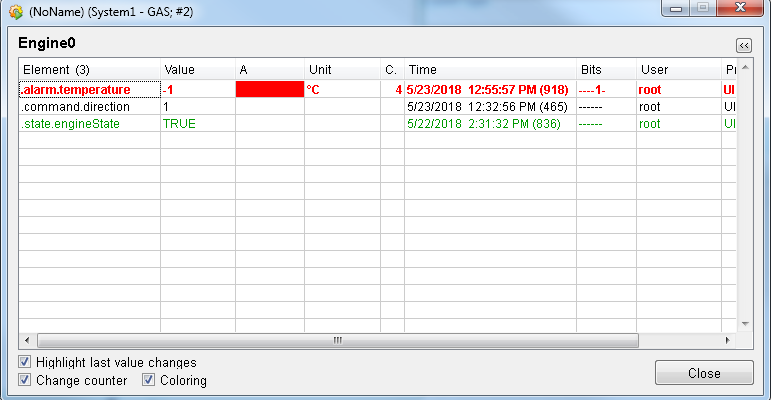
In the next figure, the check boxes are not ticked.