How to Create a Standard Object Library Faceplate
The Stdlib provides a faceplate template for the standard view for further processing - main.pnl (/panels/objects_parts/faceplates/STDLIB_template/main.pnl).
The faceplate can be used either by saving it in the right directory via the "Standard Object Library Setup panel" or manually. This chapter describes both options.
The faceplate template must be saved in the project directory. For the configuration of the library, elementary symbols are used. The Stdlib provides the elementary symbols.
This chapter describes
How to create a faceplate
Create a FACEPLATE via the "Standard Object Library Setup panel"
-
Open the "Standard Object Library Setup panel" via the System Management Panel-> Settings -> StdLib Development Tool.

-
Create a data point type by entering the data point name into the text field and clicking on "Create". You can also use an existing type.
-
Select the data point type from the "Datapoint type" combo box.
-
Select a symbol template from the "Symbol template" combo box.
-
Create a main faceplate by entering the name "main" to the text field "Tab name" and by clicking "Create". The faceplate is saved in the project directory/objects_parts/faceplates/[data point type].
-
Proceed with the step 5 of the "Create a FACEPLATE Manually" example.
Create a FACEPLATE Manually
-
Create the following directories (marked in bold) in the WinCC OA library project directory:
-
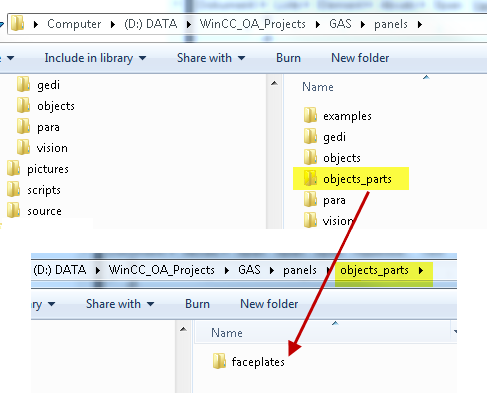
/panels/objects_parts
-
/panels/objects_parts/faceplates
Figure: Project directory and "faceplates" directory
-
-
the directory /panels/objects_parts/faceplates/<datapoint type name> is optional. It contains tabs that will only be available for the data points of this data point type.
-
Open the project view in the GEDI.
-
In the project view open themain.pnlpanel from the\panels\objects_parts\faceplates\STDLIB_templatedirectory of the Stdlib project and double click the panelmain.pnlto open it.

-
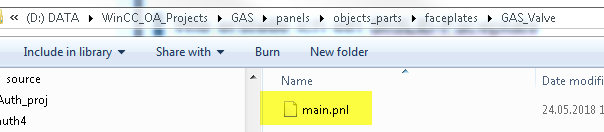
Save the main.pnl panel in the project directory /panels/objects_parts/faceplates/<data point point type name> in order to use the faceplate only for the specified data point type.
Figure: main.pnl in the GAS_Valve directory
-
Test the functionality of the faceplate by placing a symbol from the project catalog on a new panel. In the "Reference definition" window, select a data point of the data point type in whose directory main.pnl is located.
In order to select the symbol, select the symbol and hide the layer 8 via the GEDI object menu:


-
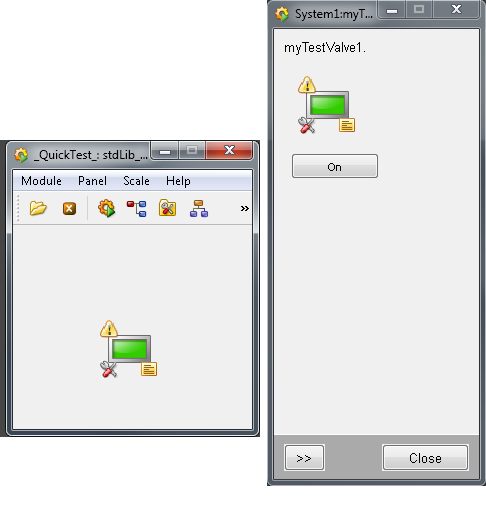
Start the panel via QuickTest. By left clicking on the symbol, the faceplate that the symbol represents is opened.
Figure: A symbol and an opened faceplate
 How to extend the faceplate by adding tabs
Depending of the structure of a data point type, the following tabs are available in the extended view of a faceplate:
-
"Alarms" - available if the sum alert handling data point config is available in the alarm node.
-
"Trend" - available if at least one data point element, whose graph should be shown in the Trend tab, has been selected on the "Trend" tab of the PARA when marking a data point.
-
"Notes" - available if the data point element contains the general node with the data point element note, in which the internal data point type _STDLIB_Note has been embedded and the config entry useNotes is not set to FALSE.
A tab can be added to the main faceplate either via the "Standard Object Library Setup panel" - see below or manually:
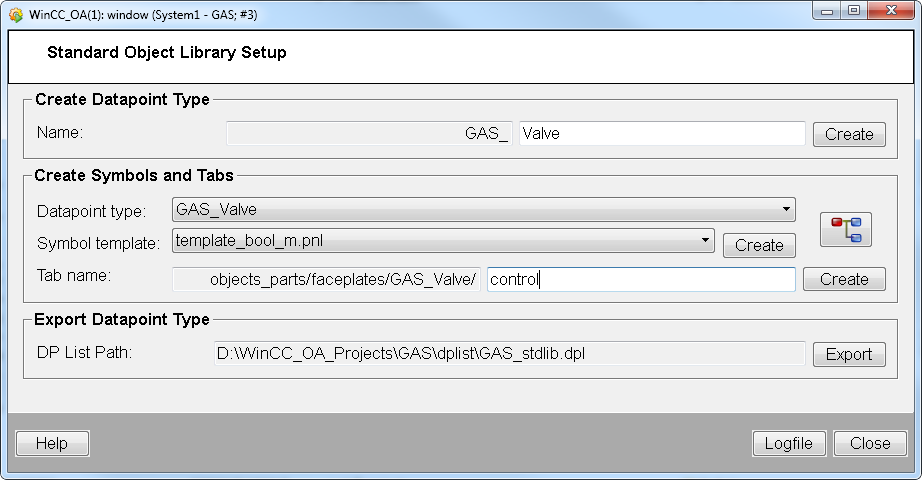
Add a Tab to the main faceplate via the "Standard Object Library Setup panel"
-
Open the "Standard Object Library Setup panel" via the System Management Panel-> Settings -> StdLib Development Tool.
-
Select the created data point type from the "Datapoint type" combo box and a symbol template from the "Symbol template" combo box. See figure below.
-
Add a tab name e.g. "Control" to the "Tab name" text field. and click on "Create". See figure below.
-
The tab is saved in the project directory/Panels/objects_parts/<data point type name>.
-
You can edit the tab by opening it from the /Panels/objects_parts/<data point type name> directory in GEDI.
Figure: Standard Object Library Setup - Add a Faceplate Tab
Add a tab to the main Faceplate Manually
-
Open main.pnl from the newly created library project directory.
-
In the \panels\objects_parts\faceplates\STDLIB_template directory of the Stdlib subproject, you can find panels that are used as templates for tabs (except for main.pnl (faceplate)).There are four different panels: control.pnl, parameter.pnl, simulation.pnl and status.pnl available.
-
In the GEDI, open one of these tab templates, e.g. control.pnl. Which of these templates will be used for the new tab, is irrelevant at this point, as the elementary symbols can be freely changed in the tabs later.
-
If the tab should only be available in faceplates whose symbol references to a data point of this specific data point type, save the tab under /panels/objects_parts/faceplates/<datapoint_type_name>, or if the tab should be available in all faceplates of the project, then save it under /panels/objects_parts/faceplates.
Figure: Save the panel control.pnl in the /panels/objects_parts/faceplates/<datapoint_type_name> directory

-
Test whether the tab is available in the extended view of a faceplate. If not, then check that the tab-panel is saved in the correct directory.
Figure: Faceplate and tabs - the tab is shown, additionally also the other tabs are shown. For how all tabs are shown - see the description further above.

-
In this way, any number of tabs can be added to a faceplates tab.
-
Save the changes to main.pnl.
How to change the Heading of
the tab in the faceplate
By default, the title of a tab in a faceplate is shown as the name under which it was saved. In order to language-dependently change the heading, proceed as follows:
-
Open the project view in the GEDI.
-
Right click on "Message Catalogs" in the library project.
-
Choose the option "Add New Catalog" in the context menu.
-
Enter the following name for the catalog: <Library_project_name>.cat.
-
Double click on the created catalog to open it.
-
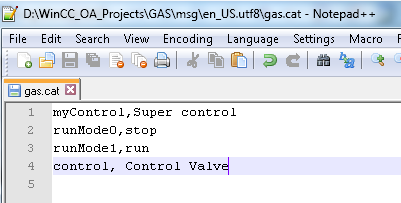
Under "Keyword" enter the name under which the tab panel was saved.
-
In the second column from the left, enter the header for the tab, which should be entered in the corresponding project languages.
Figure: Changed name for a tab in the gas.cat file
-
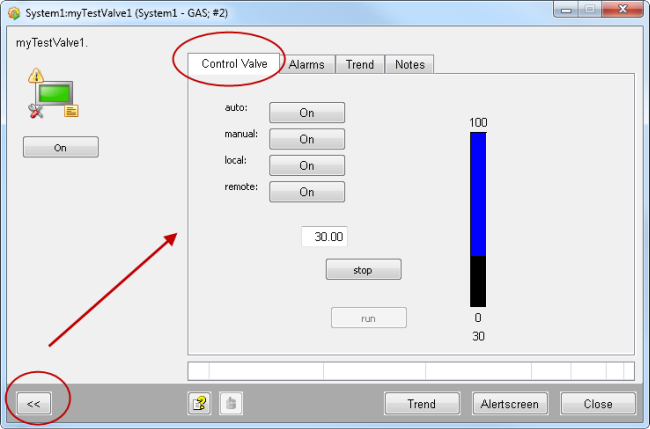
Save the entries and open the extended view of the faceplate see the changes.
Figure: Faceplates and "Control Valve" tab