Allocating Compression Calculations to Data Point Elements
The allocation of compression steps to data point elements takes place in the tree view of the main panel. Open the Database tab of the system management and click RDB Compression to open the main configuration panel (see also Configuration - Introduction).
The main configuration panel of the RDB compression is opened:
If the RDB compression is configured for the database user the first time, the tree view on the left of the main configuration panel is empty (has no data point elements, yet).
How to allocate data point elements to compression calculations and how to change and delete them is described in the following paragraphs:
-
Adding a data point element to the RDB compression
-
Adding a compression calculation to a data point element
-
New compression calculation - description of the panel for creation of a new compression calculation
By default only master data points are shown in the panel. The compressed data points can be displayed. See the option Display <number> compressed DPEs at the bottom of the chapter.
Adding a data point element
Requirements for adding a data point element to the tree view are:
-
The data point element, which has to be added, has an _archiveconfig with an assigned archive group.
-
The data point element is of the type float, uInt or int.
 This is how to add a data point element to the
RDB compression
This is how to add a data point element to the
RDB compression
-
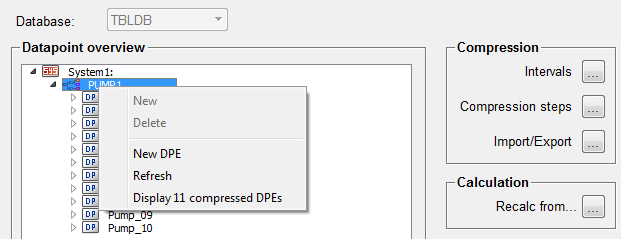
Right-click the area of the tree view. The following context menu is opened:
-
Click New DPE to open the data point selector for data point element selection. The selection takes place in the "DPE" tab of the data point selector.
-
Choose the corresponding data point element and click OK to add the data point element to the tree view of the RDB compression.
-
The panel for creation of a new compression calculation is opened (for the settings in the compression calculation panel see New compression calculation).
-
Click on the Create button to add the data point element with the settings of the compression calculation to the tree view.
-
The added data point element (here e.g. ExampleDP_Float.ExampleDP_Trend1) is shown in the tree view as follows:
New compression calculation
The panel for compression calculation creation is opened whenever:
-
a new data point element is added.
The following settings have to be configured for the new compression calculation:
Data point
Name of the data point element to which the new compression calculation is added.
If a new data point element is added the data point selector is opened for data point element selection.
If a compression value is added to an already existing data point element the name of the corresponding data point element is written to the input field automatically.
Compression Step
Select a compression step from the combo box. In the event that no one is available, this can be created in the Compression Steps panel. Therefore, click on the Compression Steps button.
Active
Tick this check box, when the compression calculation should be active after creation. Leave the check box unticked, when the compression calculation should be inactive after creation.
Note that the compression calculation takes place only if the appropriate compression interval and compression step are also active. The context menu of the compression calculation informs you whether they are active (see also Activating/Deactivating compression calculations).
Base Element
In this area one of two options can be selected:
-
based directly on history
The compression calculation is carried out for the values, which come directly from the history of the data point element.
-
based on another compression
The compression calculation is carried out for the already compressed values of another compression calculation. The compression calculation, of whose compressed values the calculation should take place, can be selected from the combo box below.
The interval of a compression step for a compression calculation based on another compression calculation should not be much bigger than the interval of a compression step for a basis compression calculation in order to avoid performance problems and to run the risk that basis values are swapped out before the calculation starts. This applies to the values, which define the archive swap out (see Swap out/backup archives).
The intervals of the compression calculations should be based on each other, thus the time for calculation is shorter. For example, it should be avoided that the calculation of daily average values is based directly on the values of the history of a data point element. It is recommended to calculate here the e.g. hourly average values before.
![]() Example
Example
Existing compression intervals: 5 minutes, 6 minutes, 1 hour, 1 day
Resultant compression steps: _5min_sum, _6min_avg, _1hour_sum, _1day_sum
The compression steps of the 5 and 6 minutes intervals retrieve their values directly from the EVENTHISTORY.
The hour interval is based on the 5 minutes interval (or the 6 minutes interval) - that means that functions of the hour interval retrieve their values from the CSHISTORY_5MIN table).
The day interval is based on the hour interval.
A case, which should be avoided, is for example that the calculation of the day values is based on the 5 minutes values.
Create
Click this button to create a compression calculation with the configured setting. In the event that a compression calculation cannot be created, assure that the following requirements apply:
-
A connection to the Oracle database is established.
-
In case of a compression calculation based on another compression the entered compression step must have a longer interval than the compression step of the basis compression calculation. For example it does not make sense that minutes values are calculated from day values.
-
Check whether the data point element still exists. If a data point element has been deleted, the view in the tree view is not updated automatically and the data point element is still shown as if still exists, whereby a creation of a compression calculation is still possible for it. Close the panel for creation of a new compression calculation and refresh the view in the tree view. Therefore, right-click the tree view to open the context menu and click the Refresh option. Thereby the view is refreshed and the deleted data point element is no longer shown in the tree view. The same applies, if the archive config (_archive) of a data point element has been deleted or the data type of the data point element has changed and it is not int, uInt or float.
Detailed information on the reason is shown in the RDB Log Viewer, where the errors, warnings and information from the ARC_LOG and CSTIMELOG tables are displayed.
Compression Steps
Click this button to open the Compression-Steps-Overview. This allows the creation, deletion or de-/activation of compression steps.
Close
Closes the panel for creation of a new compression calculation without the currently edited compression calculation has been created.
A compression calculation is carried out even if within a compression interval no new values are written to the data point element. That means that this compression value is returned, which was written to the data point element at last. Provided that at least one value has already been written to the data point element.
Adding a compression calculation
One data point element can have any number of compression calculations. These can be calculated directly from the historical values (basis values) of a data point element or from the compressed values of another compression calculation.
This is how to add a compression calculation
based on the basis values of a DPE
-
Right-click the compression data point element of the added data point element. This opens the following context menu:
-
Click the New option to add a new compression calculation based on the basis values of the data point element.
-
This opens the "New compression calculation" panel. Choose the based directly on historyoption and create the compression calculation with the selected compression step.
-
The new compression calculation was added to the tree view:
This is how to add a compression calculation of
another compression calculation
-
Right-click the compression calculation from whose compressed values a new compression calculation should be carried out. This opens the following context menu:
-
Click on the New option to add a new compression calculation to the basis compression calculation.
-
This opens the "New compression calculation" panel. Choose the based on another compression option and create the compression calculation with the selected compression step.
-
The new compression calculation was added to the tree view:
Activating/Deactivating compression calculations
Compression calculations can be de-/activated in the tree view at any time.
In the case that a basis compression calculation is active and the subordinated compression calculation is deactivated, the basis compression calculation is still performed.
In the case that a subordinated compression calculation is active and the basis compression calculation is deactivated, the subordinated compression calculation is still performed. Thereby, for the subordinated compression calculation the last values received from the basis compression calculation are used.
The leading compression calculation icon indicates whether a compression calculation is currently active or inactive:
-
 - compression
calculation is active
- compression
calculation is active -
 - compression
calculation is inactive
- compression
calculation is inactive
Status of the appropriate compression interval and step
A compression calculation takes place only if the appropriate compression interval and compression step are also active. The context menu of the compression calculation informs you about the status of the step, interval and calculation:

This is how to deactivate a compression
calculation
-
Right-click the active compression calculation that should be deactivated. This opens the following context menu:
-
Click the Deactivate option to deactivate the compression calculation.
This is how to activate a compression
calculation
-
Right-click the inactive compression calculation that should be activated. This opens the following context menu:
-
Click the Activate option to activate the compression calculation.
Deleting compression calculations
The deletion of compression calculations is possible only if:
-
This is inactive (for deactivation of a compression calculation see instruction above).
-
This does not have a subordinated compression calculation. Otherwise this has to be deleted first.
This is how to delete a compression
calculation
-
Right-click the inactive compression calculation, which should be deleted. This opens the following context menu:
-
Click the Delete option to delete the compression calculation. In fact, the compression calculation is deleted now, but the archived values are still available.
Display of Sub-Compression Calculations
If there are several compression calculations available for a data point element, the function "open Sub-Compressions", facilitates the display of them.
how to OPEN SEVERAL compression calculationS AT
ONCE
-
Right-click the data point element, whose compression calculations should be opened. This opens the following context menu:
-
Click the "open Sub-Compressions" option in order to open all subjacent sub-compression calculations:
Display <number> compressed DPEs
Loads all compressed DPEs for the selected data point type. In the figure below the data points for the data point type "PUMP1" are shown. 11 data points are shown (the master data point as well as ten data points Pump_01 till Pump_10).