Working with standard WinCC OA HTML pages
The following pages illustrate how to modify and edit standard pages.
Editing the base configuration
The base HTTP Server settings are specified in the HTTP config file under
<proj_path>/config/config.http.
 How to change the background color
In order to change the background color of the standard start-up page only, edit the base configuration as follows:
-
Open the file config.http in the project directory <proj_path>/config
-
Edit, for example, the background color of the standard start-up page.
-
Set the background color to light gray, for example. To do so, change:
httpBackColorLight = "cccccc"
In addition to HTML hex color codes in RGB, you can also specify colors using WinCC OA color names (for example, _invalid, "gray" or [80,60,20]), respectively alias name or {222,188,155} for a light brown.
-
Restart the HTTP Server.
-
Update the selection in the browser (note that some browsers are set to do a real reload only after restarting the browser.
Your standard start-up page now has a light-gray background.
How to change the logos
If you want to use a different logo, you can replace these graphics with your own:
-
Copy your image or logo into the directory <proj_path>/pictures/http
-
Name your image "httpHeaderLogoRight.gif" to replace the logo at the top right with your picture.
-
Restart the HTTP Server.
The logo at the top right in the standard page header now displays your logo!
Proceed in a similar way to replace the other logos. A list of possible names can be found in the section on config.http (Base HTTP configuration).
Changing the start-up view
Proceed as follows to display a different start-up view:
How to change the start-up view
-
You have created an HTML page using an editor (for example, Test.html).
-
Copy this file into the directory <proj_path>/data/http/de
-
Name your page "main.htmlRef"
-
Reload the start-up page in your browser.
Your custom page is now the main frame on the start-up screen.
Of course, you can also modify the other components of the start-up screen. You must display the appropriate frame under a custom name, for example, save as "button.htmlRef".
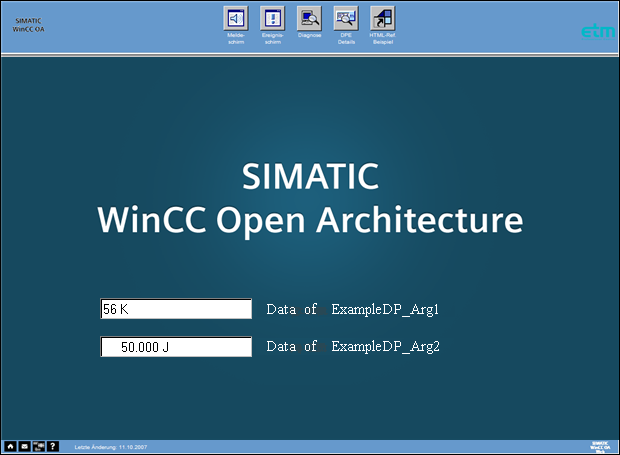
Displaying values in the custom start-up
view
-
Open the file main.htmlRef
-
Insert the following at the appropriate place in your page, for example, an input box:
<input type=text value = "<%?"ExampleDP_Arg1.:_online.._value"%>">
If you want to display the value with a unit and format, use:
<input type=text value = "<%?"ExampleDP_Arg1."%>">
-
Whenever you reload the page, the current online value of the desired data point is displayed (see also the example for the main screen).
alert panel, event panel
How to load your data
This requires you to configure data points with alert handling procedures. You can find details on this in the section Alert handling. The data points ExampleDP_Trend1 and ExampleDP_Arg1 have been assigned alert handling procedures and sent values that trigger an alert.
-
Click the alert panel button
-
Select a time interval in which alarms occur.
-
Enter the name of your data point and a filter, for example, Example*. (* for all alerts)
-
Select the desired alert state (Pending, All, ...).
-
Click the Show alerts button
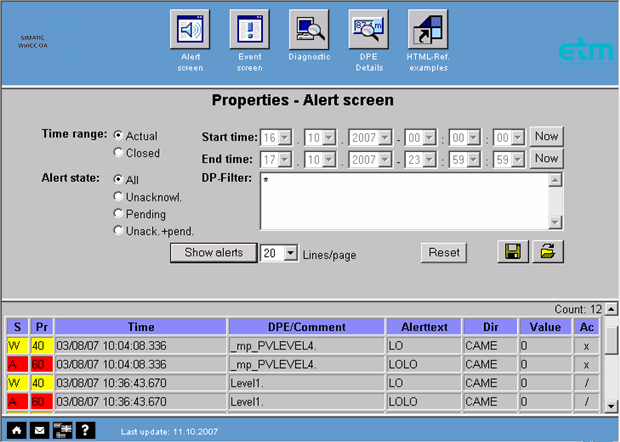
-
Click on the Ac column (in the alert screen) to acknowledge the alerts.
-
A confirmation dialog box is displayed for the current acknowledgement.
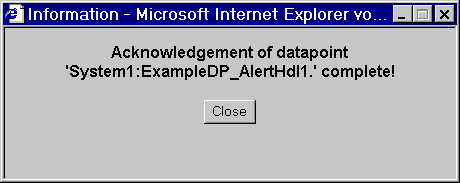
-
Click Close
Detailed information
How to query information on data points
-
Specify an existing data point, a data point element or multiple data points using wildcards such as Example* .
-
Click Show
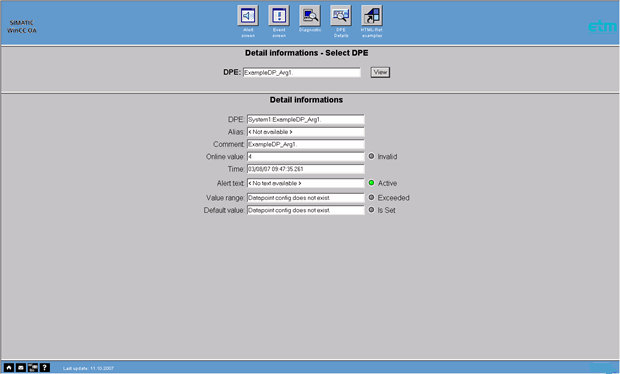
Displays a list of associated data point elements with a host of details.


