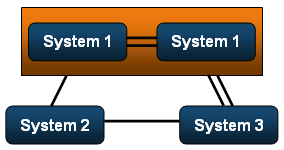
Example on a redundant distributed system
This chapter describes stepwise how to create a redundant distributed system in WinCC OA via the wizard. Before you have to think of the topology and of the connections between the sub systems. In this example the following structure is used for the whole system:
| Project name | System name | System number | Note |
|---|---|---|---|
| Project1 | dist_1 | 1 | Redundant distributed project with redundant network connection. |
| Project2 | dist_2 | 2 | Connected to dist_1 via simple connection. |
| Project3 | Sys3 | 3 | Connected to dist_1 via redundant network connections and connected to dist_2 via simple connection. |
How to create the three systems via the wizard is described and is divided into three parts (the single steps of creating the system are described). The redundant and distributed system specific settings are not described in detail since the settings were already described in the chapters Creating a redundant system and Create a distributed system.
Create the whole system (settings for the project1)
Execute the following steps to create the project1 with the settings shown above (System name "dist_1" with System number 1):
- Open the wizard for creating a new project from the project administrator panel.
- Choose the project type Redundant distributed project and click on Next >.
- Enter general settings like project name (in this case "Project1"), languages, project directory and click on Next >.
- Create the redundancy settings for the "Project1" like shown in the following
figure.
Figure 2. Redundancy settings for Project1 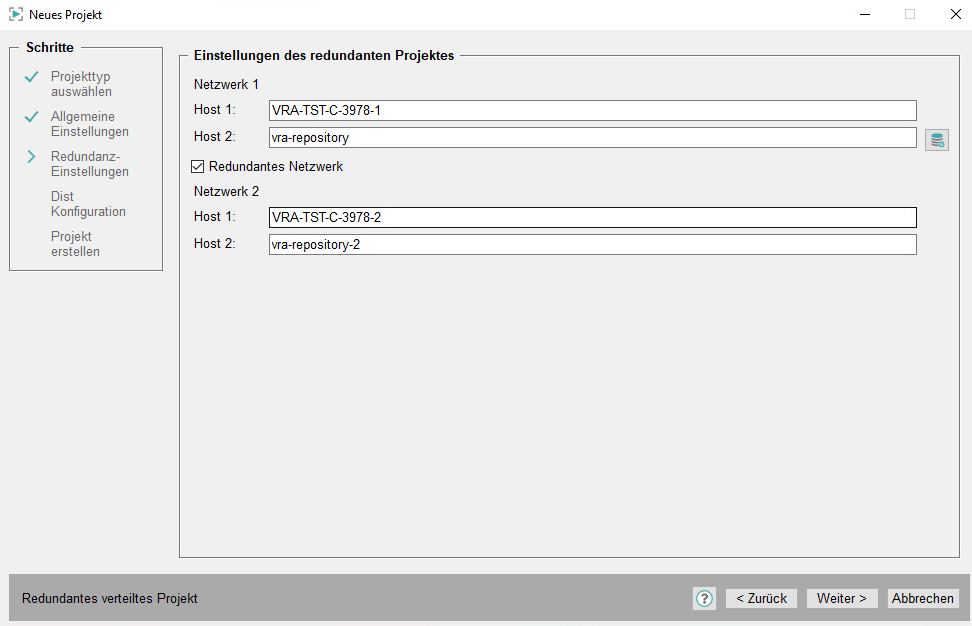
- Click on Next > and create the settings for a
distributed system in the next panel. The following figure shows the settings
for "dist_1".
Figure 3. Settings for dist_1 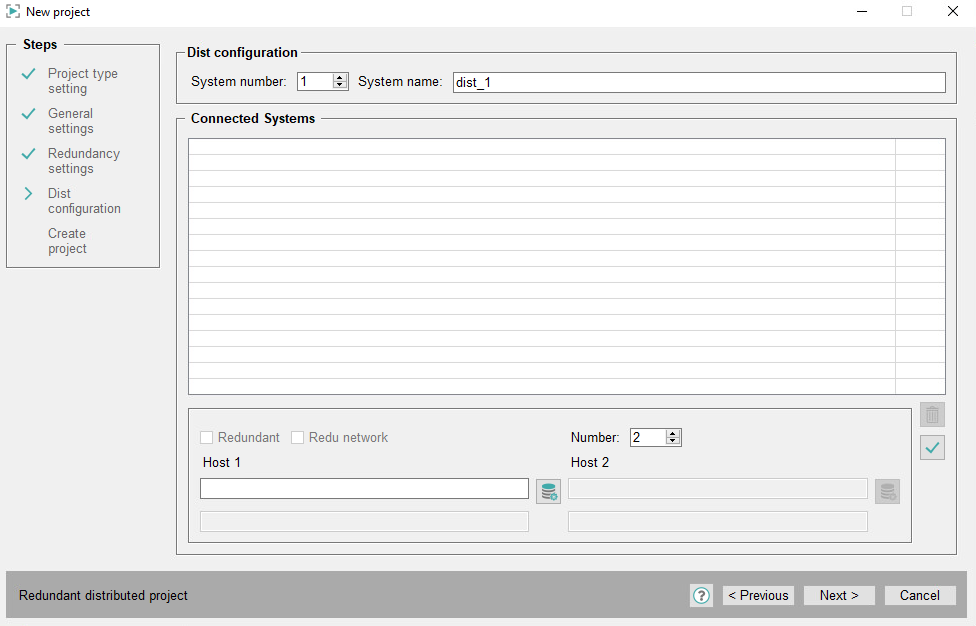
- Since the system "dist_1" is the server in this example no further settings are necessary in the area Connected Systems.
- Click on Next > and then on OK to create the project.
Create the whole system (settings for the project2)
Execute the following steps to create the project2 with the settings shown above (System name "dist_2" with System number 2):
- Open the wizard for creating a new project from the project administrator panel.
- Choose the project type Distributed project and click on Next >.
- Enter general settings like project name (in this case "Project2"), languages, project directory,... and click on Next >.
- Create the distributed settings for the "Project2. The following figure shows
the settings for "dist_2".
Figure 4. Settings for dist_2 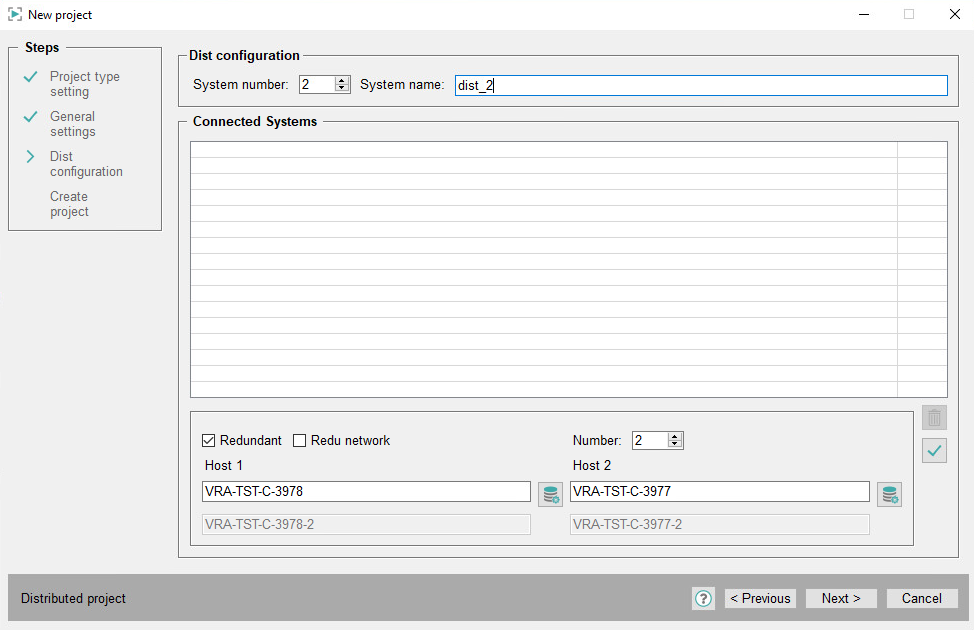
- The system "dist_2" has a connection to "dist_1". The dist_1 is redundant (the check box Redundant must be activated). Choose the both computers on which the redundant system "dist_1" is configured via the appropriate buttons. The button with the green check mark applies the settings (the settings are added into the selection list of the Connected Systems).
- Click on Next > and then OK to create the project.
Create the whole system (settings for the project3)
Execute the following steps to create the project3 (System name "dist_3" with System number 3)
- Open the wizard for creating a new project from the project administrator panel.
- Choose the project type Distributed project and click on Next >.
- Enter general settings like project name (in this case "Project3"), languages, project directory,... and click on Next >.
- Create the distributed settings for the "Project3". The following figure shows
the settings for "dist_3".
Figure 5. Settings for dist_3 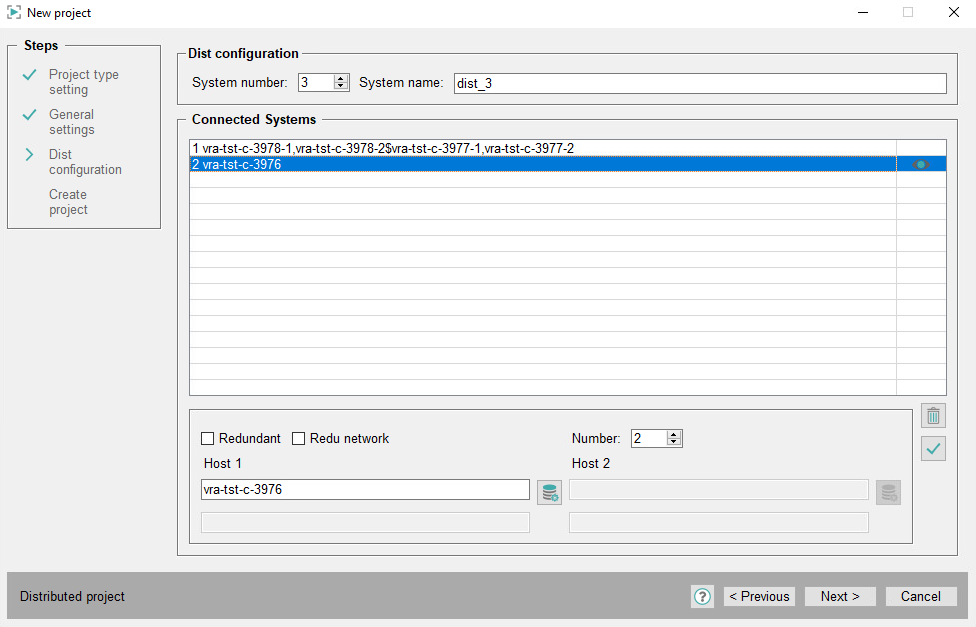
- The system "dist_3" has a connection to "dist_1" which is redundant (the check box Redundant has to be activated). Choose the both computers on which the redundant system "dist_1" is configured via the appropriate buttons. Additionally the network from "dist_3" to "dist_1" is redundant (the check box Redundant net must be activated). The button with the green check mark applies the settings (the settings are added into the selection list of the Connected Systems ).
- The "dist_3" has additionally a connection to "dist_2". The connection to this system is not redundant. Choose the host and the specific system number (for "dist_2" this is the number 2) via the spin button Number. Apply the settings (the settings are added into the selection list of the Connected Systems .)
- Click on Next > and then OK to create the project.
Result
You have configured and created the systems dist_1, dist_2 and dist_3 with the settings described above. Note that when you configure a hierarchical structure it is sufficient to have a connection in one direction (see also Figure of the hierarchical structure of a distributed system).
Changing system information
You can change the system number and name of an existing project by using the WCCOAtoolSyncTypes (RAIMA project). Note that the project is stopped and start WCCOAtoolSyncTypes (RAIMA project) via the command line as follows:
WCCOAtoolSyncTypes -system 3 newSysName -proj "Demo_3.18"As shown above, specify first the system number and then the system name.
If a system number was specified explicitly, specify the number manually when executing the WCCOAtoolSyncTypes (RAIMA projects)!
The system number and name can be queried via the tool WCCOAtoolNameToId or in CONTROL via the functions getSystemName() and getSystemId():
main()
{
  int sysId;
  string sysNam;
  sysNam = getSystemName();
  DebugN("NAME IST:",sysNam);
  sysId=getSystemId(sysNam);
  DebugN("ID IST:",sysId);
}


