Creating a distributed system
Before you create a distributed system you have to think of the structure (of the complete system)that should be created. A distributed system in WinCC OA can be structured hierarchically. This facilitates the configuration of the whole system considerably (see also Principle and functionality).
A distributed system via WinCC OA is created via a wizard. The wizard allows to specify all relevant settings for a distributed system. This wizard is opened via "New project" button of the project administration (for more information on creating a project see chapter Create project). Create a distributed system as follows (with the following settings):
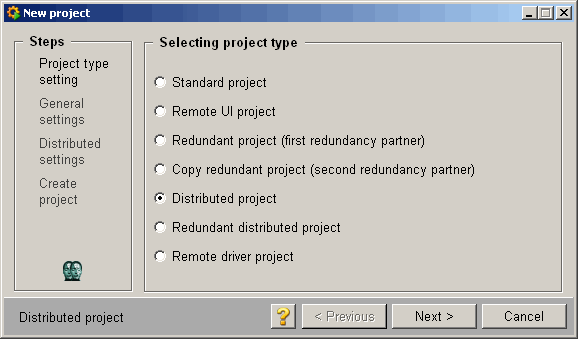
Choose a project type Distributed project and click on Next >. A dialog box for entering the project data is opened.
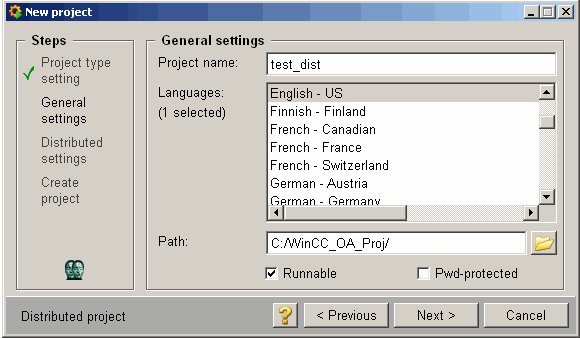
Assign a project name, the desired languages and the project path. You can protect the project with a password if needed. For more information on these settings see chapter Create project. After creating the settings click onNext >. A dialog box, which allows to specify specific settings for distributed systems, is opened.
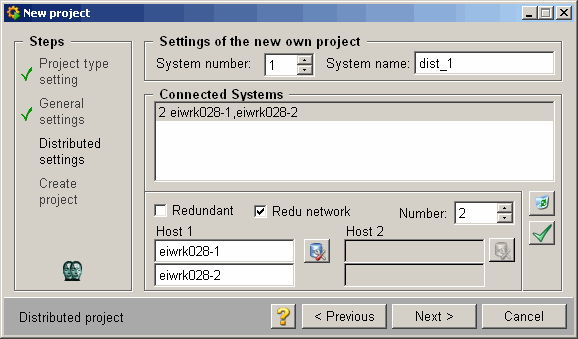
In this panel settings for the own project (=system) like System number (select the system number via the spin button) and System name (enter the name into the appropriate text field) are specified.
Following characters are allowed when entering the system name: A ...Z, a ... z, 0 ... 9 and "_"!
How messages are sent in case of redundant network connections and distributed systems, is described in the chapter redundant network connections.
Create the settings for systems to which the connection should be established in the lower part. Choose a computer from the network (the button with the network symbol opens a "Search" dialog box, which allows to choose a computer from the network environment. So that the computer name is entered into the text field at least a directory that is shared on this computer has to be chosen) that has already a configured WinCC OA system and set the appropriate number of this system via the Number spin button. Activate the check box Redundant net if you have a redundant network connection to the other computer. Activate the check box Redundant if the other system to which you want to build connection is configured redundant. By activating this option you can choose the redundant computer under Host 2. The case sensitivity for Host 1 and Host 2 (in both text fields) is ignored. Note also that double host names (the same name twice) are not allowed. Apply the created settings (settings are added to the selection list Connected Systems) by clicking the button with the green checkmark.
Moreover, it is possible to enable the "One Way Dist" option for connected systems. If One Way Dist is enabled, the new system cannot see and access the other system, even though they are still connected. The following icons indicate the used setting:
-
Figure 2. Partner system is visible 
-
Figure 3. Partner system is not visible 
Please refer to the One Way Dist chapter for further information.
The settings can be changed by selecting an entry form the list and can be applied (added to the list) by clicking the button once more. The button with the wastebasket icon deletes entries from the list of connected systems. The selection list is shown in the following form (see figure above):
1 Eiwrk028-1,Eiwrk028-2
The first number is the system number of the system to which the connection should be established (in our case this is the system with the number 1). After it the computer name (if a redundant network connection exists the first and the second connections are separated by ",") to which the Dist Manager should establish a connection.
If you have not created a distributed project yet the connections to other systems do not have to be specified. In this case it is sufficient to set the system number and system name in the upper part of the panel. Thus, the created system is a server in the hierarchical structure (for more information on the hierarchical structures in case of distributed systems in WinCC OA see chapter Principle and functionality).
After creating the settings for distributed systems in the wizard click on Next >. The last dialog box shows a summary of the settings.

Click on OK to create the distributed project. If you are not satisfied with the created settings you can change the settings by clicking the < Previous button.
The distributed system in WinCC OA is configured by executing these steps (corresponding entries were made in the config file, all necessary managers are listed in the console with the right start type). In a distributed project the single managers have to start in a specific start sequence:
Database Manager (WCCILdata)
All Archive Managers (WCCOAvalarch -num 0 to -num...)
Event Manager (WCCILevent)
Control Manager (WCCOActrl -f pvss_scripts.lst)
All further project specific managers
Distribution Manager (WCCILdist)
Since version 3.5 the "-num" option is not necessary for the distribution manager anymore. Consider, that if older projects are upgraded to version 3.5, the "-num" option must be removed.
If a project already exists and it should be used in a distributed system the necessary config entries and managers have to be added manually. See chapter Configuration file for distributed systems for details on the config entries of a distributed system.
After creating and starting a distributed project the error weight can be configured. The settings for the calculation of the error statuses are configured in the system overview panel (see also Panel System overview in distributed systems).


