Archive control panel
Archiving settings can be made for alerts in the Archive Control panel. The panel is opened through the System Management panel/ Database/ Archive export RAIMA. The "Archive control" panel is located in the version directory /panels/vision.
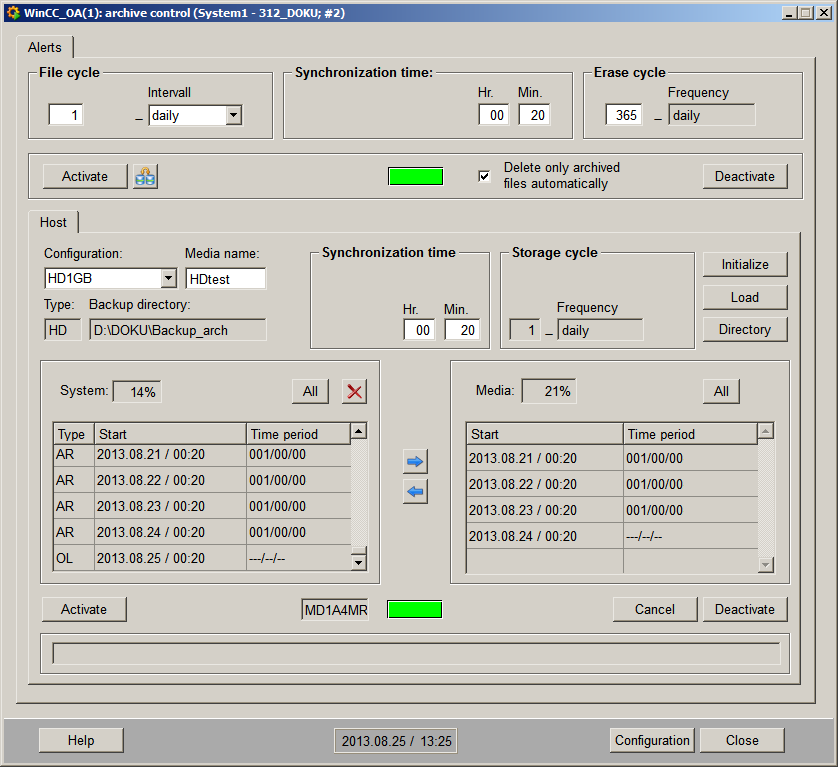
The panel is divided into seven sections.
General information
The archiving settings can be configured separately for alerts and events. Archiving settings are configured for alerts in the Archive Control panel. The archiving for events is configured via the History database, see chapter History DB, basics.
- Using the History DB, the events must be configured in the panels provided for that purpose. The Events tab is disabled.
- Alert colors are not saved when using RAIMA. Only when using a RDB the alert colors are saved.
- When using RDB archiving, the alert colors will be deleted after the alert has been acknowledged.
Database
The settings for the database are made in the second section.
File cycle
The file cycle is the time period after which the database files are changed. A time period must be selected by first clicking on the Frequency combo box. As a default, "weekly " is selected. The following settings are possible here:
| Parameter | File cycle |
|---|---|
| annually | File changed once a year |
| monthly | File changed once a month |
| weekly | File changed once a week |
| daily | File changed once a day |
| <daily |
File changed more than once a day (cycle specified in hours and minutes). Consider, for example, the following file cycle: Hr: 0, Min: 15, Frequency: <daily with the synchronization time being Hr: 14 and Min: 10 This would mean that the first file change is executed at 14:10, the next at 14:25, the third at 14:40 and so on. |
If a manual file switch is started on a single computer, this will be executed within the next minute. In case of a redundant system this file switch will be executed on clock hour. This behavior guarantees a file switch with chronological synchronism. With the aid of the "fileSwitchRoundOff" config entry this time can be specified in detail.
When changing the file cycle times the file cycle activation as well as the activation of the exporting must be done again (if these functions have already been used) so that the settings are written to the data point of the type _TimedFunc. If these steps are not performed, the newly configured cycle times will not be used.
Synchronization time
If this selection has been made, the start time can be specified in the input fields of the Synchronization time section. Here the synchronized time means the absolute time of the file change.
Assume the synchronization time would be specified as follows:
Hr: 14 and Min. 10 with a File cycle Hr: 0, Min: 15 and a frequency: <daily
Then the first file change would be executed at 14:10 (synchronization time), the second synchronization at 14:25 (15 min file cycle), the third at 14:40 and so on.
If you do not specify hours, for example, Hr: empty, Min: 20, the first file change would be at 00:20.
For <daily, daily and weekly file changeovers, the synchronized time must be specified in winter time and in local time for the monthly and annual options.
Erase cycle
The erase cycle allows automatic deletion of database files.
Interval = annually, monthly, weekly, daily
The time period of one alert segment is specified in the associated input field by entering an integer value which specifies a multiple of the selected changeover period.
The erase cycle of alert segments is specified in the associated input field by entering an integer value which specifies a multiple of the selected interval.

Interval = < daily
The time period of one alert segment is specified in the associated input fields by entering a specific time period in hours and minutes.
The erase cycle of alert segments is specified in the associated input field by entering an integer value which specifies a multiple of the specified hours and minutes.
The erase cycle is then displayed accordingly.

Whenever a file is changed, the system checks whether there are files present whose validity period is before the delete period. Activating the check box Only delete archived files automatically means that only those files that have already been archived are deleted from the database during a delete cycle. If the check box is not activated, then all files with a validity period before the delete period are deleted.
If an alert set contains alarms with future time stamps which actually should be saved in the next alert file set, the config entry [event] validTimeDiff must be set to a low value (e.g. 5) to avoid that alarms are saved in the wrong alert file set.
If alarms were already saved in the wrong alert file set (a query for the given time period does not return all values), this file set can be repaired by using the WCCOAtoolBuildIdList with the following syntax:
WCCOAtoolBuildIdList -proj <project name> -alert -dataset <alert data set
                number without "al">
If you need to rebuild the ID list for all of the alert archive sets of your project, use:
WCCOAtoolBuildIdList -proj <project name> -alertThis is equal to:
WCCOAtoolBuildIdList -proj <project name> -alert -dataset 0If you switch the from a RAIMA database to RDB, delete all RAIMA alarm file sets (al* files) except the most current one using the archive control panel since otherwise the start time of the RDB manager is extended unnecessarily. The start time is extended since the RDB also searches for alert data in the RAIMA files. You cannot access the RAIMA alarm history afterwards anyway.
Activating and deactivating the file cycle
Clicking on the Activate and Deactivate buttons enables and disables the file changeover process, including the deletion function. The current status is displayed. By default, the file cycler is enabled to prevent an increased alert history.
- Green field: File changeover enabled
- Red field: File changeover disabled
Configuration
The type of storage medium is configured using the Configuration button.
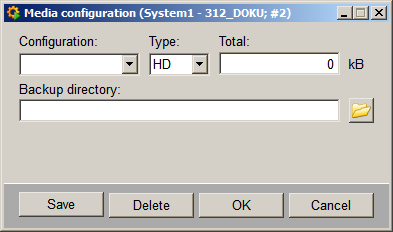
Configuration
General name for the configuration which should be as descriptive as possible, for example, DAT4GB for archiving on a 4 GB DAT tape.
Type
The Type combo box is used for selecting the type of storage medium for archiving. The following settings are possible here:
- Hard disk ( HD )
- MO disk ( MO )
- DAT tape ( DAT )
Total
The usable storage capacity is entered in the Total input field. Any hardware compression should also be taken into account here.
Backup directory / Mount directory / Device / Drive
The following applies, depending on the operating system and the type of storage medium (path names should be changed to suit the system):
| Medium | Linux | Windows | ||
|---|---|---|---|---|
| Device | Mount directory | Backup directory | Drive | |
| Hard disk | /dev/dsk/c201d0s1 | /disc | C:/Directory/ | -------- |
| MO disk | /dev/dsk/c201d0s1 | /disc | C:/Directory/ | -------- |
| DAT tape | /dev/dsk/c201d0s1 | -------- | -------- | Tape0 |
When backing-up on DAT tape under Windows, the device must be labelled with Tape[n].
For the backup of RAIMA alerts or HDB in a redundant project, access to the shared network drive is required.
Save / Delete / Cancel
The specified configuration for the medium is saved by clicking the Save button. Clicking on OK closes the panel and saves the set configuration. The Delete button deletes the set configuration. Clicking on Cancel closes the panel without saving the set configuration.
Media name
After saving the configuration, you have to type in the name of the media which will be stored in the MEDIA_NAME file after the initialization.
Data archiving
The settings for data archiving are made on the Host tab. If a redundant system is involved, data archiving must be configured on a separate tab for each host.

Synchronization time
The synchronization time specifies the start time for archiving. For a synchronization time of 00:05 hours and a storage cycle of 30 min, files are archived at XX:05 and XX:35.
Initialization
The specified configuration can be selected using the configuration combo box.
If a DAT tape is selected as the back-up medium, then two extra buttons are provided. Clicking on the Rewind button rewinds the DAT tape. Clicking on the Eject button ejects the DAT tape.

If a hard disk is selected under Linux as the back-up medium, then two extra buttons are provided. Clicking on the Mount button connects the specified drive with the mount directory. Clicking on the Unmount button breaks the connection to the specified drive.

If you haven't already specified the media name you have to do it before initializing. Clicking on the Initialize button writes the MEDIA_NAME file to the storage medium. The specified name is retained if initialization is successful.
Clicking on the Import button imports the directory from the storage medium again. The directories of all archives created are managed in two internal data points:
- _AlertArchivDirBezeichner (Directories for alarms)
- _EventArchivDirBezeichner (Directories for events)
A directory saved in these internal data points can be displayed by clicking on the Directory button.
File display
The fifth section displays the database files available on the system together with their status in the left half and the files saved on the storage medium in the right half.
Storage utilization of the System (for example, 79% of the hard disk is full) and of the Medium (for example, 40 % of the medium is full) are shown in the top line.
The files can have the following statuses:
- OL : File is located in the system but has not been archived yet.
- AR : File is located in the system and has already been archived.
- RS : File was no longer located in the system and has been imported from the storage medium.
All imported files (locally stored files) can be accessed.
File are selected by clicking on the relevant line.
Buttons for manual import and export or deletion of database files are located between the System and Media sections.
Clicking on the > button archives the selected database files.
Clicking on the < button imports the selected database files from the storage medium into the system.
All files can be selected or deselected by clicking on the All button.
Clicking on the X button deletes the selected files.
Toolbar
Using the buttons in the lower section of the Host tab, archiving can be enabled (Activate button), disabled (Disable button) or an action currently in progress can be cancelled (Cancel).
In addition to the buttons just described, there is an extra field in this section of the tab that displays the host name.
The current archiving status is indicated to the right of the host name.
Green field : Archiving enabled
Red field : Archiving disabled

Status bar
The status bar is used for displaying user information and error messages. Error messages are displayed in the status bar until the next action starts. Otherwise, the status bar shows what action is currently in progress.

General icon bar
Two buttons appear in the bottom section of the Archive Control panel.
- The Configuration button opens the panel for configuring a medium type (see Medium).
- The Close button closes the panel.
The date and time are also displayed in this section.


