Example of Drag & Drop at Runtime
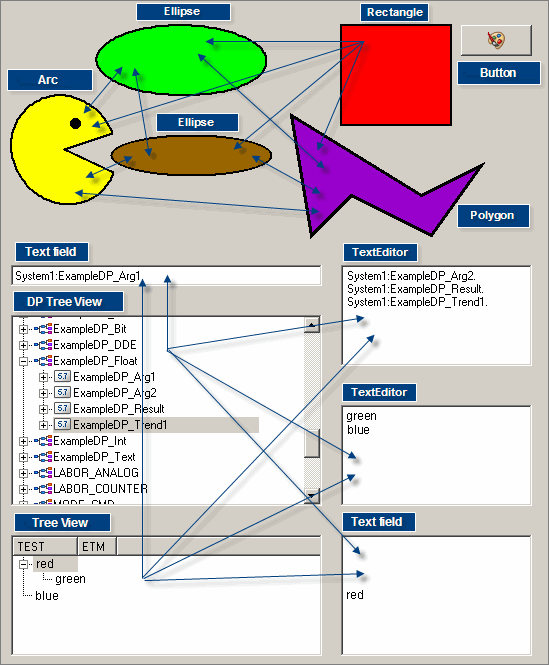
In the following example you create a panel with several different objects. Specific information can then be dragged between the objects. You learn how to use the Drag & Drop functionality.

In the panel shown above you can execute the following actions:
-
Select a color using the WinCC OA color selector (the color selector will be opened using the "Pushbutton") and then drag and drop the color to be used for an object (rectangle, arc, polygon or ellipse) of the panel.
-
You can select a data point from the DP Tree and then drag and drop the data point to a textEdit or to a text field.
-
You can select a color name from the table and drop it to a text field or to a textEdit.
To create the panel above, proceed as follows:
-
Create a panel and the following graphic objects using the graphics editor GEDI:
-
1 rectangle
-
1 push button (with button label <wincc_oa_path>/pictures/colors.png)
-
2 text fields
-
1 DPTree
-
1 arc
-
2 textEdits
-
1 tree widget
-
1 polygon and
-
2 ellipses
-
-
All Objects: Set the attribute "Accept Drops" in the graphic editor to TRUE for all the above created objects. "Accept drops" tells that the shape allows dropped information on it.
-
Rectangle, Arc, Polygon, Ellipses: Set the attribute "Draggable" in the graphic editor to TRUE for the objects rectangle, arc, polygon and for the ellipses. The "Draggable" attribute tells if a shape allows to start a drag operation.
-
Rectangle: For the rectangle use the "DragStart" event. In this event, the script has to decide what information it should provide for the drag operation. The rectangle provides a color for the drag operation. Therefore, use the following script.
main(int keys)
{
  string info;
  info = this.backCol;
  dragStart(info);
}
Currently, the information to be provided for the dragStart event must be of string data type (this means: TEXT only) otherwise the function will return -1 and an error will be shown.
-
Push button: For the Clicked event push button use the following code:
main()
{
  string color;
  colorEditor(color);
  RECTANGLE2.backCol=color;
}
The code opens the WinCC OA color editor and sets the selected color for the rectangle "RECTANGLE2".
-
Text fields: For all text fields use the following code for "DragDrop" event:
main(string information, int dragType)
{
  this.text = information;
}
The code specifies that the dragged information like a name of a data point will be shown in the text field.
-
Arc: For the event "DragStart" of the arc, use the following code:
main(int keys)
{
  string color = this.backCol;
  dragStart(color,"arc.png",DRAG_COPY);
}
The arc also provides a color for the drag operation. The "arc.png" is an image that is shown next to the cursor during the drag operation. If you pass an empty string, a default image will be used. A filename can be passed. This must be specified relative to the pictures directory. DRAG_COPY specifies that a copy operation will be executed. This means the dragged information remains in the source and will be copied. DRAG_MOVE moves the information and it does not remain in the source.
Since there is a DragEnter event for the arc, you have to call dropAccept():
main(string information, int dragType)
{
  dropAccept(1);
}
To be able to apply a color to the arc, use the following script for the DragDrop event:
main(string information, int dragType)
{
  DebugN(information);
  this.backCol = information;
}-
Tree Widget: For the event "Initialize" of the Tree widget, use the following code:
main()
{
  this.addColumn("TEST");
  this.addColumn("ETM");
  this.appendItem("","1","red");
  this.appendItem("1","2","green");
  this.appendItem("","3","blue");
  this.setDragEnabled("1",TRUE);
  this.setDragEnabled("2",TRUE);
  this.setDragEnabled("3",TRUE);
  TREE1.setDragEnabled("3",1);
}
The code adds the columns TEST and ETM to the tree widget and the items red, green and blue to the columns. The method setDragEnabled enables the drag at runtime for the items of the tree widget.
-
Polygon: For the DragDrop event of the polygon use the following script in order to drag a color and apply it to the polygon:
main(string information, int dragType)
{
  DebugN(information);
  this.backCol = information;
}
As usual you must provide data to drag with dragStart(...) so that you can drag the color of the polygon to be used for another object:
main(int keys)
{
  string color = this.backCol;
  dragStart(color,"arc.png",DRAG_COPY);
}
Since there is a DragEnter event, you have to call dropAccept():
main(string information, int dragType)
{
  dropAccept(1);
}-
Ellipses: For the ellipses, add the following code for the DragDrop event:
main(string information, int dragType)
{
  string color1 = this.backCol;
  this.backCol = information;
  ELLIPSE4.backCol = color1;
}
The code applies a color to the ellipse. The code ELLIPSE4.backCol = color1; specifies that either the color of ellipse3 or ellipse4 will be set.
For the DragStart event add the following code so that the color of the ellipse can be dragged to another object:
main(int keys)
{
  string color = this.backCol;
  dragStart(color,"",DRAG_LINK);
}
Since you pass an empty string, a default image will be used for the cursor.
Now you can:
-
Select a color using the WinCC OA color selector, drag and drop the color to be used for an object (Rectangle, Arc, Polygon or Ellipse) of the panel.
-
Select a data point from the DPTree and then drag and drop the data point to a textEdit or to a text field.
-
Select a color name from the tree widget and drop it to a text field or to a textEdit.


