Insights Hub Configuration Panels
This chapter describes the WinCC OA Insights Hub Configuration:
Insights Hub Main Panel
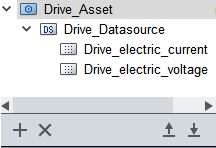
On the left side you can find the Insights Hub structure tree. The tree contains all Insights Hub structure elements. At the top level you can find assets. Data sources are located below assets and data points below the data sources.
Open a context menu via right-click on the tree widget.
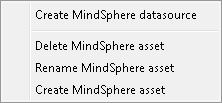
If you click an empty space, the option "Create Insights Hub asset" is shown.

If you click on asset, the options "Create Insights Hub datasource", "Delete Insights Hub asset", "Rename Insights Hub asset" and "Create Insights Hub asset" are shown.
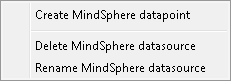
A data source contains the options "Create Insights Hub data point", "Delete Insights Hub data source" and "Rename Insights Hub data source".
For a data point, the options "Rename data point" and "Delete data point" are shown.
With the buttons under the Tree Widget (+ and X) the options "Create element" (+) and "Delete element" (x) are shown for the element selected from the tree view. The X deletes the selected element and + adds a child element to the selected element.

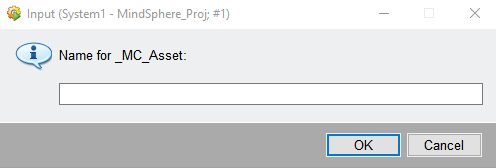
Create Asset
A pop-up window is shown. Enter a name for the asset to be created. If the name is valid, a new asset and a WinCC OA data point are created.
Delete Asset:
The asset and all sub structures are deleted. CAUTION! This action cannot be undone.
Rename Asset:
A pop-up window is shown. Enter a name for the asset to be created. If the name is valid, the asset and the WinCC OA data point are renamed.
Create Data source:
A pop-up window is shown (see screenshot under Create Asset). Enter a name for the data source to be created. If the name is valid, a new data source and a WinCC OA data point are created.
Delete Data source:
The data source and all sub structures are deleted. CAUTION! This action cannot be undone.
Rename Data source:
A pop-up window is shown (see screenshot under Create Asset). Enter a name for the data source to be renamed. If the name is valid, the data source and the WinCC OA data point are renamed.
Create Data point:
A pop-up window is shown. Enter a name for the data point to be created. If the name is valid, a new data point is created.
Delete Data point:
The data point is deleted. CAUTION! This action cannot be undone.
Rename Data point:
A pop-up window is shown. Enter a name for the data point to be renamed. If the name is valid, the data point name and the WinCC OA data point are renamed.
With the buttons under the tree widget (↑ and ↓), the structure can be exported and imported.

Export:
A file selector is opened in the data directory of the project. You can select an existing file or enter a new name. If you enter a new name, a new file is created when exporting the structure. The file is a JSON file.
The structure is exported in JSON format. Enter the ending ".json" for the file.
When the export is completed, a pop-up window with the message "Export finished" is shown.
Import:
A file selector is opened in the data directory of the project. Select the file where the structure is saved and which you want to import. The file is a JSON file.
The import is non-destructive. This means that existing elements are not deleted or overwritten. In case of a conflict during the import, a pop-up message, which shows the element that caused the conflict, is shown. This message is also shown in the log viewer. This element is ignored for the import but the other elements are created.
If you select one of the elements in the tree widget, the corresponding view is shown in the main area
(Asset->AssetView, DS->DSView, DP-> DPView).
In these views all changes are real time changes and are written directly on the data point. This action cannot be undone!
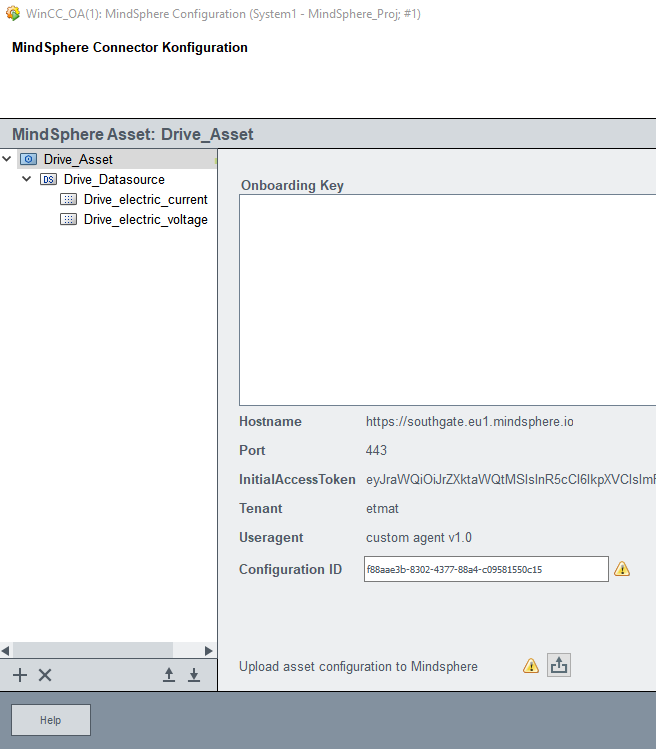
AssetView
In the AssetView you can see all configuration information for the selected asset.
Onboarding Key:
In this text field the Onboarding key is added. The key is created on the Insights Hub server. Via the text field, most of the information for the asset is filled in.
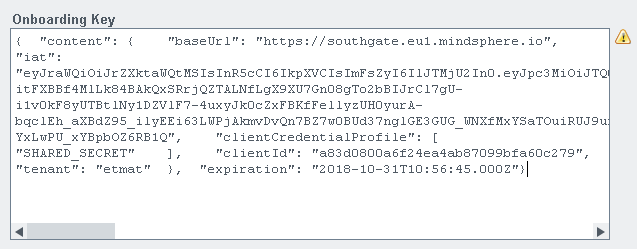
When an asset on the Insights Hub Server is "onboarded" but a connection to the server cannot be established anymore due to expired authentication data (token), you must offboard the asset on the Insights Hub Server. Create also a new Onboarding key. Copy this new created Onboarding key into the Onboarding Key text field in order to reset the internal AccessToken and to use the correct Initial Access Token (IAT) for the next connection establishment.
Configuration ID:

This field specifies whether a counterpart for this asset and its structures exists on the Insights Hub Server. If a counterpart exists, copy the configuration ID of the asset from the server and enter it here.
If you leave this field empty and you have defined the structures for the asset in WinCC OA, you can synchronize the structure to Insights Hub via the ↑ button in the asset view or when establishing the first connection to Insights Hub.
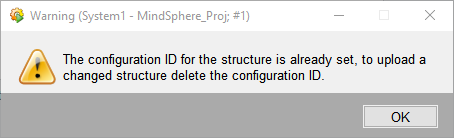
Configuration Upload:
The structures defined for the asset are sent to the Insights Hub Server and created on the server by clicking this button. If a configuration ID was already entered into the panel, a pop-up message with an error is shown. In order to upload changed structures to the server, delete the already existing Configuration ID.
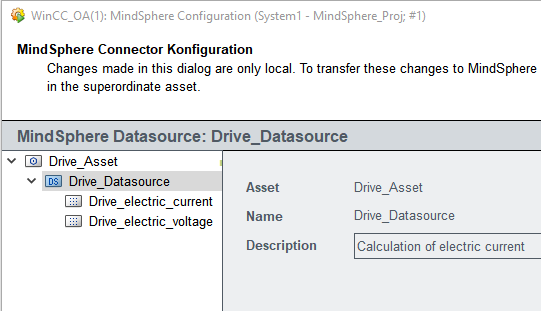
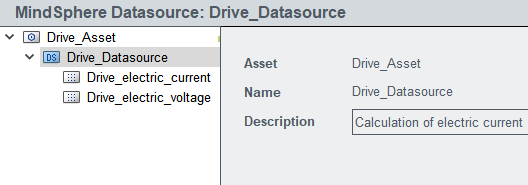
DatasourceView
In the DatasourceView you can see all configuration information for the selected data source.
Asset:
The higher-level asset to which the data source belongs. Open the AssetView of the asset via a click on the name of the asset.
Description:
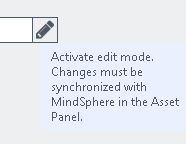
Enter here the (optional) description for the data source. If a configuration ID is already available for the higher-level asset, the text field is not editable by default. You can modify the local description by clicking the "Edit" button.
In order to upload the change to Insights Hub, use the configuration upload button.
DatapointView
In the DatapointView you can see all configuration information of the selected data point.

Asset:
The higher-level asset to which the data point belongs. Open the AssetView of the asset via a click on the name of the asset.
Data source:
The higher-level data source to which the data point belongs. Open the DataSourceView of the data source via a click on the name of the data source.
ID:
The data point ID is normally assigned when uploading structures to the Insights Hub Server. If you have already specified your structures on the Insights Hub Server, enable the editing via click on the Edit button and copy the ID from the Insights Hub Server.

Description:
Enter here the (optional) description for the data point. If a configuration ID is already available for the higher-level asset, the text field is not editable by default. You can modify the local description by clicking the "Edit" button. In order to upload the change to Insights Hub, use the configuration upload button.
Note that in addition to a description, a unit must be added in order to save the description. If you do not specify the unit, the description is not saved.

Data Type:
Select here of what data type the data point should be. If a configuration ID is already available for the higher-level asset, the text field is not editable by default. You can modify the local description by clicking the "Edit" button. In order to upload the change to Insights Hub, use the configuration upload button.

Unit:
Select the unit for s data point here. If a configuration ID is already available for the higher-level asset, the text field is not editable by default. You can modify the local value by clicking the "Edit" button. In order to upload the change to Insights Hub, use the configuration upload button.


