Button functions
The options in the MaPara menu offer the same functions as the toolbar buttons described on this page. Additionally the MaPara menu offers the option Info, which opens a dialog window, showing the version number of the Add-In and ETM contact addresses.
Options

Opens a dialog window in which you can make various settings for the Excel tools.
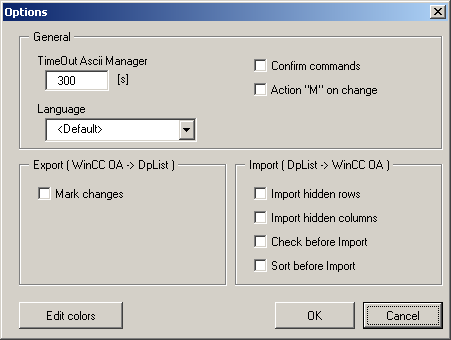
In the General section you can set the time-out time in seconds for the ASCII Manager. If the ASCII Manager runs for a longer time without importing/exporting data (longer than the specified time), the user receives a dialog, which conveys the time-out and no answer from the ASCII Manager was sent (In that case control running processes, because the ASCII Manager does not stop automatically after the defined time). In addition, you can change the language settings for the menu and the dialog boxes used in the Language combo box.
Nevertheless some dialog windows present German expressions (for example, "Ja" resp. "Nein" button in hint windows) after changing the language (German --> English). Since these are standard dialogs, the labelling of the buttons complies with the installed Excel language.
There are two check boxes on the right-hand side. If the check box Confirm commands is enabled (default), then a confirmation dialog box is opened prior to execution of an action, in which you select Yes/No to start/cancel execution of the action, for example, creating a new DP list. If the Action "M" on change check box is enabled (default), then the letter "M" is set in the "Action" column of a data point line when there is a change to a cell value (value of a dynamic attribute). The letters that can be used are explained in the chapter Creating a template. Note that when copying a cell by "dragging", the source line is also marked with the letter "M", even though the value in the cell has not changed. The add-in knows that something has changed, but does not know whether the contents of the cell have stayed the same. So if "100" was previously contained in a cell, and "100" is entered again, then although the contents have in fact stayed the same, the cell has still been changed ("Action" column is marked with an "M").
You need to disable this option to make the Undo function useable again in the Excel sheet (this is an Excel problem).
In the Import ( DpList -> WinCC OA ) section - data adopted in WinCC OA from Excel) - you can use the two check boxes Import hidden rows (default = disabled) and Import hidden columns (default = enabled) to define whether hidden lines/columns should be included in the import. Check before Import (default = enabled) starts a check function of the whole Excel table before the import process (see also Check table - this is only for the format V 4 valid). Sort before Import (default = enabled) starts a sorting process according to the data point types before the file is taken on WinCC OA. With V 3 a sorting by data points takes place, with V 4 it is a sorting by data point types.
In the Export ( WinCC OA -> DpList ) section - data adopted in Excel from WinCC OA - you can use Mark changes (default = enabled) to define colored highlighting of modified lines compared with those that are unchanged.
The colors for the specific markings within the Excel table, when invoking specific functions described on this page, are defined via clicking on the Edit colors button. This opens another window for defining the color:
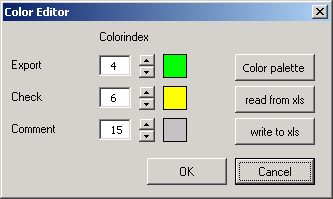
The colors are addressed via indices in Excel (56 indices are available). These are chosen via Spin buttons and shown on the right in the preview. A definition of a color can take place for following functions:
-
Export : Changes in a DP list compared with data from WinCC OA are marked with a defined color.
-
Check : If errors were found in the table after the check, these are marked with a color. (See also Check table)
-
Comment : The comment columns (format V 4 specific) and the header of ASCII files imported into Excel are marked with a defined color.
Via clicking on the Color palette button, the colors assigned to single indices can be changed. A dialog window in which you can assign a color, is opened. An Excel table that shows default indices with the respective colors is visible in the background.
After changing the colors, the current color settings can be transferred to the opened Excel sheet via the write to xls button (in order to see this also in the sheet, you have to change the color for the Export, Check or Comment). The set colors are administered in a separate color catalog in the Add-In. Via opening another sheet where other color settings were set, a transfer of the color palette between the current sheet and the Add-In is initiated via clicking on the read from xls button.
To see the indices in the Excel spreadsheet in full, move the dialog windows "Options" and "Color Editor" to the bottom right side of the monitor before you edit the colors assigned to the indices by clicking on the color palette button. The position of the dialog windows beneath cannot be changed anymore since these are modal dialogs.
Once you have made the settings in the Options dialog window, click OK to adopt the changes and close the window, or Cancel to close the window without adopting the settings.
WinCC OA login

Opens a dialog window in which you are prompted to enter a user name and password in WinCC OA. This information is needed to establish whether the logged-in user has the necessary rights to import modified ASCII files into WinCC OA (authorization to start the ASCII Manager).
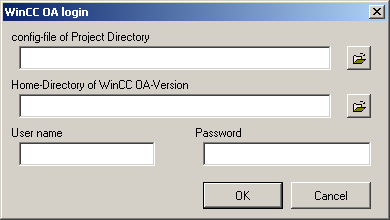
Enter your WinCC OA user name in the User name text box and the appropriate password for the user name in the Password text box. The text fields config-file of Project Directory and Home-Directory of WinCC OA-Version point at the config file of the current running project and the installation directory of WinCC OA. With the file selector button you can specify the config file. Then the installation directory will be added automatically. Use the OK button to confirm your input.
The config file and the installation directory will be saved for the Windows account that's currently logged in. Therefore, you don't have to specify these entries every time. If you log in with another Windows account, you have to specify the config file and the installation directory again.
The information about the current WinCC OA project has to be set correctly otherwise an error message is shown after confirmation.
Once you have entered user name and password, they are not checked for correctness until the next action on the WinCC OA side is performed (for example, when starting the ASCII Manager in order to import data into WinCC OA).
Add new DPList to the workbook

Places a selected ASCII file in a new Excel sheet. Click on this button to display the dialog window for opening files. Select a template that you have already created (file type is ASCII with the extension *.ascii). Read the chapter Creating a template or Creating a DP list to find out how to create templates.
Click on Open to insert the ASCII file in the workspace. When inserting the file, the data delimited by tabs in the ASCII file is automatically arranged and displayed in columns.
Note that when you add a template/DP list (created in V 3) in Excel 2003, the total number of columns may not exceed 256. This is because Excel 2003 can only handle up to 256 columns. Thus, only 254 columns for dynamic attributes can be defined in the template/DP list (2 columns are allocated for the header). Files that include more than 254 columns can only be edited with a text editor. This restriction does not apply to Excel 2007 or above.
Update this DPList from WinCC OA

This function updates the Excel sheet with the changes that have been made in the WinCC OA database since the last import of the present ASCII file. Changes (for example, new parameter values set) are displayed by colored highlighting in the Excel sheet (the color for highlighting can be set in the Options). If several data point types exist in a DP list in V 4, a user can decide which DPTs should be updated. This takes place in a dialog window, where you can select existing DPTs.
If the changed values of an Excel spreadsheet are imported into WinCC OA (Column Action marked with "M") and an update of the table with data from WinCC OA is initiated afterwards, the error protocol is opened and it displays the changed cells in the Excel spreadsheet (Column Action marked with "I" again). The error protocol is only opened when the check box Mark changes in the dialog window "Options" is activated. In case the option is not set, the table will be updated automatically.
Transfer this DPList to WinCC OA

The DP list edited in the Excel sheet is imported into the internal WinCC OA database. The ASCII Manager, which performs this task, starts in the background. If the logged-in user does not have the necessary authorizations, it may not be possible to start the manager, and an error message is displayed.
Make sure that a peripheral address is inactive on the master DP before transferring the DP list to WinCC OA, in order to guarantee a proper functionality of the peripheral address when creating new DPs (for example, with the OPC driver - correct server, group and item name)!
Transfer all DPLists to WinCC OA

Imports all DP lists that have been defined in the Excel sheet.
Check table

With the button a check for the whole Excel table can be made. Via clicking on the button, a check if the data is given correct in the cell of the master data point that is corresponding to the DPE, is made. These illegal entries in the cells, for example, if a cell on the right next to a comment column in the format V 4 is assigned with a value and the earlier value of this cell was "---" (i.e. the cell cannot contain a value because no dynamic attribute exists for this element, in the cell of the corresponding element of the master data point also stands "---"). This is identified and displayed when checking. Also errors like the entry "#VALUE!" or "#DIV/0" in a cell are checked and displayed. The display takes place via a dialog window which is opened extra in case of errors:

In the figure shown, 4 illegal entries were found in the table. You can see the concerned cell in the protocol as well as a description of the error. Via selecting an entry in the error protocol and clicking on the button Mark this, the cell with the error is defined with a color (for example, yellow) . Which color is used for the marking, depends on made settings in the dialog window (see dialog window Options). The button Mark all marks all cells that contain an illegal value, with the defined color.
The dialog window that shows the errors, is opened when updating a table with data from WinCC OA and changes are found. The user can switch to concerned cells via selecting single entries.
Sort DP type

Sorts all lines of the Exel table by DP types (column "TypeName"). This function again is only for the format V 4 available (at templates in format V 3 this button is disabled in the tool bar of Excel tools). This is because no column is used for the data point type in the format V 3 (in V 3 there is an ASCII file for each DP type). An other criteria for sorting in the format V 4 is the column "ElementName".
Sort DPE (DP)

Sorts all lines of the Excel table by data point elements (in V4) resp. by data points (in V 3). For the sorting the column "ElementName" is
Hide master DPs

Hides the master data points in the Excel table. Via clicking on the button repeated, all master data points are shown again.
Format worksheet

Restores the excel table with the original formatting. If the appearance of templates/ DP lists was changed, the original state (without marking) can be restored via this option. Excepting the markings of comment columns and the header of Excel table. The marking is activated automatically after adding a DP list into the folder. A better overview when editing the file is consequently ensured.
Show columns

Shows all columns again that were hidden. These columns can be changed and are re-enabled when importing the DP list into WinCC OA (modified data are included).
Filter columns

Opens a dialog window in which you can configure filters for the columns defined in the Excel sheet.
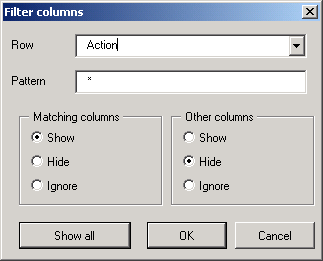
Select a row from the top combo box and enter a search pattern for the columns in the Pattern text field (for example, using wildcards - "*" means all columns). Use the two radio boxes Matching columns and Other columns to define actions that shall be performed if the search pattern finds a column match. The Show all button filters all the columns of the selected line ("*" set as search pattern).
Hide columns

Opens a dialog window in which you can select the columns that are to be hidden in the Excel sheet. Hiding a column (a column corresponds to a dynamic attribute) means that it is not included in the import into the internal database. If you have already defined a filter for the DP list (see option Filter columns), then you can save this definition as a configuration in this dialog box. The dialog window shows immediately when opened which columns are shown or hidden.
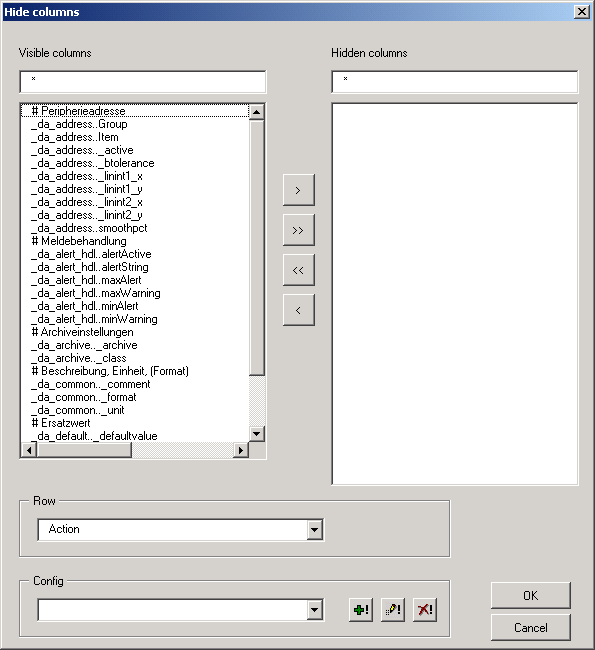
In the Row area below, you can select from the defined lines of the ASCII file. The associated columns are then displayed above in the list of shown (non-hidden) columns (the display of column names can be filtered using wildcards).
Select a column and add this to the list of hidden columns on the right-hand side (click on the right-arrow button) to remove this from the Excel sheet. Alternatively you can place all the columns in the list of hidden columns (click on the button with the double right-arrow). The left-arrow buttons perform a similar function, except in this case hidden columns are placed in the list of shown columns.
Save a setting as a configuration in the Configuration section below. The buttons on the right of the Configcombo box mean the following:
-
 Saves the
settings in a new configuration.
Saves the
settings in a new configuration.
-
 Saves the changes in an
existing configuration.
Saves the changes in an
existing configuration.
-
 Deletes the
selected configuration.
Deletes the
selected configuration.
The OK button adopts the settings and closes the dialog window, while Cancel closes the dialog window without taking any action.
Filter columns combo box

This combo box contains saved configurations that you have created using the dialog window Hide columns (see above).


