Groups
Each user has to belong to a group. In other words, a group is a collection of users. The groups are defined in WinCC OA or are inherited from Windows in case of Os Auth - Windows user administration. Note, however, that the rights for the groups always have to be defined in WinCC OA. An arbitrary number of groups can be defined and an arbitrary number of users can belong to a group. WinCC OA user administration also provides five predefined groups. A user may also belong to several groups. If a user belongs to several groups, the user rights of this user are a combination of the rights for the different groups.
Up to 32 authorization levels can be assigned to a group. Also areas can be assigned to groups. For more information on areas, see chapter areas. This chapter describes in detail the groups as well as the panels used to administer them.
Note that the panel Group administration may block if the determination of the user groups takes longer due to the domain size. The groups are, however, shown after the loading process.
Predefined groups
The following groups are already predefined with set authorization levels.
| Group name | Group ID | Authorization level | Authorization bits |
|---|---|---|---|
| root | 0 | root | all |
| para | 1 | Administration | bit 1,b2,b3,b4,b5 |
| operatorAll | 2 | Advanced operator | bit 1,b2,b3, ,b5 |
| operator | 3 | Normal operator | bit 1,b2, , ,b5 |
| guest | 4 | Visualization | bit 1 |
The authorization levels are defined by means of authorization bits (1-32).
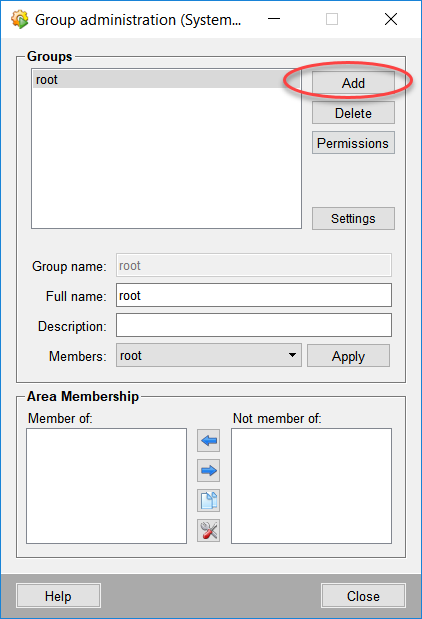
Group administration
The Group administration panel (See the figure below) is used for creating and deleting groups as well as for assigning area memberships to the groups.
Group
The Group administration panel consists of aGroupsview where you can see all existing user groups.
![]() Adds a new group. Note that if
you use Windows user administration, only the groups that are defined in Windows,
can be added. The Windows groups can be chosen from a panel that appears when you
select the Os Auth - Windows User administration.
Adds a new group. Note that if
you use Windows user administration, only the groups that are defined in Windows,
can be added. The Windows groups can be chosen from a panel that appears when you
select the Os Auth - Windows User administration.
If you use Windows user administration, only the groups that are defined in Windows, can be added. Add the groups by using the "Operating System Group Selection" panel. Open the "Operating System Group Selection" panel via the Add button:
- For OS Auth - Windows User Administration - see chapter OS Auth. Groups
Each user of the group ROOT can open the User administration panel.
![]() Deletes the chosen group.
Deletes the chosen group.
![]() Opens the Authorization
window and shows the authorization bits of the chosen group:
Opens the Authorization
window and shows the authorization bits of the chosen group:
Note that you can also configure the rights of a group by double-clicking on the group in the Group administration window.
You can change the authorization bits by clicking on the column. For the authorization bits, tool tips are shown also (for example, bit 2 = normal user level).
The following text fields show detailed information about the chosen group:
Group name : Shows the group name. The group name cannot be changed.
Full name : Shows the full name of the group.
Description : Shows the description of the group.
Members : In the members combo box you can see all users that belong to the selected group.
Group settings...: Opens the Settings Management panel. The Settings Management panel can be used to define user group settings.
![]() Applies the changes. You can
for example change the full name or the description of a group and apply the changes
by pressing this button.
Applies the changes. You can
for example change the full name or the description of a group and apply the changes
by pressing this button.
Area membership consists of two text areas:
The area membership section allows to assign areas and define the respective authorization bits.
Member of: Shows the areas the selected group belongs to.
Not member of: Shows all available areas which are not assigned to the selected group. The areas are shown with the defined "full name".
Each group can have different rights for the same area (for example, the group guest has only visualization rights for the tunnel2 and the users of the group operatorAll can execute commands and set values for the tunnel2) and one group can have different rights for different areas (for example, the group operatorAll has different rights for the areas tunnel1, tunnel2 and tunnel3).
![]() Assigns an area to the
group.
Assigns an area to the
group.
![]() Deselects the chosen
area.
Deselects the chosen
area.
![]() Adopts the authorization of
another area. Note that the authorizations can only be adopted for an area which has
an area membership and is displayed in the Member of text area. The adoption
of the authorization means that the authorization bits of the adopted area are set
for the area selected in this area are set for the area selected from the Member
of text area.
Adopts the authorization of
another area. Note that the authorizations can only be adopted for an area which has
an area membership and is displayed in the Member of text area. The adoption
of the authorization means that the authorization bits of the adopted area are set
for the area selected in this area are set for the area selected from the Member
of text area.
If there is, for example, the area "Area1" and this area has the authorizations "Visualize" = Bit 1 and "Normal user level" = Bit 2, you can copy these authorizations to a new area. Create a new area and assign this area to the desired group (the area is shown in the "Member of" view). Now you can adopt the authorizations of an existing area (e.g. Area1), for this new area. For this, select the new area from the "Member of" view and click the "Adopt authorization of another area" button. In the "Copying area authorization" panel (see figure below), select the desired group from the combo box and then the area "Area1" from the table. The authorization bits of Area1 are applied to the new area through the "OK" button.
The button opens the Copying area authorization... window:
In the Copying area authorization... window you can choose a user group from the Select a group combo box. Area(s) belonging to this group are displayed in the areas table and you can adopt the authorization bits of an area for the new area and you do not have to define the bits separately.
![]() Displays the next 16
authorization bits in the Authorization table.
Displays the next 16
authorization bits in the Authorization table.
![]() Allows editing the
authorization of the area. Opens the Area authorization window:
Allows editing the
authorization of the area. Opens the Area authorization window:
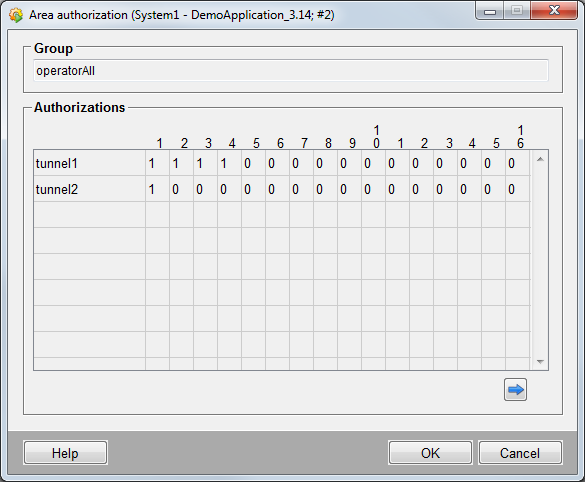
In the Authorization window you can see the full name of the chosen group as well as the areas assigned to the group. The authorization bits of an area can be changed by clicking on the column.
![]() Displays the next 16
authorization bits in the Authorization table.
Displays the next 16
authorization bits in the Authorization table.
To create a new group
-
Click on the Group administration ... button.
-
Click on Add.
-
Define a new group (Group name, Full name, Description) in the Adding new group window.
-
Click on OK. A new group was created.


