Create a Disaster Recovery System
The section describes step by step how to create a Disaster Recovery System (DRS).
A DRS consists at least of two redundant systems PSS and SSS. PSS comprises the hosts PSS1 and PSS2 and the SSS comprises the hosts SSS1 and SSS2.
The section describes step by step how to create a Disaster Recovery System. In the project, historical archiving is deployed with Oracle® using the WinCC OA RDB Manager.
Create Database Schema
- Set up both databases (Primary Server System (PSS) and Secondary Server System (SSS) with the same schema name, password and configuration. The installation of the WinCC OA database schema is described in the chapter First-Time Installation.
Create WinCC OA Project
- Create the PSS project as a redundant project (PSS1 and PSS2).
- Open the command shell of the operating system and change the system name and the system number in the project using the WinCC OA WCCOAtoolSyncTypes. In the following example, the system name and system number of the TEST_REDU_4 project are changed to "System1" and "1". However, any user-defined number and name that are not already occupied by another distributed system can be used.

Note:
When changing the system number and name, the project must
not be running.
Note:
Note that you have the license option
for DRS - see WinCC OA License options (Features).
- Add the redundant network connections to the host file:
C:\Windows\System32\drivers\etc (Windows) or
/etc/hotst (Linux).
Note:The host file must be the same on all 4 hosts of the DRS system.
- Add a redundancy manager (WCCILredu) under the default control manager (pvss_scripts.lst) to the WinCC OA console.
- Add the following config entries to the config file of the project:
[general] data = "PSS1$PSS2" event = "PSS1$PSS2" distributed = 1 [dist] distPeer = "SSS1$SSS2" 2Note:Check in the system overview panel that you have a connection between the two hosts PSS1 and PSS2 of your PSS (Primary Server System).Figure 2. PSS connected 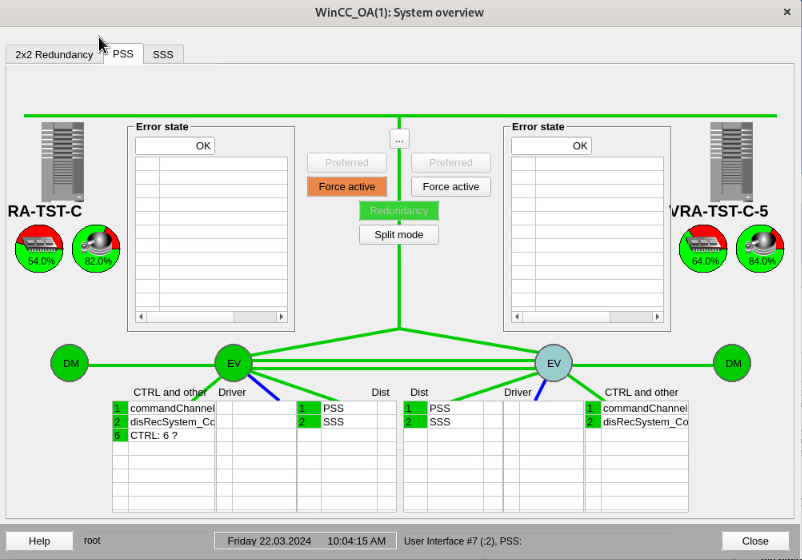
Configure the project as a distributed system (create the Secondary Server System)
- Copy the PSS project to the two SSS servers.
Note:Note that the project names must be different for the PSS and SSS.
- After copying the project, change the project name and Register the project.
- Open the command shell of the operating system and change the system name and
the system number - see also the detailed description above in the PSS
description:
WCCOAtollSyncTypes.exe -system 2 System2 -proj "TEST_REDU_4" - Open the config file of the project and define the project as a distributed
system. This can be done using the following config entries:
[general] distributed = 1 - The config entry states that the project is a distributed project.
- Modify the data and event entries of the config file on the
SSS:
[general] data = "SSS1$SSS2" event = "SSS1$SSS2" - Add a DIST manager (WCCILdist) in the WinCC OA console under
the redundancy manager.
Note:Remember to use the config entry distPeer = 1 on all redundant projects of the redundant system!
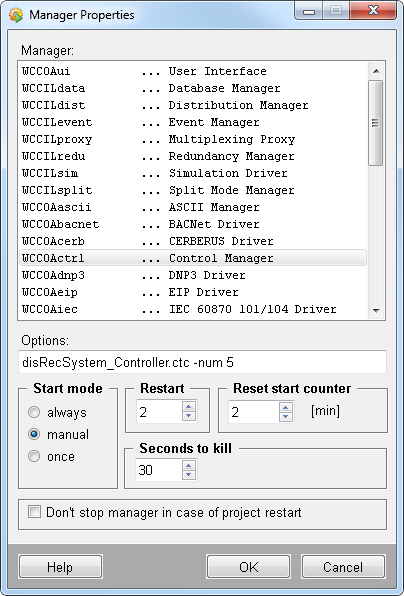
Add the Control Manager disRecSystem_Controller.ctc
- Add a new control manager to the project's WinCC OA console
with the disRecSystem_Controller.ctc option. In this
sample project, the control manager has the number 5 and a
manual start mode during the setup. You must change
the start mode later to always.
Start the manager with the synchronization script:
CAUTION:
Note that the CTRL manager must have the same manager number on all
systems!
- Configure your system as described in the chapters of the Configuration.
- In the WinCC OA console on the active PSS server, change the
start mode of the control script that starts the
disRecSystem_Controller.ctc script to always.
Thereby, the control manager starts and executes the synchronization script.
- Start the synchronization script on the remaining servers of the PSS and the SSS by changing the start mode of the control manager to always.
- On the PSS, all drivers and control scripts are now started automatically via the control manager.
- On the SSS, all simulation drivers are now started automatically via the control manager.
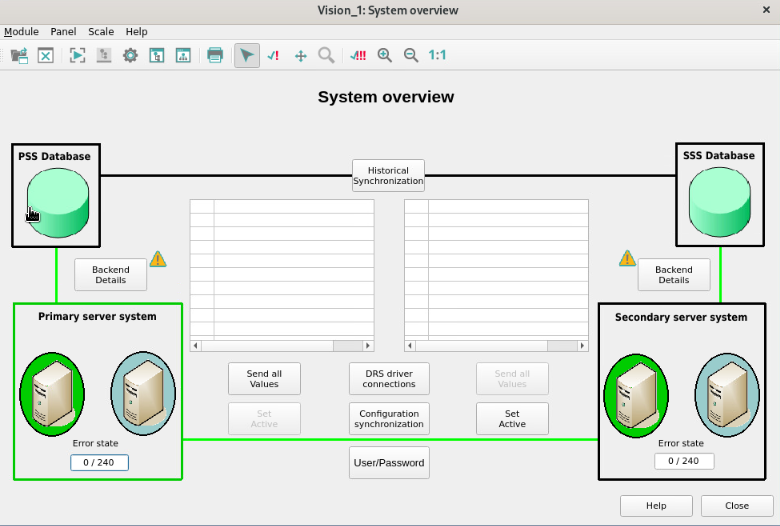
When you have configured your DRS system, the system should look as follows in the system overview panel: