Server configuration
Settings controlling the behavior of the OPC UA Server are shown and configurable within the configuration panel of the WinCC OA project.
The configuration panel of the WinCC OA OPC UA server can be accessed via the system management panel:
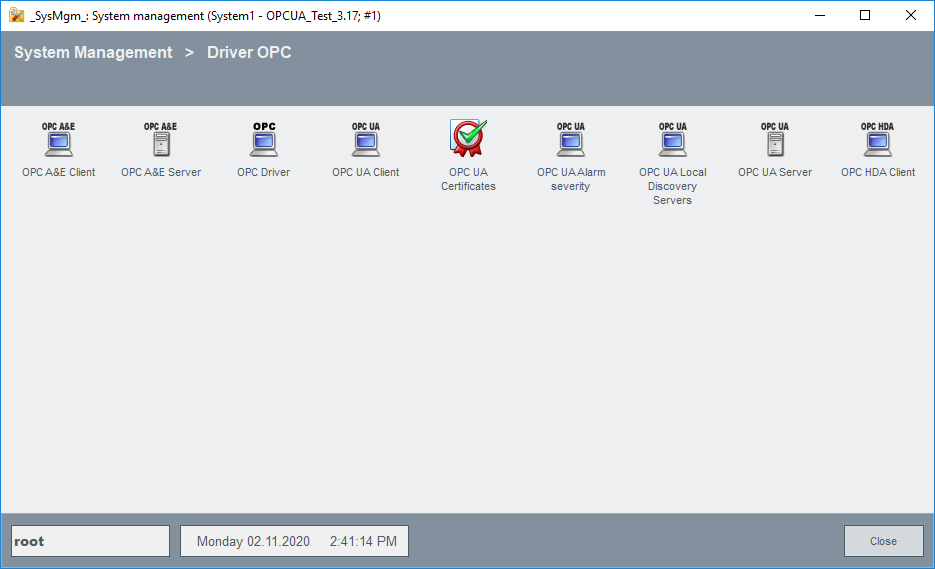
Click on the OPC UA Server button in the Driver OPC tab.
The following figure shows the panel for OPC UA Server configuration. This configuration is
stored on the corresponding internal data points of the data point type
_OPCUAPvssServer (see Internal data
points of the OPC UA Server).
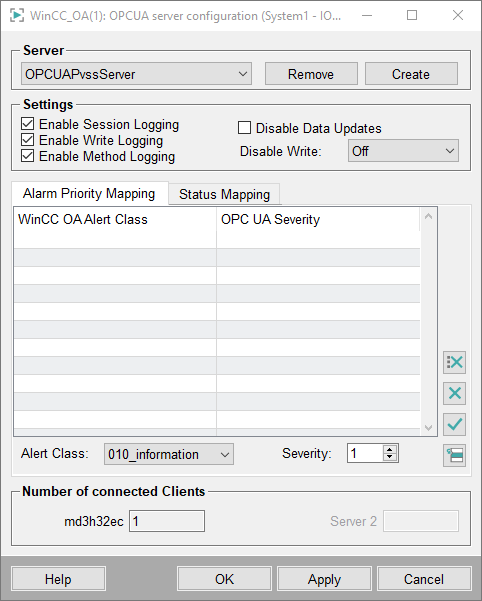
The OPC UA Server configuration panel allows the modification of the following parameters:
Server
- Create
-
Click on the Create button to specify a name for the new configuration and furthermore save it with basic settings. It opens the following input dialog for entering the configuration name.
Figure 3. Input Dialog 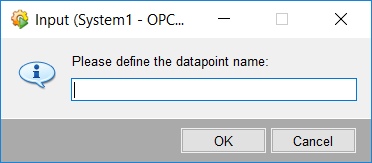
Enter a name and confirm by clicking OK.
The configuration data point
_<configuration_name>with basic settings is created using the data point type_OPCUAPvssServer(in a redundant project a data point with the name_<configuration_name>_2is created automatically for the redundant server) when confirming its name by clicking OK.To change the configuration, select the appropriate connection name in the combo box. The displayed settings will change accordingly.
- Remove
-
Click on the Remove button to delete the selected configuration. This action must be confirmed by clicking the Yes button or canceled by clicking No in the dialog.
Figure 4. Delete Config Dialog 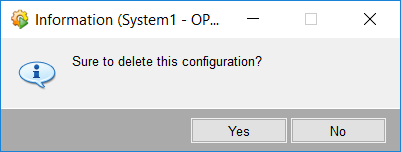
Settings
All changes made in the configuration basic settings and in the Alarm Priority Mapping and Status Mapping tabs must be applied by pressing the Apply button or the OK button on the bottom. When closing the panel without saving the changes will be lost.
- Enable Session Logging
-
By enabling this option, the OPC UA Server logs session information on the data point element
State.DatapointLogging.Sessionof the internal server data point. By default, the value of the data point element is not archived. If these logged messages should be available in the future, the user is responsible for archiving them (e.g. _archive config).The logged messages look like:
<hex session id> <code> “<session name>” “<authentication method>” “<username>” <hex ua status code>The session name, the authentication method, and the username (only exists when the client connects with username and password) are only written in the “session open“ message. For all following messages, only the hexadecimal session id and the code will be written. The following example messages could be written:
-
Client opens a session (CODE 1) using a certificate - OpcUa_Good
0x00000001 1 “Client session name” “Certificate” 0x00000000 -
Client closes the session (CODE 2)
0x00000001 2 -
Client opens a session (CODE 1) using username and password – OpcUa_BadUserAccessDenied
0x00000002 1 “C2 session name” “UserName” “bad_username” 0x801F0000 -
Server shutdown, all open sessions are closed (CODE 3)
3
If a session reconnect occurs, e.g. due to network problems, only a session opened message will be logged using the same session ID. If a session explicitly disconnects and then reconnects, a new session ID will be given.
-
- Enable Write Logging
-
This option enables the logging of writes performed in the OPC UA Server address space. The logs are stored on the data point element
State.DatapointLogging.Writeof the internal server data point. By default, the value of the data point Element is not archived. If these logged messages should be available in the future, the user is responsible for archiving them (e.g. _archive config).The logged messages look like:
<hex session id> <UA node id> <new value> <hex ua status code>For example, the following messages could be written:
-
Client writes new value “test” – OpcUa_Good
0x00000001 ns=2;s=TextTag “test” 0x00000000 -
Client writes new value 5 – OpcUa_BadOutOfRange
0x00000001 ns=2;s=IntegerTagRangeCheck 5 0x803C0000
Note:Only value changes from OPC UA Clients are logged. Value changes of the OPC UA Server address space coming from the DPEs in its address space are not logged. -
- Method Logging
-
This option enables the logging of OPC UA Method information. The logs are stored on the data point element
State.DatapointLogging.Methodof the internal data point _OPCUAPvssServer.The logged messages look like:
<hex session id> <UA node id> - Disable Data Updates
-
By activating this option, the OPC UA Server will no longer update values in the OPC UA address space. In case of value changes in the WinCC OA project, the associated values are marked as "Uncertain" in the OPC UA process space.
After deactivating it, the current values are automatically transmitted to the clients.
Note:By default, this option is deactivated. - Disable Write
-
This option allows to deny all write requests by clients. Setting this option to Off allows write requests, With Error returns the OPC UA error code “WriteNotAllowed” for every write request and Without Error discards the write request without any error on the client side.
Note:By default, this option is set toOff.
Alarm Priority Mapping tab
This section can be used to map a WinCC OA alert class to a given OPC UA severity.
Whenever the OPC UA Server receives an alert from WinCC OA , it looks for configured severities. If a severity is configured, the alert is forwarded using it, otherwise the WinCC OA alert priority is used as OPC UA severity.
The table shows all configured WinCC OA alert classes with their assigned OPC UA severities. The fields underneath the table are used to enter new data for the table. The combo box is used to select the alert class; it contains all available alert classes of the WinCC OA project. The other input field is used for the OPC UA severity, valid values are 1 - 1000.
To add a new entry to the list fill in the input fields and press the insert button.
When selecting a row of the table the input fields take its values. Change the values and press the apply button to change the entry.
Select a row and press the remove button to delete an entry. To delete all entries, press the remove all button.
Status Mapping tab
This section can be used to map a user bit to a given OPC UA status code.
Whenever the value of the data point element changes, the WinCC OA OPC UA Server checks for mapped user bits. When a user bit with an assigned status code is set, the server forwards the value change with the defined status code. If there are multiple user bits with an assigned status code set, the highest one will be used.
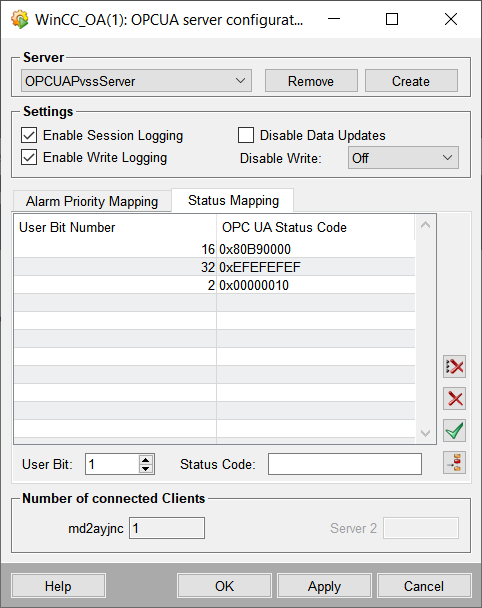
The table shows all configured user bits with their assigned OPC UA status codes. The fields underneath the table are used to enter new data for the table. The left field is used to enter the user bit, it must contain a number from 1 to 32. The other input field is used for the OPC UA status code, valid values can either be decimal integer values (e.g. “2159607808”) or hexadecimal values (indicated by leading “0x”, e.g. “0x80B90000”) which will be automatically converted into hexadecimal status codes.
To add a new entry to the list fill in the input fields and press the insert button.
When selecting a row of the table the input fields take its values. Change the values and press the apply button to change the entry.
Select a row and press the remove button to delete an entry. To delete all entries, press the remove all button.
Number of connected Clients
This section displays the number of currently connected clients to the Host. When the configured maximum number of clients (see Possible configuration entries opcuasrv) is reached, its background color switches to red.
For redundant WinCC OA projects a second text field with the number of connections to the second server is displayed.


