Examples of use
The following chapter demonstrates how to translate a project specific panel (via Export - Dictionary functions - Import).
 Example 1
This example shows you how to translate a project specific panel which you create first from English to German. The example includes the following steps:
-
Creation of a project-specific panel in English.
-
Creation of the dictionary containing the entries of the panel in the reference language English - US via the Export feature.
-
Translation of the reference language entries into the "target" language German - Austria via the Dictionary Functions.
-
Update of the panel with the translations saved in the dictionary.
Create a project specific panel
-
Create a multilingual project (languages English - US and German - Austria).
-
Start the project.
-
Open the GEDI.
-
Select the language English from the combo box in GEDI.
-
Create a new panel Panel -> New panel
-
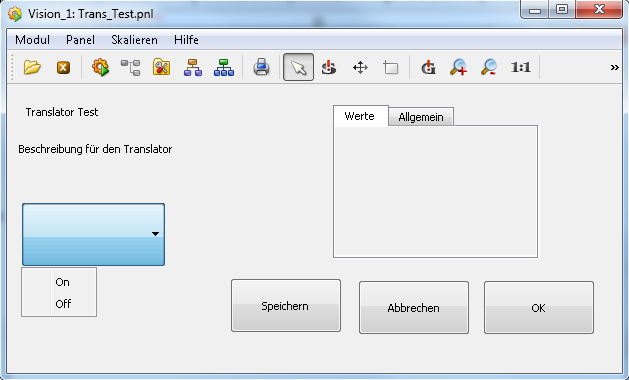
Add the following graphics objects to the panel: Buttons: Save, Cancel and OK, Texts: Translator test, Description for the Translator, Cascade Button: Engine (containing the items On and Off) and Tabs General and Values. Add also the name Trans_Test for your panel. Your panel should contain the graphics objects, displayed in the figure below:
-
Save your panel
Trans_Test.pnlin your project.
Create a dictionary
-
Open the translator panel in the GEDI via "Tools" > "Translator". The Export tab is displayed.
-
Choose the reference language English - US from the Reference language menu.
-
Choose the language German - Austria from the Language(s) to export menu.
-
Select the trans_test file via "Select panels ..." button.
-
Choose the Log progress (file level) option.
-
Select the UTF-8 format from the drop-down menu.
-
Press the Start button to start the export process.
Translate a project specific panel
-
Open the Dictionary functions panel. The following table (containing the entries in English) is displayed:
-
Define your translations in German (like in the following table) by clicking on the right cells (German-Austria) and by typing your translations in the Dictionary functions panel:
| English | German |
| -*-MS Shell Dlg-*-r-normal-*-11-*-100-100-*-*-iso8859-1|-11,0,0,0,505,0,0,0,0,0,0,0,0,MS Shell Dlg | -*-MS Shell Dlg-*-r-normal-*-11-*-100-100-*-*-iso8859-1|-11,0,0,0,505,0,0,0,0,0,0,0,0,MS Shell Dlg |
| Cancel | Abbrechen |
| Description for the translator | Beschreibung für den Translator |
| General | Allgemein |
| OK | OK |
| Save | Speichern |
| Translator test | Translator Test |
| Values | Werte |
| On | Ein |
| Off | Aus |
-
Press the Save button to save your dictionary.
-
Press the Load button to load the changes you made from the dictionary.
-
Check the same translations and empty entries. The following same translations are shown:
Since the reference and export (target) language have the same translation "OK", same translations are shown.
-
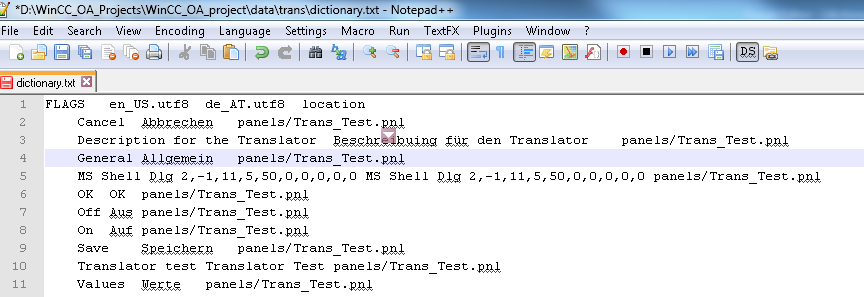
Open the
dictionary.txtfrom<proj_path>/data/trans.The dictionary has the following structure:
Import the dictionary
-
Open the Import tab.
-
Choose the reference language English - US from the Reference language menu.
-
Choose the language German - Austria from languages to import menu.
-
Choose the
Trans_Test.pnlfrom your project. -
Choose the Log progress (file level) option.
-
Choose then Open log fileafter import option.
-
Select the "dictionary.txt"´from the drop-down menu.
-
Press the Start button to start the import process.
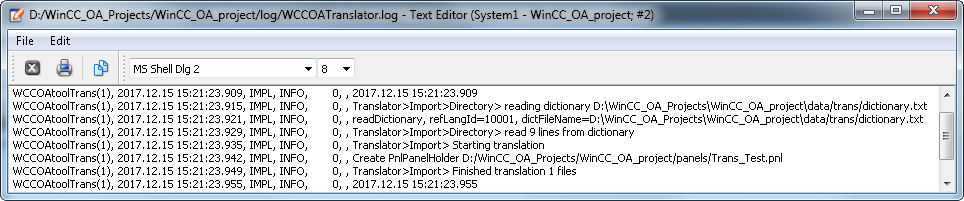
The log file is opened after the import process where you can see the work steps, the number of lines read from the dictionary :
The project specific panel was easily translated into German. Open the panel in VISION with the language option "de_AT.utf8"----> -extend -lang "de_AT.utf8" -p Trans_Test.pnl The translated panel (shown in the figure below) is displayed.