OPC UA Client Configuration
Settings regarding the connection between client and server are carried out/shown in the configuration panel of the WinCC OA client project. It is not necessary that the OPC UA server is running during the connection configuration.
The configuration panel of the WinCC OA OPC UA client is opened via the system management panel:
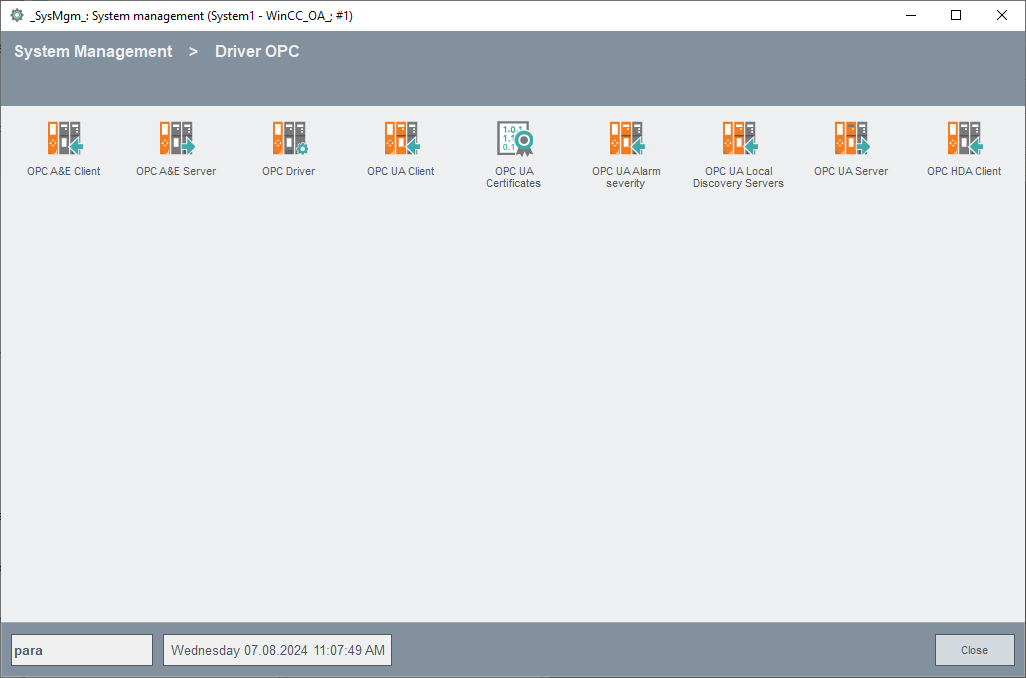
Click on the OPC UA Client button in the Drivers tab.
The following figure shows the panel for the configuration of the OPC UA connection between clients and server. The configuration of the server uses the corresponding internal data point of the type _OPCUAServer (see Internal data points of the OPC UA client).
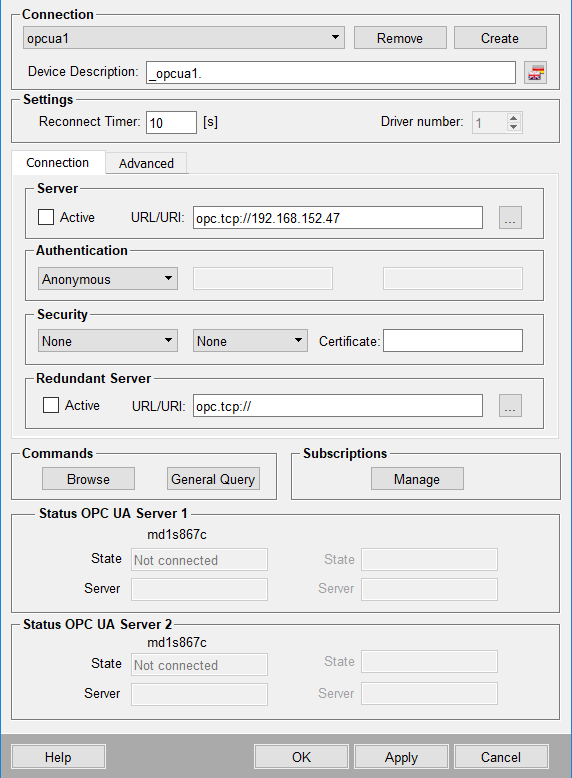
The OPC UA configuration panel allows the input/view of the following parameters:
Connection
Create
Click on the Create button to specify a name for the connection and thus to create a new connection with basic settings. This opens the following input dialog for entering the connection name.
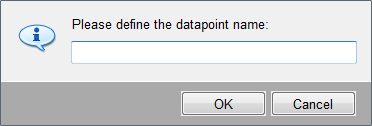
Enter a name and confirm by clicking on OK.
The connection data point _<connection_name> with the set parameters is created at type _OPCUAServer (in a redundant project a data point with the name "_<connection name>_2" is created automatically for the redundant WinCC OA server) by clicking on Apply. If you click on the OK button the connection data point is created with the set parameters and the configuration panel is closed. To close the configuration panel without creating the connection data point (if not already done before) click on Cancel.
In order to change the configuration select the appropriate connection name from the combo box. Parameter changes regarding the connection establishment will not be applied until the next connection establishment. This means that if a connection is already established, it has to be deactivated and activated again (see description of Active check box below). Please note that every configuration change has to be applied by clicking on the Apply button before it takes effect.
Remove
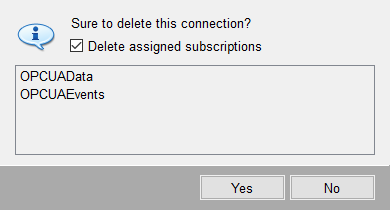
Click on the Remove button to delete the selected connection (and thus also the connection data point or data points, respectively, in case of a redundant configuration). Note that removing a connection is not effective until the Apply button is clicked.
Existing subscriptions can be kept when removing a connection (see figure below) to be reassigned to a new connection (see Configuration of a Subscription).
Device description
You can add/change a custom description for the created connection in the corresponding project language via the Device description text field. The default description in every project language is "_<connection_name>" and is shown after reopening the configuration panel.
Settings
Reconnect Timer
Specify a time in seconds after which the driver tries to reconnect to the server in case of a connection breakdown. By default the timer is set to 10 seconds.
Connection tab
Active
Tick this check box to activate the connection to the OPC UA server. This setting is not effective until the Apply or OK button is clicked. A created and configured connection can be deactivated at any time. Thereby the connection data point is not deleted and the connection can be reactivated anytime. The status display changes from "Connected" to "Not connected" if a connection has been deactivated. If a connection has been deactivated, the driver does not communicate with the corresponding OPC UA server anymore. Therefore, it is possible to avoid alarms during maintenance work on the OPC UA server.
If a connection is deactivated the connection state is not mapped to the data point elements configured for the connection (see Definition of the Peripheral Address of the OPC UA Driver). This means that a deactivated connection is not detectable on these data point elements and the invalid bit of these values is not set (see also Connection deactivation and invalid bit settings).
Server URL/URI
Enter the URL to the server to which you want to connect (TCP/IP address and port) or the URI which shall be converted to a URL by a Local Discovery Server (refer to OPC UA Discovery for further information). The address must be accessible.
Examples for the server URL address:
opc.tcp://localhost:4840opc.tcp://host:51234/UA/UA_ServerExample for a server URI address:
urn:MyServerUri
Authentication
Enter the access data for the server depending on the selected mode.
-
Anonymous - no user and password defined, the client tries to connect with the user Anonymous (see also User Authentication).
-
Username/Password - the format for the input is <user_name>:<password>. The password is displayed encoded. If the input field is left empty, the client tries to connect with the user Anonymous.
-
User certificate - define the appropriate user certificate (e.g. myCert.der). The file is browsed in the certificate directory of the client.
Security
Strategy
Choose a security policy:
- None
- Basic128Rsa15
- Basic256
- Basic256Sha256
- Aes128Sha256RsaOaep
- Aes256Sha256RsaPss
For further information see Security Policy.
Message Mode
Choose a message security concept - None, Sign or Sign&Encrypt. If you have selected None from the security policy, the message security concept is automatically also None and the selection of another message concept is not possible. If you select another security policy as None either Sign or Sign&Encrypt are available for the message security concept.
For further information see Message Security Concept.
Client certificate
Name of the client certificate which is accepted for the server. The certificate name has to be entered without path specification and file extension and is written to the _OPCUAServer.Config.Security.Certificate data point element of the server connection data point.
If the field is empty, the client uses the default certificate, which is delivered by WinCC OA.
See also Certificates.
Redundant Server
Active
Tick this check box to set the connection to the redundant OPC UA server to active.
Server URL
Enter the URL to the server to which you want to connect (TCP/IP address and port) or the URI which shall be converted to a URL by a Local Discovery Server (refer to OPC UA Discovery for further information). The address must be accessible.
In addition to an accessible server URL also the link, which is returned by the server during Discovery, must be accessible (e.g. in case of several network cards).
OPC UA Client Configuration - Advanced
Advanced tab
- Node Registration
- "Registered Read/Write" - If this option is enabled, node IDs on the server are registered for optimized access (read or write). It must only be enabled if it is supported by the server and mainly polling is used (since in case of subscriptions there is no performance improvement).
- Disable MI on passive WinCC OA
- The option allows to disable the Monitored Items for the passive WinCC OA server.
- Disable MI on passive UA Server
- The option allows you to disable the Monitored Items for the passive OPC UA server
- Allow unencrypted password
- The option allows you to use an unencrypted password.
CAUTION:The setting must only be used if your plant provides a secure environment as it will lead to unencrypted transmissions of passwords between client and server.
- Ignore invalid server certificate
- The option allows you to establish a connection to a server with invalid
server certificate.
CAUTION:This setting must only be used if the server cannot be updated with a valid certificate!
- Ignore expired server certificate
- This option allows you to establish a connection to a server with an expired
server certificate.
CAUTION:This setting must only be used if the server cannot be updated with a valid certificate!
- Ignore invalid hostname
- This option allows you to establish a connection to a server even if the provided host name is invalid.
Status Mapping
Enter the mapping of the OPC UA status codes to WinCC OA user bits (_online.._userbit1 to _online.._userbit32). It is possible to map status information of the OPC UA items to WinCC OA user bits with these entries. Define the OPC UA status code in the text field and the appropriate user bit via the spin box. By default, this field is empty, i.e. there is no mapping to user bits.
The entries have the following syntax per row:
<UA status code><space><user bit number>The same user bit on the right side can be presented on several rows, e.g.:
0x00000000 1
0x80280000 2
0x80300000 2
2150891520 32
OPC UA Client Configuration - Commands
Browse
Opens the panel to browse the server.
General Query
Click on the General Query button to trigger a general query (GQ) for all configured data values of the corresponding server. In case of a general query a single-read request to data points with peripheral address to values is carried out.
A general query can also be triggered automatically during connection establishment and/or during a redundancy switch-over (see autoGQ config entry; default = no automatic GQ).
For further information see General Query (GQ).
OPC UA Client Configuration - Subscription
Configure
Opens the panel for configuring a subscription (see Configuration of a Subscription).
A subscription is always definitely assigned to a server. A server may have multiple subscriptions.
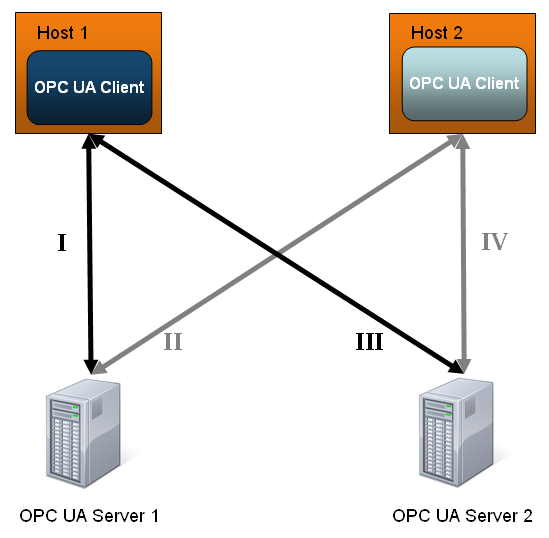
OPC UA Client Configuration - Status
Status OPC UA Server 1/2
This area provides information about the states of the OPC UA server connections. If a redundant server is used, an area is available for each of the redundancy partners (OPC UA server 1 & OPC UA server 2).
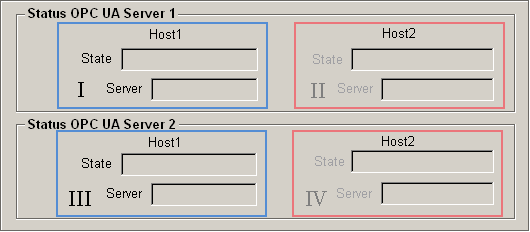
Status OPC UA Server 1
I
-
State => Displays the connection state between OPC UA server 1 and OPC UA client 1.
-
Server => Displays the current state of OPC UA server 1.
II (only when using a redundant client)
-
State => Displays the connection state between OPC UA server 1 and OPC UA client 2.
-
Server => Displays the current state of OPC UA server 1.
Status OPC UA Server 2
III
-
State => Displays the connection state between OPC UA server 2 and OPC UA client 1.
-
Server => Displays the current state of OPC UA server 2.
IV (only when using a redundant client)
-
State => Displays the connection state between OPC UA server 2 and OPC UA client 2.
-
Server => Displays the current state of OPC UA server 2.