Branding - Example of Use 1
Introduction
The branding package is available for OEM customers on the ETM portal. Note that the branding is only available for customers with a corresponding contract.
Overview of the Files
This chapter shows an example of the WinCC OA branding. To brand your WinCC OA Installation, the following files must be modified
| File | Meaning |
|---|---|
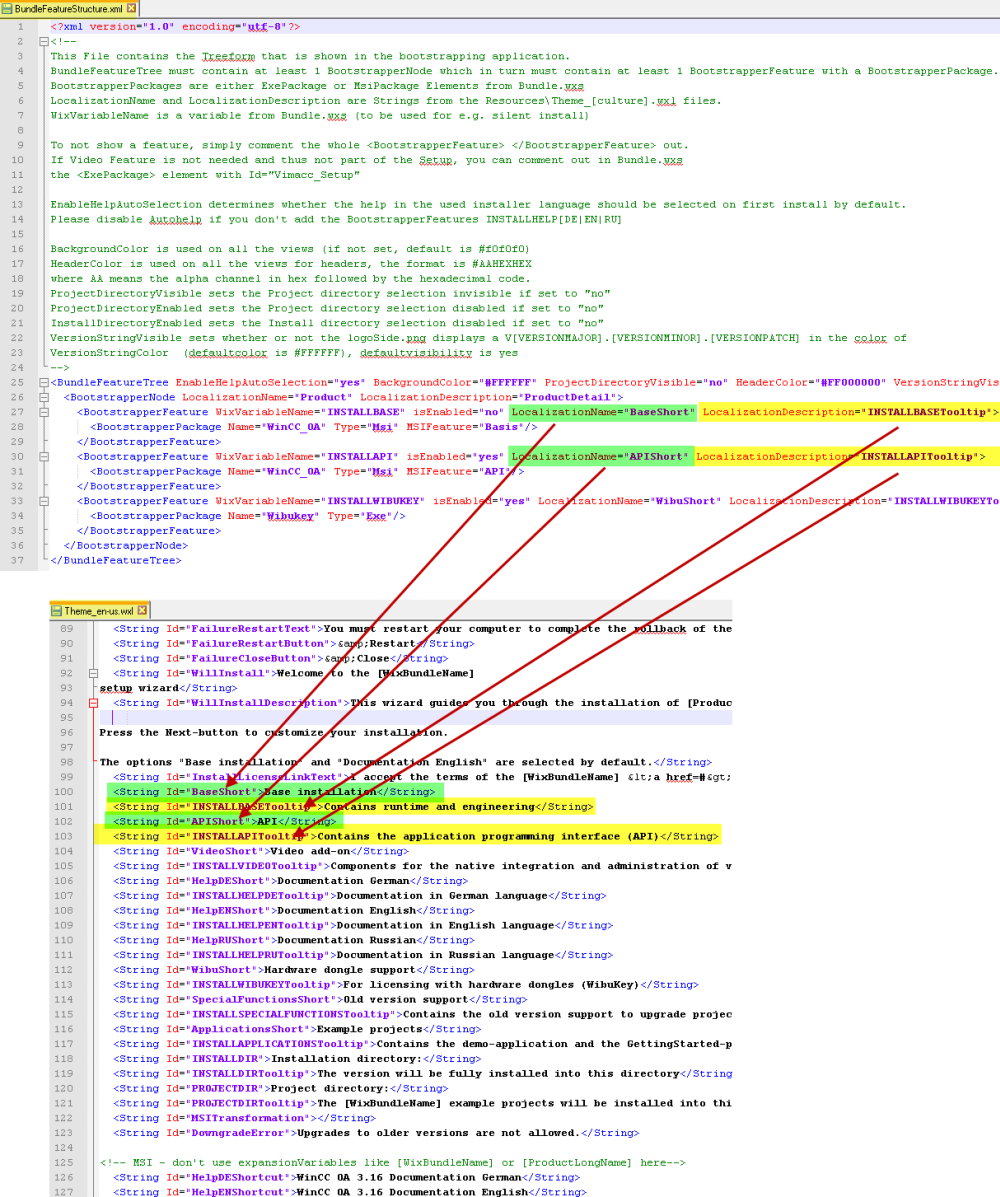
| /Branding/Resources/BundleFeatureStructure.xml | This file specifies what is installed when you click on a specific text. In other words the file connects the packages of the Bundle_substituted file (see below) with the texts in this file. |
| /Branding/Resources/Theme_de-de.wxl (Theme_en-us.wxl oder Theme_ru-ru.wxl) | Specifies the texts for the install wizard and for example, for the components that are opened via the start menu. |
| /Branding/Resources/ProductConfiguration.wxi | Specifies general product information as a text: the product name, the product long name etc. |
| /Branding/Resources/ProductVersion.wxi: | Specifies the product number. |
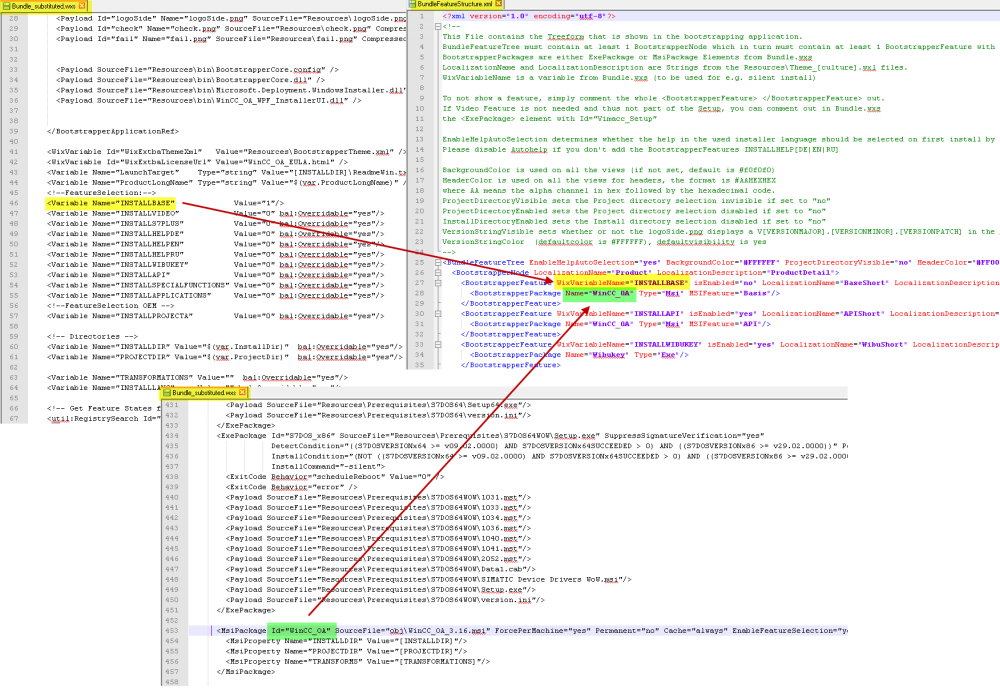
| /Branding/Bundle_substituted.wxs | Specifies which packages are installed. Needed to, for example, add or delete packages. |
| /Branding/build.bat | Is used to generate the setup. |
The files Bundle_substituted.wxs and Theme_en-us.wxl are linked to the BundleFeatureStructure.xml file. This means that the BundleFeatureStructure.xml file retrieves part of its content from these files.
The images below demonstrate how the files are linked. The "Branding Overview" image further below demonstrates the WinCC OA branding.
Summary of the Example
The example on this page describes how to:
- Change the images used for the setup
- Use different Header and background colors
- Change the available features by deleting them
-
-
- Delete the S7 Plus driver option
- Delete the video add-on. Since the video add-on is deleted, the size of the setup file is much smaller.
- Delete the example projects GettingStarted and DemoApplication
- Delete the old version support
- Delete the documentation options
-
- Set the project directory to invisible
- Deactivate the default online help option
- Delete the Russian MSI installation
- Change the Language and Feature Selection Text Options
- Change the Product Name
- Change the name of the components that are opened via the start menu
- Change the product version number
- Generate the setup
- Open the branded Install wizard
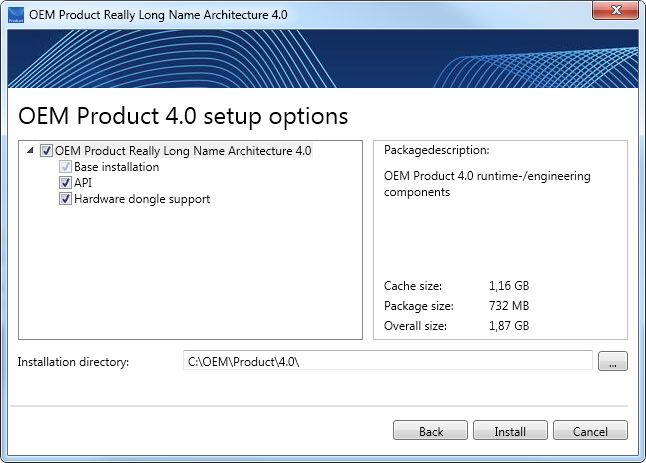
The following image demonstrates the end result. Which files are changed in order to brand the setup to look as follows, is described further below.
The End Result
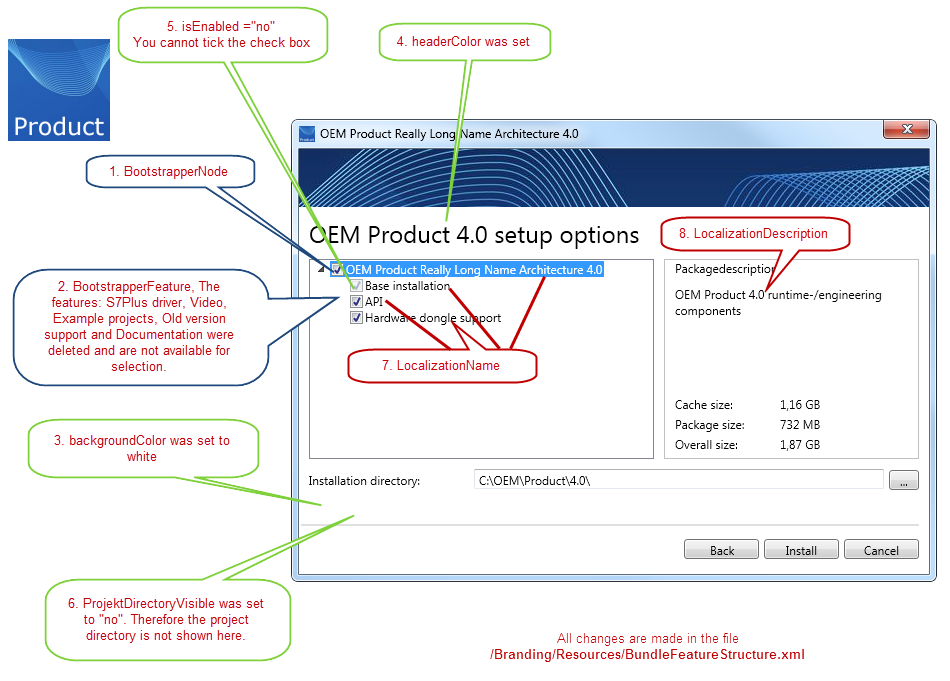
How to brand the setup as shown above is described in the following "Step by Step guide". Where to find the individual steps of the figure above, is described in the list below.
-
BootstrapperNode "LocalizationName = product" (OEM Product Really Long Name
Architecture 4.0) is retrieved from the file ProductConfguration.wxi
file.
The ProductConfguration.wxi is described under Change the Product Name.
-
BootstrapperFeatures meaning the features that can be installed via the setup are described under Change the available features by deleting them.
- How to set the background and header colors is described under Use different Header and background colors.
- The check box is ticked by default and cannot be unticked. See the note for isEnabled.
- How to change the visibility of the project directory is described under Set the project directory to invisible.
- The LocalizationNames ("Base Installation", API + Hardware dongle support" etc.) are retrieved from the Theme-en-us.wxl file. See Change the Language and Feature Selection Texts
- LocalizationDescription ( "OEM Product 4.0") is retrieved from the ProductConfiguration.wxi file. See Change the product name.
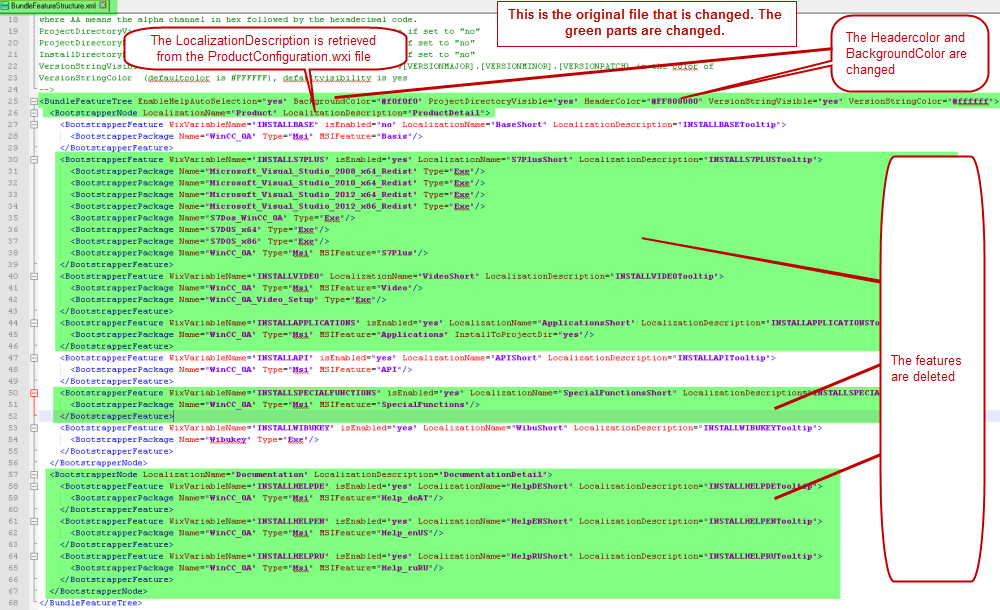
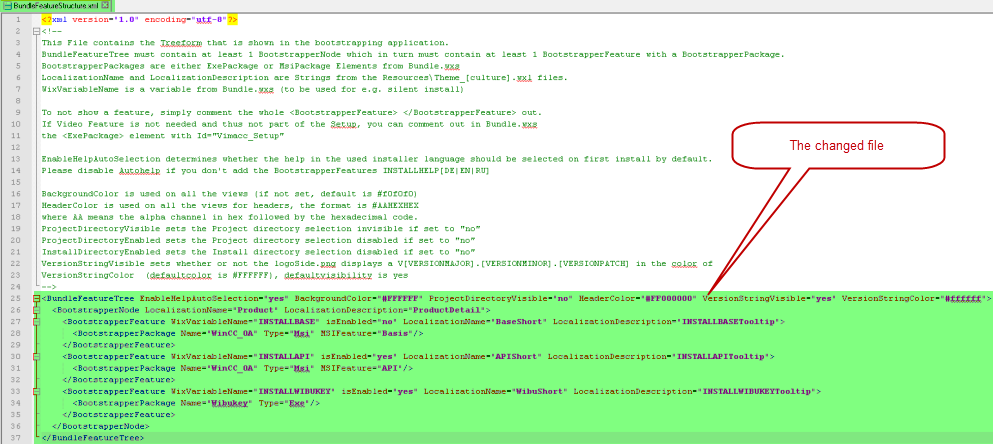
The following image shows you what parts of the file are changed. The second file shows the changed file.
Step by Step guide
Requirements for the branding
Proceed as follows:
- Install WiX (WiX Toolset). Check whether the Environment Variable WIX exists and is set to the installation path of WiX.
SET [VARIABLENAME]
SET WIX
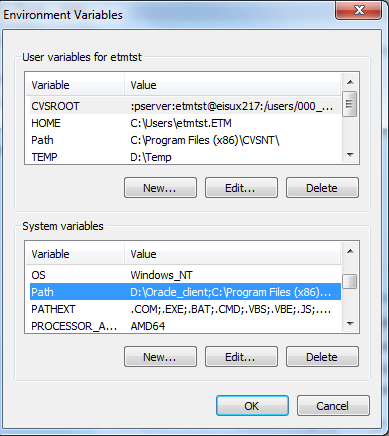
- If you want to sign your brand labelled product, install the Windows Software Development Kit for your Windows version. In the /bin directory of the Development installation you can find the signtool.exe. The signtool is required in order to digitally sign the product. Add the /bin subdirectory to your environment PATH variable (you can find the PATH environment variable via Windows start menu. Right-click on "Computer" -> Properties -> Advanced System Settings ->Environment Variables.)
- Unzip the Branding.zip file to a place of your choice. The folder BuildStructure contains the structure of the installation meaning the files that will be installed. Overwrite the original files with your brand labelled files.
Change the images used for the setup
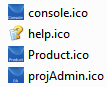
- Replace the following images in the Branding/Resources directory: Product.ico (256x256px), console.ico (256x256px) and projAdmin.ico (256x256px) . In this example the WinCC OA *.ico files were replaced by the following ico files - see figure below.
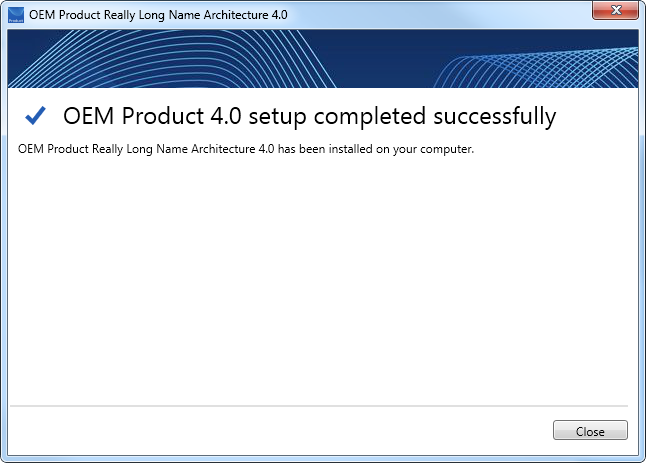
Furthermore, the image check.png and fail.png were changed for this example. These images are shown after a successful/failed installation.


Use different Header and background colors
- Set the Header and backgroundcolors for the installation wizards in the /Branding/Resources/BundleFeatureStructure.xml file:
Change the available features by deleting them
-
In the /Branding/Resources/BundleFeatureStructure.xml delete the
S7Plus driver option, the video add-on, the example projects, the old
version support (INSTALLSPECIALFUNCTIONS) and documentation options
(highlighted green):
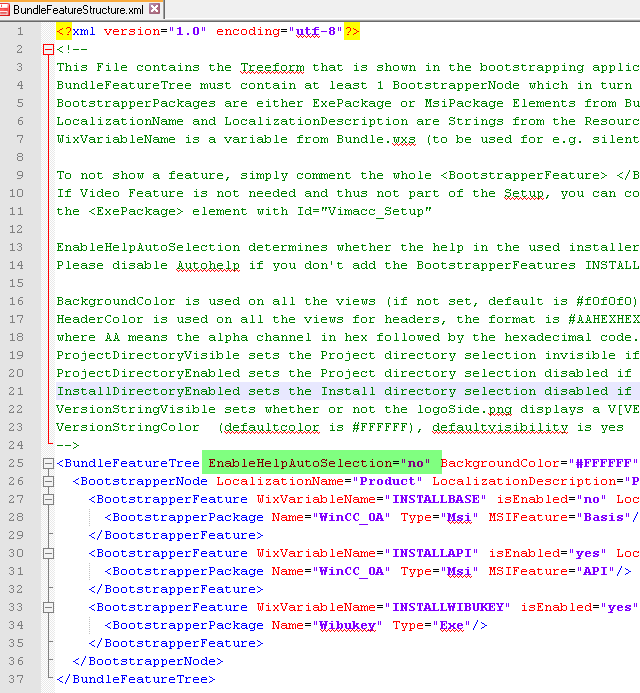
Figure 10. BundleFeatureStructure.xml file including all feature options 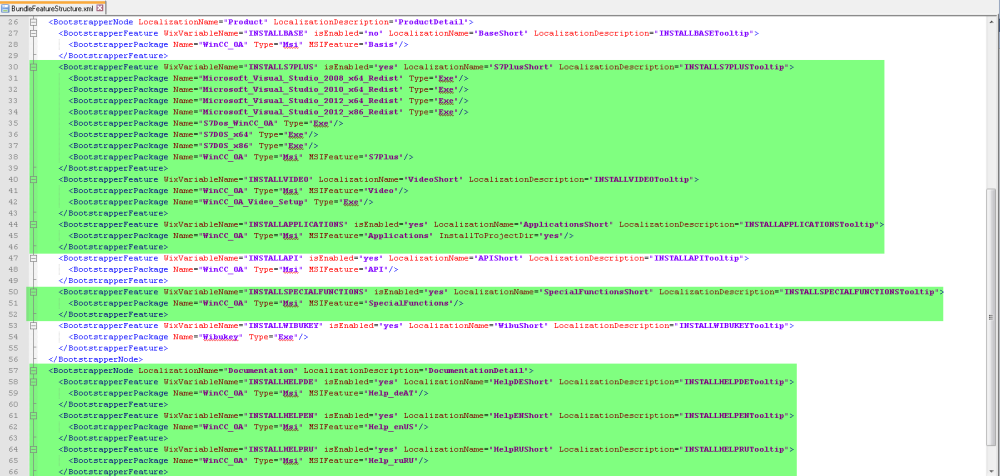
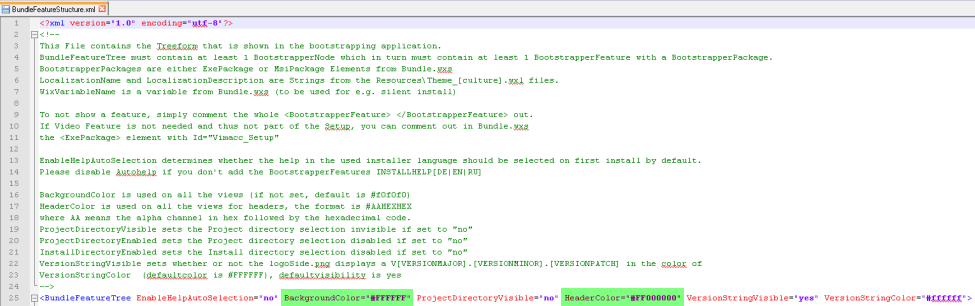
- When the features are deleted the file looks as follows:
Figure 11. BundleFeatureStructure.xml file without the S7Plus driver option, the video add-on, the example projects, the old version support and the documentation options 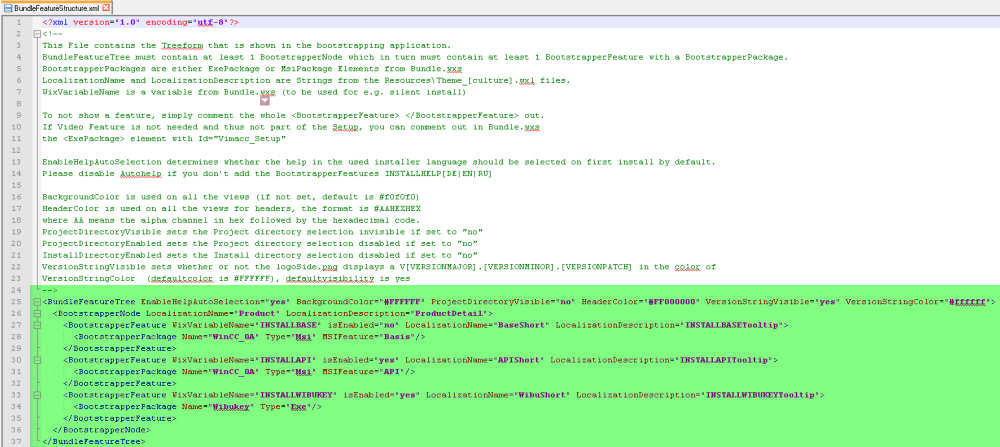 Note:Note that for the base installation "isEnabled" is set to "no" meaning that the package is automatically installed. You cannot untick the check box for the base package in the installation wizards (see figure above).
 - Since the video add-on was deleted, delete the video setup from the
/Branding/Bundle_substituted.wxs-file - see figure below.
Figure 12. Bundle_substituted.wxs file - Video setup 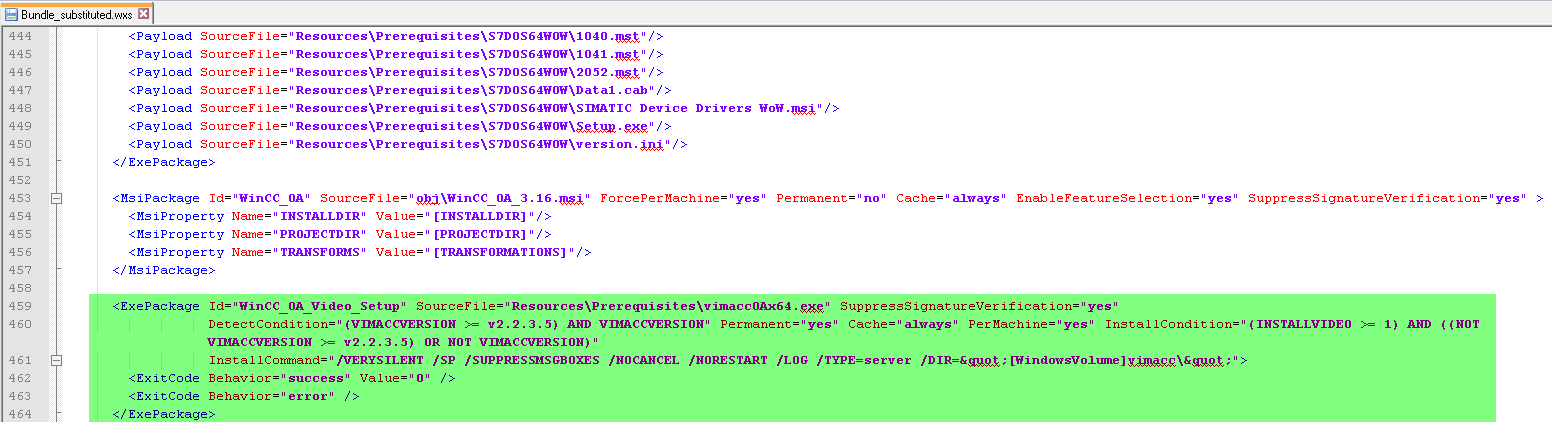
Set the project directory to invisible
- Set the project directory to invisible by setting the ProjectDirectoryVisible="no". Set the directory to invisible since example projects were deleted.
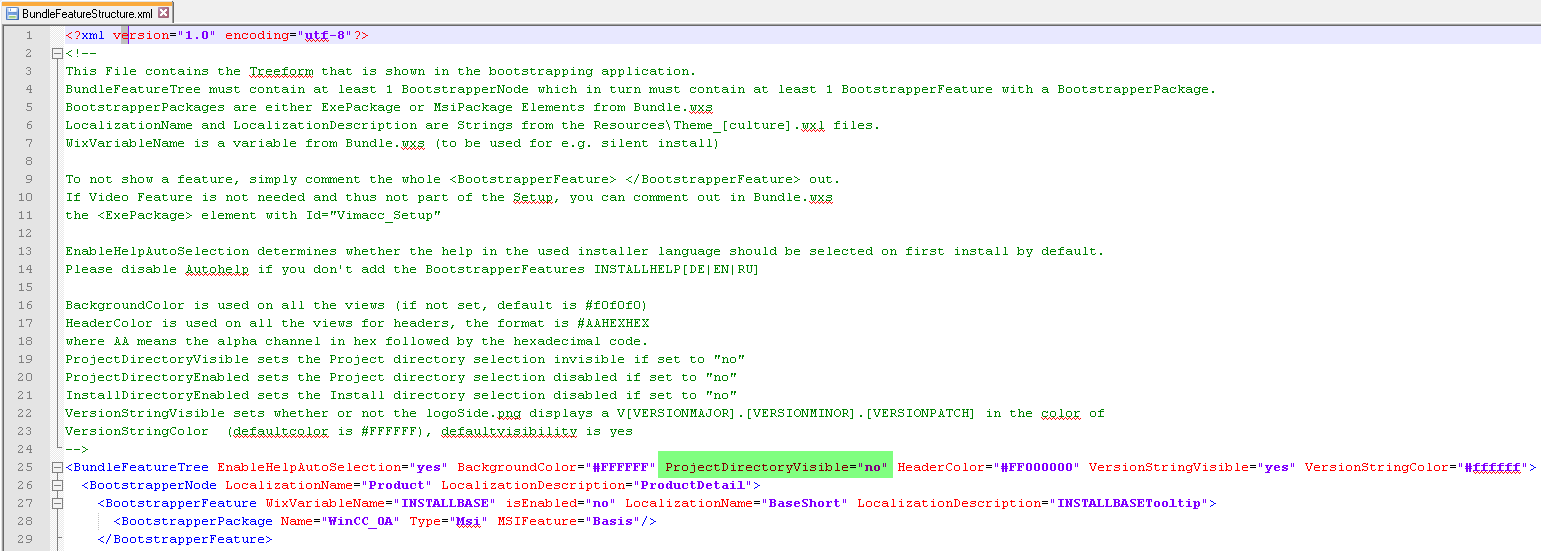
Deactivate the default help option
- In the /Branding/Resources/BundleFeatureStructure.xml set the EnableHelpAutoSelection="no". Thus, the default online help option of the install wizards is disabled.
Delete the Russian MSI installation
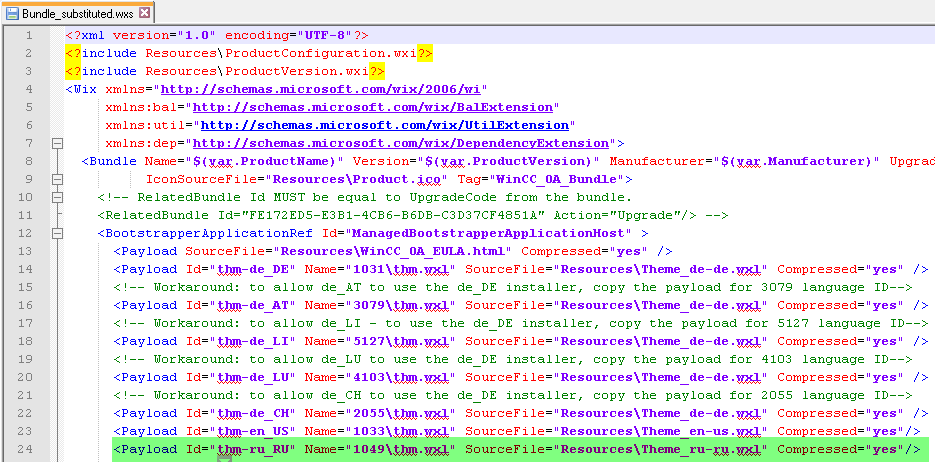
- To delete the Russian MSI installation, delete the Russian option from the /Branding/Bundle_substituted.wxs file - see figure below. You can of course delete the German MSI installation as well. In this example the Russian installation is shown as an example.
-
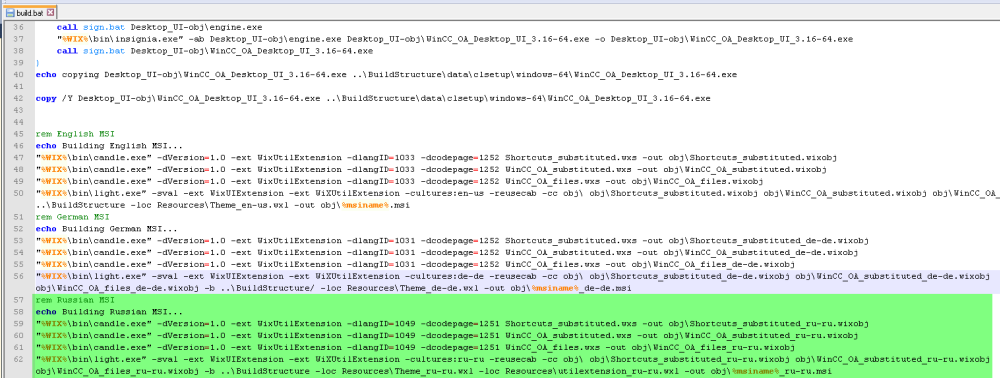
- Since the Russian MSI installation was deleted, the Russian MSI build option must also be deleted from the Branding/build.bat file:
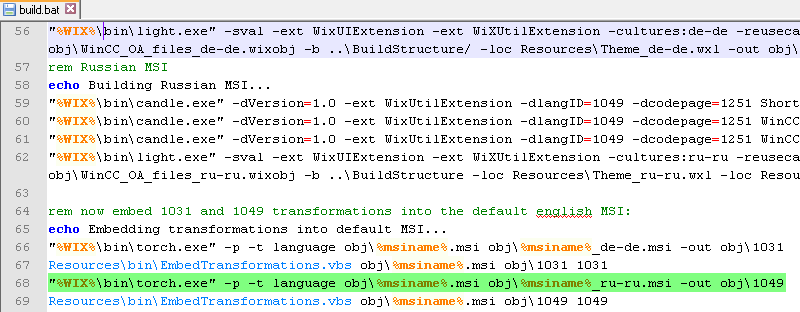
Furthermore, delete the Russian installation (tranformation) from the Branding/build.bat file:
Change the Language and Feature Selection Texts
-
Since the S7Plus option, the video add-on, the old version support and the
documentation features were deleted, modify also the
/Branding/Resources/Theme_en-us.wxl file.
Delete the S7Plus option, the video add-on, the example projects, the old version support and help options from the feature selection as well as the project directory option since the example projects were deleted from the feature selection.
Furthermore, delete the Russian language option since the Russian MSI installation was deleted (highlighted green):
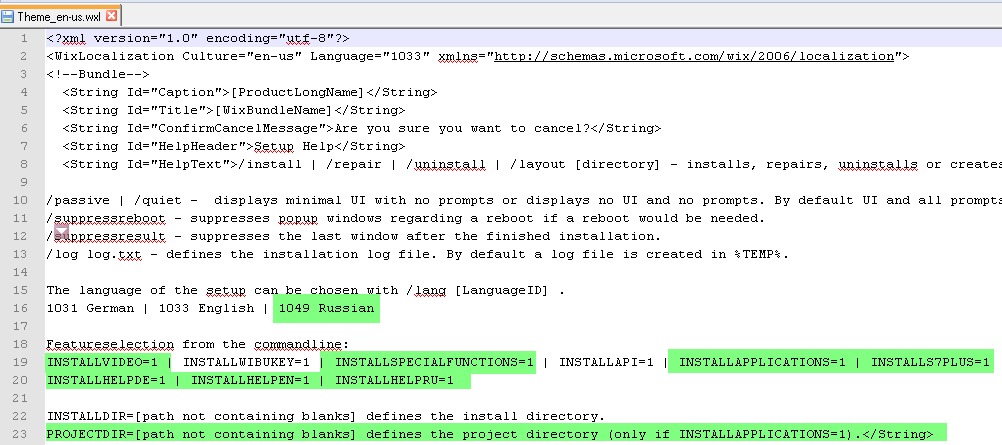
In the Theme_en-us.wxl file you can also change the texts (string IDs) for the install wizard (highlighted green in the figure below).
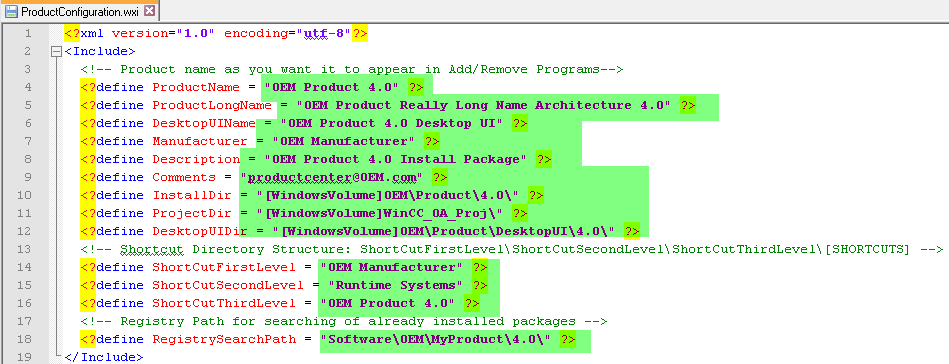
Change the Product Name
-
In the /Branding/Resources/ProductConfiguration.wxi file, set the product name, product long name, manufacturer, description, comments, installation directory and the short cuts for the start menu.
The product name, the product long name, the description and the installation directory are shown in the install wizard (see figure Branding Overview as well as the ready setup).
The manufacturer is shown in the control panel -> Programs and Features and the comments via right-click on the setup-exe file -> Properties. For the Desktop UI option, see chapter Branding the Desktop UI Installation
The project directory can also be changed but since the project directory is not shown in this example, the directory must not be changed.
The [WixBundleName] (See figure above) of the Theme_en-us.wxl file is replaced by the ProductName of the ProductConfguration.wxi file (See figure below). The same applies to [ProductLongName] of the Theme_en-us.wxl file, it is replaced by the ProductLongName of the ProductConfguration.wxi file.
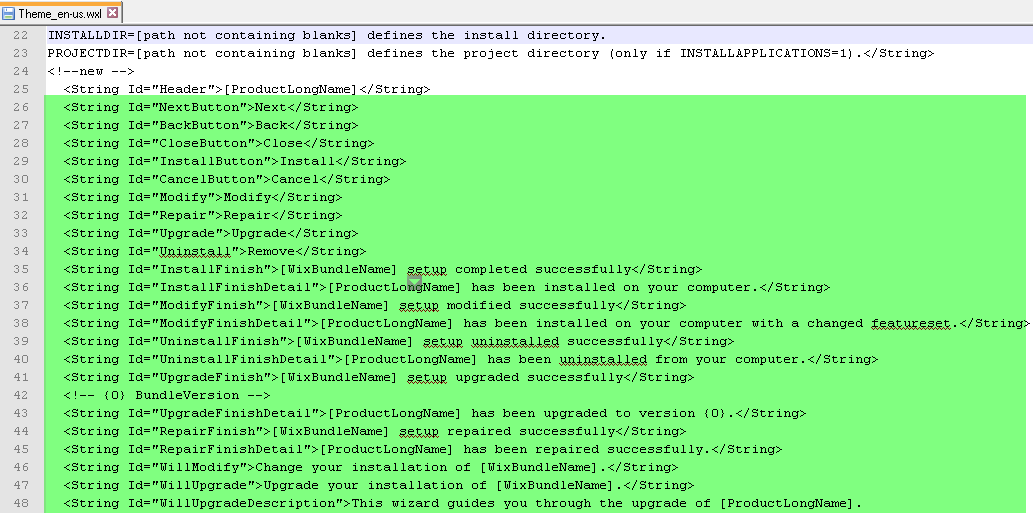
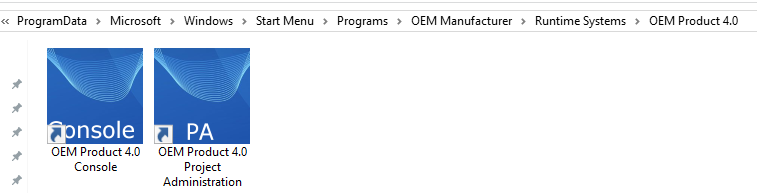
Change the name of the components that are opened via the start menu
-
Change the name of the components that are opened via the start menu in the lower part of the /Branding/Resources/Theme_en-us.wxl file.
Since the online help is not installed, the shortcuts for the online help do not need to be changed. The shortcuts for the online help can, however, also be changed.

Change the product version number
- Set the product version number in the /Branding/Resources/ProductVersion.wxi file:

A higher version number is required for each upgrade. Set the version number as shown in the figure above. Furthermore, The product ID in the file
Branding/Resources/[Projectname].wxs must be changed and the setup must be regenerated (see chapter Branding Example of Use 2 for an example) if you change an own project (feature).
You have to change the Product ID only for your own projects. The WinCC OA Branding package contains a Product ID. Note also that leading zeros are cut from the version number.
Generate the Setup
- In order to generate a brand labeled setup, open the command line and the branding directory. Call the build.bat with the following parameters:
-
-
- If the product should not be digitally signed: build.bat -name [Productname.exe]
- If the product should be digitally signed: build.bat -name [Productname.exe] -sign [Path_to_PFX] -pass [Password]:
-
build.bat -sign certificate_[certificateName].pfx -pass MyPassWord -name MyExeName.exe
The Deployment directory contains all other files that are necessary for the deployment of the Executable.
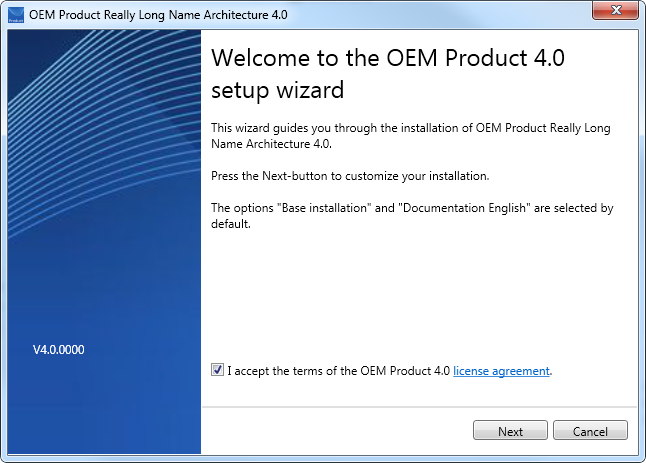
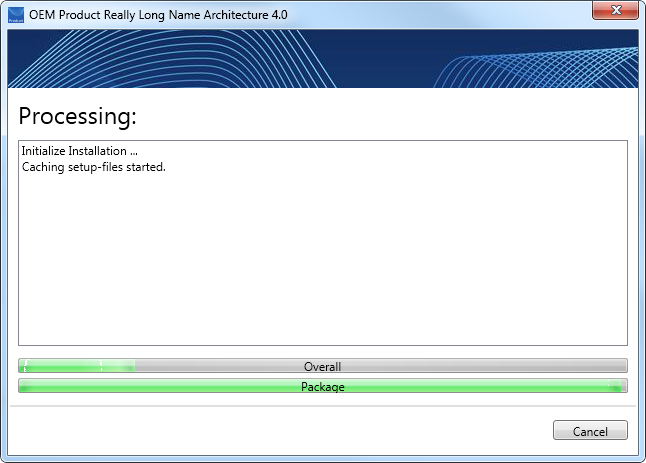
The branded install wizard
The brand labeled setup is saved in the Branding/Output directory. Open the .exe file.
The branded install wizard is opened.
The changed image, the product name, the description and the product number are shown.
The product is installed in the installation directory (see figure:ProductConfguration.wxi file - set the product name, product long name etc.)
And the specified start menu entries are created:
If you want to modify your installation or uninstall the product, open the Control panel -> All Control Panel Items -> Programs and Features:
Right-click on your product symbol.

Then click "Change".


