Structure of the PARA module
The PARA module is integrated in the module VISION. The PARA panel is displayed in the module VISION window. The VISION module window contains a title bar, menu bar, tool bar with buttons and a work area. If you open e.g. the PARA panel, it will be displayed in the work area of the VISION module (see figure).
The PARA panel contains
-
a PARA Tree (also known as a tree view) in the left-hand part that displays the structure of systems and datapoints, and can be used in a similar way to a tree view in Windows Explorer.
-
and a panel field on the right-hand side of the PARA panel showing the panels for e.g. configuration of the datapoint configs. See the figure for an example.
Starting the PARA module
You can open the PARA module using the PARA button ![]() in
the GEDI module.
in
the GEDI module.
or:
start the PARA module directly from the console with the command line
"-m para":
WCCOAui -m para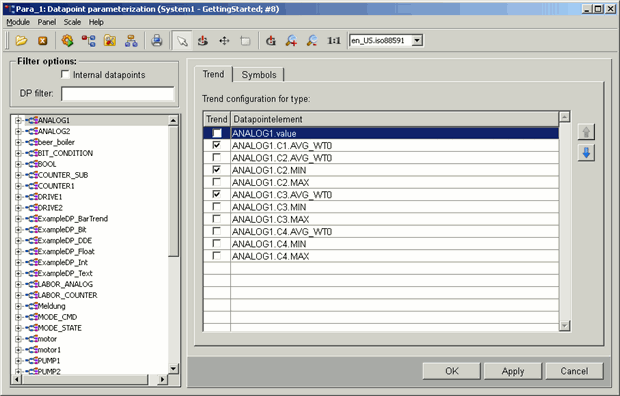
If WinCC OA is used with distributed systems, also the single systems in the TreeView of module PARA are visible and the tree structure of the systems can be opened.
The implementation of the mass configuration changed the PARA module (e.g. new context menus for the mass configuration). (See also chapter Datapoint type, master data point and datapoints).
Browse the PARA tree and view datapoint configs
After selection of a datapoint type in the panel field a panel with two tabs is displayed ("Trend" and "Symbols") - see Figure.
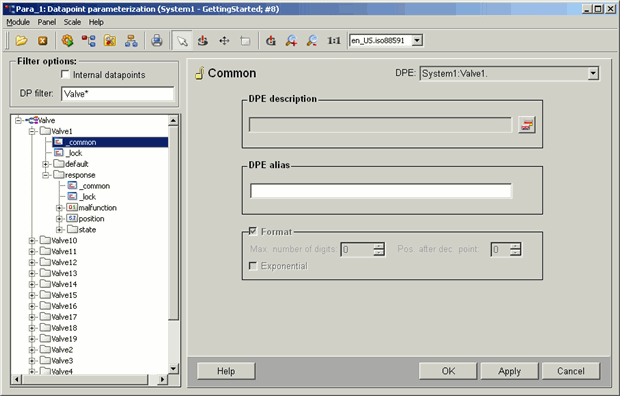
You can see an example for the datapoint type configuration in the figure below. The PARA tree shows an opened datapoint type (=DPT) "Valve1". This contains nodes and leaves. The "common" config of the "Valve1" datapoint element is selected. The Config panel for "common" is displayed in the right part of the PARA panel (by double-clicking on "common").
Displaying datapoints
Above the tree view you can specify filter options for displaying the data points.
Displaying internal datapoints
WinCC OA uses internal datapoints.
By default the tree view is opened without displaying the internal datapoints. Clicking on the "Internal datapoints" check box enables to display the internal datapoints of WinCC OA.
Datapoint filter
You can filter datapoints by entering a search pattern in the DP filter input field.
You can also add datapoints from the PARA tree to the DP filter input field via drag and drop.
When it is filtered by a datapoint and the search returns results, then also all datapoint elements are always shown. This means that the DP filter can only expand the search levels, but can not filter the desired datapoint elements, when it has been filtered by a datapoint.
Example:
*analog1*, *analog1*.*, *analog1*.*.* -> the tree is up to the 1st, 2nd and 3rd layer rolled out, but there are also datapoint elements of a datapoint which do not meet this search criterion.
In other words, more complex criteria, such as for example *analog1*.*.A* deliver all elements of the datapoint, which includes "analog1", irrespective of whether the datapoint element starts with an "A" or not.
Wildcards for search pattern
You can use the "?" wildcard for just one arbitrary character or "*" for any number of arbitrary characters
![]() Example of a DP filter
used for all datapoints
Example of a DP filter
used for all datapoints
In order to display all internal and non-internal datapoints, click on the Internal datapoints check box. Type for instance the search pattern "_A*" in the "DP filter" field and confirm with enter.
Result
The figure below shows the result.
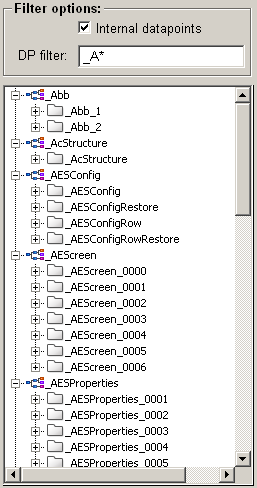
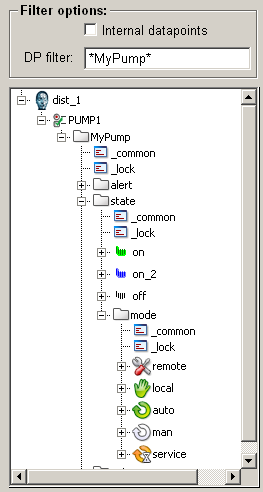
If the datapoint filter e.g. "_A*" is set, the tree shows the datapoint types that contain datapoints beginning with _A. This filter is applied to all datapoints, i.e. including "internal datapoints".
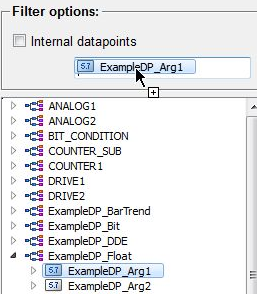
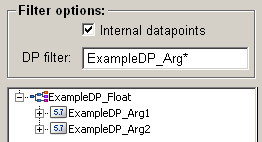
If you want to search e.g. the ExampleDP_Arg datapoints, specify the filter ExampleDP_Arg*. The datapoints ExampleDP_Arg1 and ExampleDP_Arg2 are shown.
Individual icons in the PARA tree
With the CTRL function dpTreeSetIcons() you can set individual icons for a system, a datapoint type or a datapoint element in the datapoint tree view that are then global effective for the entire UI.