Create a datapoint
Datapoints represent the concrete system components to be controlled by the WinCC OA process control system. The structures of datapoints are already defined in the datapoint types.
This chapter shows you how to create new datapoints and how to change them. The result could look like in the following figure.
The figure below is an example which shows how it looks like after a datapoint was created.
Click with the right mouse button on a datapoint type in the PARA TreeView. The context menu of the PARA Tree looks like the following:
You can create a new datapoint that shows the structure of DPT and holds the standard configs, via the Createdatapoint.
Refer to nameCheck() for not permitted characters.
For more information about the function of further entries (of the context menu) please refer to chapter Mass configuration. You can describe every element of a datapoint with further configs. In order to do this click with the right mouse button on a datapoint element and choose the desired entry from the context menu.
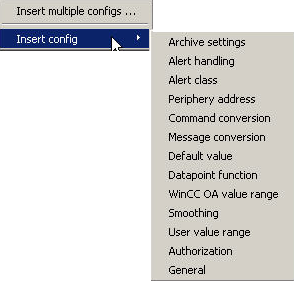
Via the entry Insert multiple configs ... you can add several configs to an element from a selection dialog by activating the check boxes. With Insert config you select only one config and the element should subsequently be extended with it.
To delete a config, click with the right mouse button on a specific config and select the entry Delete config.
How to create a datapoint
- Click with right mouse button on a DP-type, e.g. Valve and select Create data point.
-
Another dialog for entering a new DP name is displayed. Enter a name (e.g. Valve18) and confirm your input with OK button.
Note:Datapoint names must only contain characters allowed by nameCheck(). - The structure of your datapoint corresponds to the chosen datapoint type, e.g. Valve and has the default configs _common and _lock and _original.
-
Insert further datapoints, e.g. Valve18.
Figure 4. Create a new datapoint