Requirements and Installation
Requirements
The requirements for the use of the video feature are:
- Correctly installed WinCC OA
- Valid WinCC OA license
- A valid WinCC OA video license
-
Under Linux the vimacc public key (
vimaccoa.key) must be imported to check the vimacc deliveries for using the video feature. If the key is not installed an error message will be displayed within the Linux shell:vimaccOA-***-0x86_64-suse.rpm Package is not signed! vimaccOA-***-0x86_64 (Plain RPM files cache): Signature verification failed [6-file is unsigned]To import the public key, use the command rpm --import [path to the public key].
Supported operating systems
The Video add-on supports all operating systems that are supported by WinCC OA. There exceptions to this:
- Android and iOS are not supported by the Video add-on.
- The WinCC OA-video feature cannot be used with Docker because the required vimacc components cannot be installed within a container.
Please remember this information when planning your system.
Licensing
The WinCC OA video manager must have permanent access to the codemeter license container.
Hardware requirements
The hardware necessary to run WinCC OA video depends on the respective project. Quality, resolution and number of streams as well as other factors influence the required RAM and CPU.
Therefore the following specifications are only meant as minimum requirements. During the system planning the actual project requirements must be considered. Refer to System planning for detailed information regarding system planning and calculation of the necessary hardware.
It must be considered which WinCC OA video software components shall be installed on the respective computer. The components make different demands on the hardware. Therefore the hardware requirements may differ for a streaming server and a workstation.
Please make sure that the chosen hardware meets the requirements of the specific system to ensure smooth WinCC OA functionality.
WinCC OA video client computer
The minimum requirements for WinCC OA video client computers (workstation, display station, interface) are as follows:
| Hardware component | Requirements |
|---|---|
| System architecture | PC x64 Architektur |
| Processor | 4 core processor with 2 GHz or faster |
| RAM |
4 GB |
| Hard disk | 20 GB |
| Graphics adapter |
Memory > 256 MB |
| Network adapter |
100 Mbps |
WinCC OA video streaming server
The minimum requirements for WinCC OA video client computers (workstation, display station, interface) are as follows:
| Hardware component | Requirements |
|---|---|
| System architecture | PC x64 Architektur |
| Processor | 4 core processor with 2GHz or faster |
| RAM |
8 GB |
| Hard disk | 20 GB |
| Network adapter |
100 Mbps |
Installation
Installation Windows
To use WinCC OA Video select the "Video AddOn" option during installation and the vimacc components will be installed automatically.
Installation Linux
To use WinCC OA Video the relevant RPM package must be installed.
Recording and export directories
To enable vimacc services access to video recordings (write access for recording, read access for playback) and export directories, without giving access to these directories for every user, set the respective owner via "chown" to user and group "vimacc" and the permission rights via "chmod" to "775".
Groups and permission
The permission to access vimacc directories in the file system is automatically set. Therefor, user and corresponding group "vimacc" are created if not already existing.
Distributed video system
The vimacc_keys.pem file is automatically created in the <vimacc_installation_path>/data/ directory when installing WinCC OA video. This PEM file contains a plant-specific AES key to encrypt the interprocess communication (IPC) between vimacc services and WinCC OA video components as well as a user-crypto-token to encrypt video streams and recordings.
To ensure a successful communication between the vimacc hosts and the WinCCOA video system, this file must be distributed to the WinCC OA video system and all vimacc hosts. Make sure that this file is present on all relevant locations and systems to enable correct encryption and communication.
The PEM file must be located in the respective WinCC OA project directory <WinCC_OA_Proj >/data/videoOA. You can use the System overview or the security wizard.
Set up vimacc hosts
Vimacc hosts (e.g. a second video server) can be configured by using the security wizard (<vimacc_installation_path>/bin/AccVimaccSecurityWizard.exe). The Security wizard can be found in the directory <vimacc_installation_path>/bin as "AccVimaccSecurityWizard.exe"
Execute the security wizard and follow the directions to apply the relevant settings. With this you can ensure the communication between the vimacc hosts and the WinCC OA video system is configured correctly.
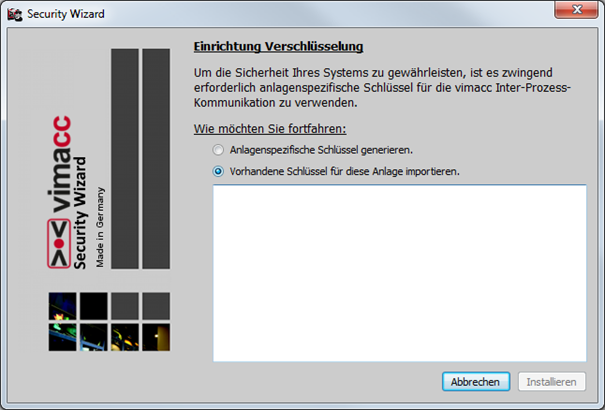
Select the option "import existing encryption keys for this site", copy the content of the PEM file to the text field and finish the configuration via the install button. You have to restart the vimacc services after the import.
Please note that after importing the keys the vimacc services must be restarted. This ensures that the new settings are applied.
Replacing keys
Site-specific keys
The site-specific key for IPC encryption can be replaced anytime. However, you have to update the key of the WinCC OA project and all vimacc hosts afterwards. Use the security wizard to replace the key.
Open the security wizard and select the "generate plant-specific key" option. Follow the instructions in the wizard to input the new key and start the update. Ensure that the new key is updated in the WinCC OA project directory as well as on all vimacc hosts.
This ensures that the update of the site-specific key is done correctly and the correct encryption and communication between the vimacc services and the WinCC OA video system is assured.
As explained before, you have to distribute this key to all vimacc hosts and the WinCC OA project and restart the vimacc services after that. This restart ensures that the new keys are active and the communication between the vimacc services and the WinCC OA video system is updated.
User-Crypto-Token
Crypto-tokens are used for streaming encryption, hence also for encrypting recordings of video data. Changing the crypto-tokens means that all existing recordings cannot be decrypted anymore and playback of this data is also impossible.
Because of this it is especially important to take certain precautions when changing crypto-tokens to take present recordings into account. This can include keeping a security backup of the present crypto-token to remain able to access present recordings.
Before exchanging the cyrpto-token you should evaluate the effects closely and keep in mind the effects on already present recordings. It is advisable to take appropriate security measures and if applicable, save crypto-tokens to avoid data loss.
If you want to change the crypto-tokens you have to use the security wizard and start it with the following command:
<vimacc_installation_path>/bin/AccVimaccSecurityWizard.exe --forcenewctk
By adding the option "--forcenewctk" you force the exchange of the crypto-token. Afterwards you can exchange the tokens as described above.
Please ensure that the security wizard is used with the stated command and the exchange of tokens is done accordingly.
Video Komponenten
The video components outside WinCC OA are installed in the C:/vimacc directory by default. The WinCC OA installation includes the following components:
Video Explorer:
The video AddOn is a sub project and has to be integrated in the WinCC OA project. You can find all files used by the WinCC OA video in the Video_3.18 directory of the WinCC OA installation directory.
Video Server:
For the use of the video application at least one video server must be installed and enabled. For smaller projects you can operate the server together with the video application on the same computer, together with a WinCC OA server or remote on a separate computer. For redundancy you can also use a second server.
Video Recorder:
This component allows to set up a remote video recorder.
Video Streaming Proxy:
This component can be used to establish a remote video interface to bundle steams and lighten network loads.
Video Client:
This component installs the emergency client.
Display PC:
For displaying videos on monitors you can set up a display server in addition to the video server. For smaller projects you can install the server together with the video server and video application on the same computer, together with a WinCC OA Server or remote on a separate computer. If needed several display servers can be used fo display several videos .
Step by Step new Video Project
- Create a new WinCC OA project (e.g.: Legacy Standard Projekt).
- Open the project settings and add the subproject "Video_3.18".
- Add the following managers with their corresponding start options to the console:
- WCCOAvideoOA ... Video Manager
- WCCOActrl ... Control Manager with the start option: "-f VIDEO_OA_scripts.lst"
- Start the WinCC OA project.
- Open
- Choose Import and activate the following options:
- Automatically update existing DP types
- Load data with alert handling
- Alert handling without periperal history
- Select the folder to open the dialouge to choose the import.
- Open the file
„VIDEO_OA_complete.dpl“in the folder„…/Video_3.18/dplist/“. - Start the import with the button start and confirm the password input. Then close the dialogue.
- Open the System Management and select video and then video object explorer. The "video object explorer" is opened.
- Select the system components and click on system configuration.
- Choose the following settings in the system configuration:
- Video Server set to active
- Input the Hostname
- Select all services
- Encrypt IPC-Sockets
- Click on import vimacc key in the "video object explorer".
- Confirm the security query for ther security wizard and restart the video manager in the console. A small info-dialouge is opened for this.
- Click on "stop manager" to restart the video manager.
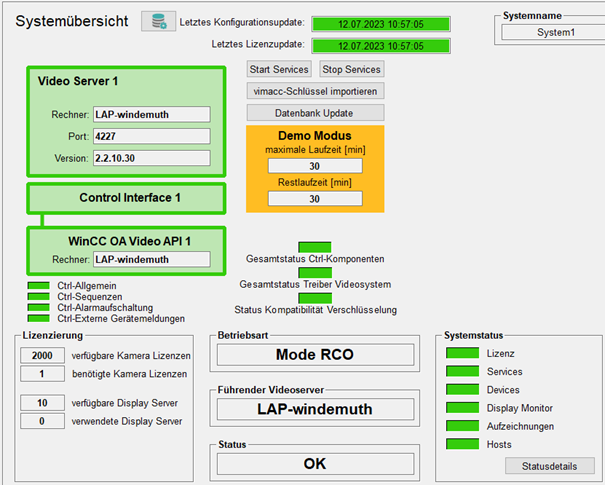
- After restart of the video manager the system overview should look similar to this example:
- Now a demo camera is created to display a video. Right click on "camera" in the "video object explorer and choose "add new object". Confirm with "ok".
- Choose the type „IP camera“ for the camera.
- Activate the "active" and "permanent connection" settings in the configuration and select the type „USB camera / Test Stream“.
- Check the "active" option for the stream and confirm with "ok". The stream will be shown within a few seconds.
- Now you can add further video components with the "video object explorer" and activate them.


