
Configuration
This chapter provides step-by-step instructions for configuring WinCC OA projects and environments on Edge Devices, including parameter setup, port assignment, and preparation for deployment.
Configuration Settings
Define and set port and service parameters before deploying your project to the Edge Device.
Update the WinCC OA configuration file with the appropriate parameter values. Ensure all required ports are correctly opened and mapped.
1.25 GB RAM for the winccoa container and 500 MB RAM for the node container.- Open the project’s config file in a text editor.
-
Adjust necessary parameters based on your environment:
For example, update
dataPortandeventPortas required. Ensure that Event, Data, Proxy, Web server, and WebSocket all use ports from the available Edge port range. -
Ensure the following ports are configured and open:
Table 1. Port Settings for WinCC OA Components Parameter Value Description [all sections] data 34897 Port of Data Manager [all sections] event 34998 Port of Event Manager [general] pmonPort 34999 WinCC OA Pmon [proxy] proxyPort 35678 WinCC OA Proxy [webClient] httpsPort 38843 WinCC OA Web server / Dashboard (Webserver) [wssServer] httpsPort 38449 Dashboard (Websocket) - 38100 - 38110 Freely available ports that can be used by the business logic of your project(s). -
To ensure a proper licensing of the WinCC OA for Industrial
Edge components, the local container ID must be added to your WinCC OA for Industrial Edge project by using the config
entry [general] useCMContainerSerialNumber.:
[general]
useCMContainerSerialNumber = "130-1079500405"
The configuration file should reflect the correct port assignments for communication and UI access.
The project is ready for deployment on the Edge Device only if the configured ports match the available Edge ports and the project stays within the documented container limits.
Project Upload Process
Upload a prepared WinCC OA project to the Edge Device through the Administration interface.
Before uploading your project, verify structural and compatibility requirements and ensure all configurations are in place.
- Review and confirm all required project files are present and intact.
- Validate dependencies and ensure compatibility with the Edge environment.
- Back up the entire project directory.
- Review version compatibility between engineering and edge runtime environments.
- Ensure all required network prerequisites are met, see also Configuration Settings
Once completed, your project is ready for configuration and upload.
This task describes how to compress, clean, and upload your project using the WinCC OA Administration UI.
- Create a backup of the WinCC OA project folder.
-
Optionally reduce archive size:
-
Delete the
logsfolder. - Delete the localdb folder from \db\wincc_oa\.
-
Delete the
-
Compress the entire project directory into a ZIP archive.
Include all required subdirectories.Note:In addition to .zip following archive formats are also supported:
- .tar.gz
- .tar
- .gz
- .tgz
- Open the WinCC OA Administration interface on your Edge Device.
-
Log in using administrator credentials.
Refer to Default Administration Access.
- Navigate to the project upload section.
- Select and upload the prepared ZIP archive.
- Monitor the upload progress and wait for confirmation of an successful upload.
The project archive is successfully transferred and ready to be launched.
Project Launch and Verification
Verify successful deployment and monitor system behavior after launching the project.
After uploading the project, check the health of the Edge Device and project managers to ensure operational readiness.
- Connect to the WinCC OA Administration interface on your Edge Device.
- Open the Console View to monitor manager runtime behavior.
- Access the Log Viewer to check for warnings or errors.
- Observe system resource usage (CPU, RAM, Disk).
-
Use the following verification matrix to confirm operational status:
.
Table 2. Verification Matrix Component Check Point Expected Status System Resources CPU Usage < 80% Memory Available RAM > 20% free Console Managers All running (per project config)
The project should be actively running with all managers operational and no critical log entries.
Project Update Process
Update an existing WinCC OA project on the Edge Device by modifying, repackaging, and redeploying it.
This task covers downloading the project, implementing local changes, and re-uploading the updated version.
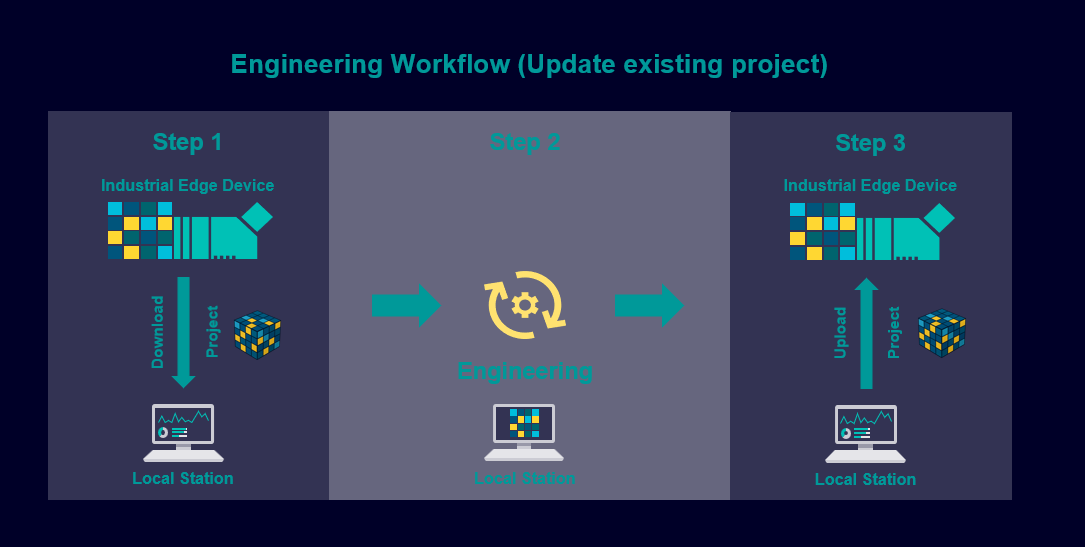
- Access the WinCC OA Administration UI and download the existing project as a ZIP file.
- Save the ZIP file with a versioned name and keep a backup.
-
Extract the archive and register the project in the local WinCC OA environment.
- Open WinCC OA Project Administration.
- Select Register Project and browse to the extracted folder.
- Confirm successful registration in the list view.
-
Implement required modifications:
- Script changes
- Panel updates
- Configuration adjustments
- Database structure changes
- Test changes locally and document all modifications.
-
Create a new backup ZIP and follow the standard upload process again.
Refer to Project Upload Process.
The updated project should now be deployed and verified on the Edge Device.
Remote UI Connection Setup
Establish a Remote UI connection to a WinCC OA project running on an Edge Device.
Ensure the following prerequisites are met before starting the Remote UI connection:
- WinCC OAis installed and licensed on the Engineering Station.
- To open a GEDI or PARA a dedicated Para Remote license for the Engineering station is required.
- The Edge Device is reachable via network and has a project deployed and running.
- All required firewall ports are open. Refer to the Port Configuration.
- You have the appropriate login credentials for the target system.
Use this procedure to configure and initiate a Remote UI connection from your Engineering Station to a running Edge Device project.
- Launch the WinCC OA Console on the Engineering Station.
- Add a new UI manager.
-
Enter the required information as manager parameters to the newly created UI
manager:
-m gedi -data <IP Edge Device>:<Data Port> -event <IP Edge Device>:<Event Port> -localLicenseThe parameter-localLicenseis required to use the
license of the engineering station, otherwise no GEDI or PARA can be opened.para remote -
Start the UI Manager and the GEDI will start, if the parameter
-m gediwas used.A login with proper project specific credentials for authentication will be required. -
You can now can update your project data.
Note:These changes will be performed on running Edge Device project and it must be ensured that no project data is lost during a project upgrade on your Edge device, see Project Update Process
The Engineering Station is now connected to the Edge Device via Remote UI. You can begin working on the project remotely.
Desktop UI Connection Setup
Connect a WinCC OA Desktop UI instance to an Edge Device-hosted project.
Before proceeding, ensure that:
- The WinCC OA Desktop UI is installed on the Engineering Station.
- The Edge Device is accessible via network and has a running project.
- The necessary ports are open. See the Configuration Settings.
- Valid credentials are available for authentication during connection.
This task explains how to launch the Desktop UI and connect to a remote WinCC OA project hosted on an Edge Device.
- Launch the WinCC OA Desktop UI application on the Engineering Station.
- Create a new connection and enter the IP address and the port of the HTTP server of your Edge device.
- Authenticate when prompted using your project credentials.
- Check that the UI is responsive and data is accessible.
The WinCC OA Desktop UI is successfully connected to the project on the Edge Device.